Remembering to add affiliate disclosures on WordPress posts is tedious. Instead of remembering to manually insert code or paste in the affiliate disclosure on each article, I created a simple PHP function to insert my disclosure message automatically. This tutorial shows you how you can do the same for your own WordPress websites … and if you’ve never done any kind of programming before, you’ll get your feet wet with some simple PHP code.
Before We Begin
A few things to mention before we get into the details of this tutorial.
Zero Programming Experience Required
I’m assuming that anyone reading this has never written any kind of code before. It is obviously helpful if you have, however it’s not required. Do not worry if you don’t entirely understand how everything works if this is your first time working with code – I’ve done the hard part for you of writing the code. Just do your best to follow along and feel free to ask questions in the comment section below and I’ll try my best to help you.
HTML Knowledge Not Required
Just as I’m assuming that anyone reading this tutorial has never done any sort of programming, I am likewise assuming that you may never have done any kind of HTML coding as well. While it is certainly helpful if you know some simple HTML/CSS when customizing the code we’re creating here for use on your own website, it is not at all required.
Text Editor Optional
If you’re not accustomed to writing any kind of code, you might be more comfortable creating your code first inside of a text editor – like Windows Notepad, for example – and then copy/pasting the code into WordPress. This is entirely up to you for you to decide how you’re more comfortable.
Plugin Optional But Recommended
While this entire tutorial can be done without the need for any WordPress plugins by directly modifying y our websites functions.php file, I highly recommended making use of a plugin that inserts the code into the functions.php file for you instead of directly editing the file yourself.
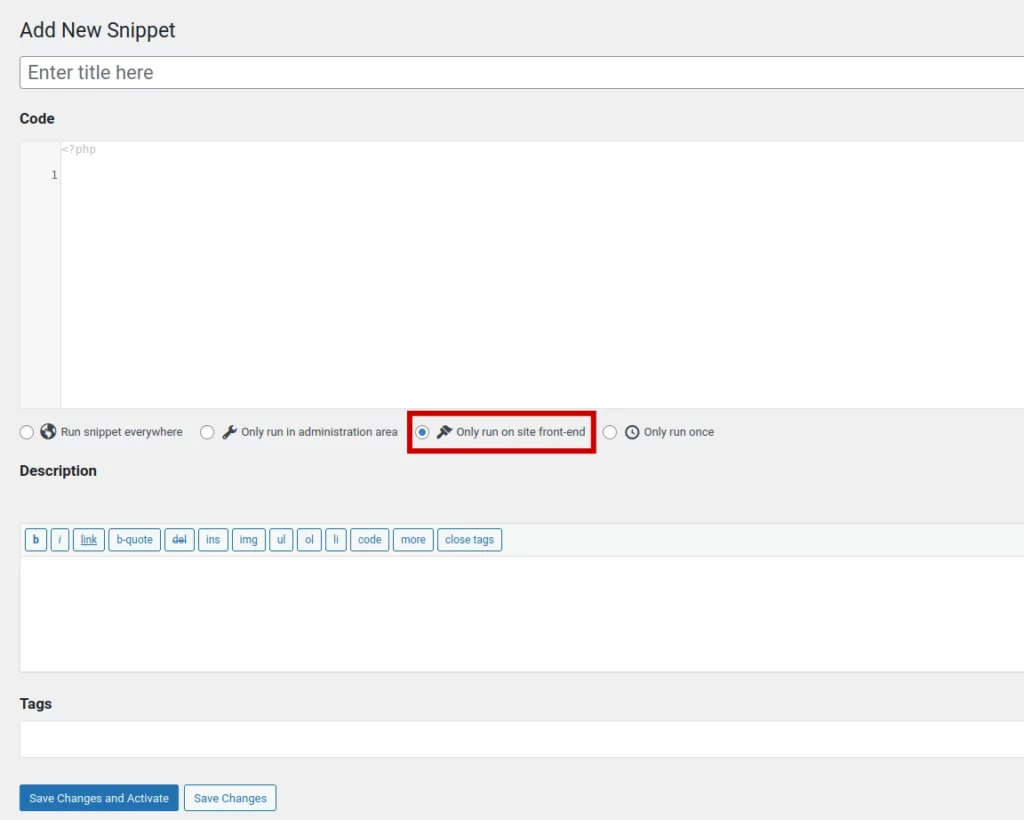
My personal preference is to use the Code Snippets plugin. If you decide to use this plugin, be sure to choose the option to have the code we’re adding today run only on the front-end of the website.

You can give your snippet a name at the top, write/paste the code inside the CODE BOX, make the appropriate selection and then click the blue SAVE CHANGES AND ACTIVATE button.
If All You Want Is The Code …
Lastly, if you’re not interested in a step-by-step explanation of the code and all you’re interested in is the final code, please feel free to skip ahead to the end of the post. It won’t hurt my feelings.
Now that we’ve got all of that out of the way, let’s begin.
WordPress ‘the_content’ Filter
To insert our disclosure message before our posts, we’ll be making use of a filter built into WordPress called the_content in conjunction with a function we’ll create ourselves called show_disclosure. Let’s start then with what this bit of code looks like by itself.
function show_disclosure($content) {

  // the rest of our PHP code will go here before we're finished

}

add_filter('the_content', 'show_disclosure');
For anyone new to programming, I’ll explain what we’ve done so far.
Your First PHP Code
Let’s start with the 1st line of code where we declare our function named show_disclosure. Notice inside the ( ) next to the function name we have what’s called a variable named $content.
Functions are blocks of code that we give a name. The name allows us to refer back to the block of code later any time we want that block of code to run.
Variables in PHP can be identified by the $ on the front of their name. This variable is bringing data from outside of our function – specifically meaning it’s getting information from WordPress – so that we can use this data inside of our function. We’re using the name $content because it helps identify what the data inside it is. In this case, it’s holding all of the content of the WordPress post being loaded.
Next, after the variable you’ll notice a little curly bracket like this – { – which is like opening the container that holds the code of our function. You’ll notice it’s companion closing bracket – } – which signifies the end of our functions code.
You may have noticed the line I inserted inside of our function that begins with two forward slashes. This is a PHP comment, which is ignored by PHP. It lets us leave notes to ourselves or others who may in the future work on our code. We won’t be leaving that comment in the final code. I’ve added it simply for the purposes of showing where everything else we’ll be writing will go.
Lastly, we’re using a function that’s already built into WordPress called add_filter to call our function. As part of using the add_filter function, we have to tell WordPress which filter we’re using – in our case, as I’ve already mentioned, we’re using a filter named the_content. This line of code is what is responsible for giving our show_disclosure function the data that’s held in the $content variable.
One last thing that’s important to note is that we use semi-colons on the end of individual lines of PHP code to tell PHP that it’s reach the end of that command. You can see a semi-colon at the end of our add_filter line of code.
Creating Our Disclosure Message
The next bit of code we’re going to create is some simple HTML code that we’ll use for our disclosure message. As before, I’ll give you the code and then we’ll discuss what it does.
<aside><b>DISCLOSURE</b> - This article may contain affiliate program links that pay a commission when you make a purchase after clicking. Please read the full <a href="/affiliate-info/">affiliate information page</a> for more information. Affiliate links are noted within the content where it says <i>(affiliate)</i> after the link.</aside>Let’s begin with the <aside></aside> tag. (HTML uses what we call tags for marking up our text). You’ll notice that our entire disclosure message is held inside the opening <aside> and closing </aside>. We’re using this tag to hold our message specifically because of it’s semantic meaning. Some HTML tags convey meaning to things like bots and search engines to help them better understand the document. In this case, <aside></aside> indicates that the content inside of it is not directly related to the rest of the body of the document. Unless your article is specifically about FTC disclosure regulations, I doubt this disclosure message is relevant to the rest of the content.
You’ll notice I’ve used some simple tags like <b></b> and <i></i> inside the message to create bold and italic text. HTML has other options to accomplish this same result – <strong></strong> and <em></em> – however, like <aside></aside>, these tags have semantic meaning. Use these tags when you want to convey importance to the text inside them.
The last bit of HTML code we’re using in our message is the <a></a> – and because it’s not obvious – the a is stands for anchor . Much like ship anchors create a connection between the ship and it’s location, HTML anchors create connections between HTML pages.
Our <a></a> tag has an attribute called href, which stands for hypertext reference. Simply put, we’re using href to tell our anchor where we want to anchor to. In our example, we’re linking to the page on our website with the URL /affiliate-info/. It’s a safe assumption that your website might not have a page at this location. You can alter this link to use your own page URL. If your website doesn’t have a page like this, you can choose to either modify the message to suit your needs – or – you could consider creating one.
Adding The Disclosure To Our Function
Now that we have some HTML for our disclosure message, we need to integrate it into our PHP function.
function show_disclosure($content) {

  $disclosure = '
    <aside><b>DISCLOSURE</b> - This article may contain affiliate program links that pay a
    commission when you make a purchase after clicking. Please read the full
    <a href="/affiliate-info/">affiliate information page</a> for more information.
    Affiliate links are noted within the content where it says <i>(affiliate)</i> after the
    link.</aside>
  ';

  // we're not quite done yet ... we'll have more code to add still

}

add_filter('the_content', 'show_disclosure');
What I’ve done here is created a new variable named $disclosure and then told PHP that I want the value of $disclosure to be equal to our disclosure HTML code. Take notice that our HTML code is being enclosed by single quotes.
Remember I mentioned earlier that we tell PHP that a line of code is over when it reaches a semi-colon? The code we’ve just added is split onto multiple actual lines in our code to make it easier for us to read. PHP is fine with the code being on multiple actual lines like this. As long as the code is valid, it will keep going until it reaches the semi-colon at the end.
Checking If The Content Is A WordPress Post
The next thing we need to do is determine if the page that WordPress is loading is of the type post as opposed to the type page. I think it’s safe for me to assume that you’re familiar with the difference between these two types of content inside WordPress. We want our disclosure message to only appear on our posts and not on other pages on our website so we need a way to check what kind of content is loading.
if( is_singular( 'post' ) ) {

  // we're going to run code here if the content is a wordpress post

}
We have a few new things happening here.
First, let’s talk about the if statement. We use if when we want to only do something when we meet certain conditions. In our code we’re checking for what’s called a boolean condition. Boolean may sound like a complicated term but all it really means is that the condition can result in either a value of true or false.
Our if statement is a simple condition in that it only will execute code inside of it’s curly braces when the test condition is true. If we wanted different code to run in the event that the condition were false, we’d have an if accompanied by an else statement. Now that we know that our code is testing for a true or false condition and will only execute the code inside the braces if the condition is true, let’s discuss what condition we’re testing.
As part of our if statement you’ll notice a pair of parenthesis immediately after the if. These parenthesis hold our test condition. In our code, we’re calling a built in WordPress function called is_singular. The is_singular function tests whether the current page is a singular page – meaning either a page or a post. This function has its own set of parenthesis where we can specify what kind of singular page we want to test for – in this case we’re testing if the content is of type ‘post’. Notice here that post is contained inside of single quotes like we saw earlier when we added our disclosure to our PHP code.
Text inside of quotes is what we call a string. PHP has a number of different types of data it can work with – strings (text), booleans (true / false), integers (whole numbers or counting numbers), float (numbers with decimals), and more. Don’t worry too much about this – just know that there are many types of data we can work with in our code. The simplest explanation as to why we use quotes to denote string data is so that PHP knows where the data begins and ends.
What To Do When The Content Is A Post
Now let’s talk about the code that runs when our condition is true because the content is of type post.
if( is_singular( 'post' ) ) {

  $content = $disclosure.$content;

}
When our condition is true, we want to assign a new value of the $content variable to add our $disclosure to it. This is accomplished using something we call string concatenation. This is really just a fancy way to say we’re adding two pieces of text together. We do this using the period between the $disclosure and $content variables as shown above. Again, we tell PHP this line of code is complete with the semi-colon at the end.
In simpler terms, we’re adding the post content to the end of our disclosure HTML and then storing the result back in the content variable.
Almost Done
There’s just one more line of code we need before we put all the pieces together for our final result.
return $content;This one is pretty easy to understand. The PHP return statement indicates that we want to end our show_disclosure function and give WordPress back the modified $content so it can be displayed inside the browser.
Now let’s put it all together into our finished code.
function show_disclosure($content) {

  $disclosure = '
    <aside><b>DISCLOSURE</b> - This article may contain affiliate program links that pay a
    commission when you make a purchase after clicking. Please read the full
    <a href="/affiliate-info/">affiliate information page</a> for more information.
    Affiliate links are noted within the content where it says <i>(affiliate)</i> after the
    link.</aside>
  ';

  if( is_singular( 'post' ) ) {

    $content = $disclosure.$content;

  }

  return $content;

}

add_filter('the_content', 'show_disclosure');
You may have noticed that the code is indented in places. Don’t worry too much about it other than understanding that we indent code to make it both easier to read and easier to debug when there are problems.
We can take this finished code now and put it into our WordPress site. If you’re using the Code Snippets plugin, you can paste this code into it as I indicated earlier. If you’re going to manually add this code to your theme’s functions.php file, you likely know something of what you’re doing already. Just be aware that this is not necessarily the best way to implement the code.
The finished result when you load up one of your WordPress posts will look similar to the disclosure message at the top of this article. The styling isn’t going to be exactly the same but the effect will be similar.
Thanks
If you found this tutorial helpful or have any questions, I encourage you to please share it with others and/or leave a comment below. If you would like to support our efforts to create additional resources like this, please consider making a donation. Your support is greatly appreciated! Thanks for reading and I hope you visit again soon!


