Whether it’s for performance reasons or reasons of GDPR compliance, you’ve decided to optimize your website by self hosting your site’s fonts from your own server. This tutorial outlines what you need to know to get your website’s fonts functioning from your own server and test it to confirm that the modifications you made are indeed working.
Before We Begin
A few things to touch on before we get into the details of this tutorial.
Why Self Host Your Website’s Fonts?
If you haven’t already read my article on 4 Reasons Why You Should Self Host Google Fonts, I highly recommend you do so before you begin, then make your way back here to continue on how to actually do it.
Create A Backup
Before making major modifications to your website, I strongly advice you to create a backup copy of your site that you can restore should something go wrong and you need to go back to square one.
Software
This tutorial makes use of the Fontanello browser plugin available for both Chrome or Firefox. Once upon a time, you’d have to rely on your browser’s inspection tools to get the information we need. This plugin makes this task easier.
Additionally, you’ll want some kind of text editor. Windows Notepad is fine. If you have something else you prefer that’s up to you.
Somewhere To Take Notes
This can be a notepad and paper or a document on your computer. How you want to take notes is up to you, however, you will need to take some notes so have something ready to do so.
SSH or FTP Server Access
You’ll need either SSH or some form of FTP access to your hosting server to be able to upload font files. What ever form that takes doesn’t matter – whether you use a program like Filezilla or a built in control panel that’s part of your hosting. Your hosting provider should have documentation on how you can transfer files to their servers.
You’ll want to create a folder called fonts in the root of your website. WordPress users, this is the same place you find your wp-admin and wp-content folders. We’ll use this folder to hold our uploaded fonts files.
Tutorial Scope
This tutorial will cover the basic concepts that would apply to any website – whether it’s custom HTML / CSS or created with any particular content management system. I will also make specific mentions for WordPress specific users, seeing as WordPress is the largest single CMS in use on the internet (currently making up over 40% of all sites on the web). If you use another CMS other that WordPress, I’m sorry that I can’t cover your specific system here. Please note that the information here should still apply. The only difference would be in the specifics of how to perform each task.
WordPress Themes
Since I’ve mentioned WordPress, I should point out before we get started that some WordPress themes – the Astra Pro theme (affiliate), for example – has functionality built in to allow you to self host your fonts instead of loading them from Google. If you use WordPress, check if your theme has this kind of functionality in place already before you go through the work of setting up the fonts manually.
With all of that said … let’s get to it.
Testing Your Site Before Changes
Before you make any adjustments to your website, you might want to consider running a test in advance that you can compare back to when you’re finished to be able to show definitively that the changes you made actually worked.
For this, we’ll make use of the Site Performance test available from webpagetest.org. Enter the URL of the page you want to test then select the first Desktop option and click the yellow Start Test button.
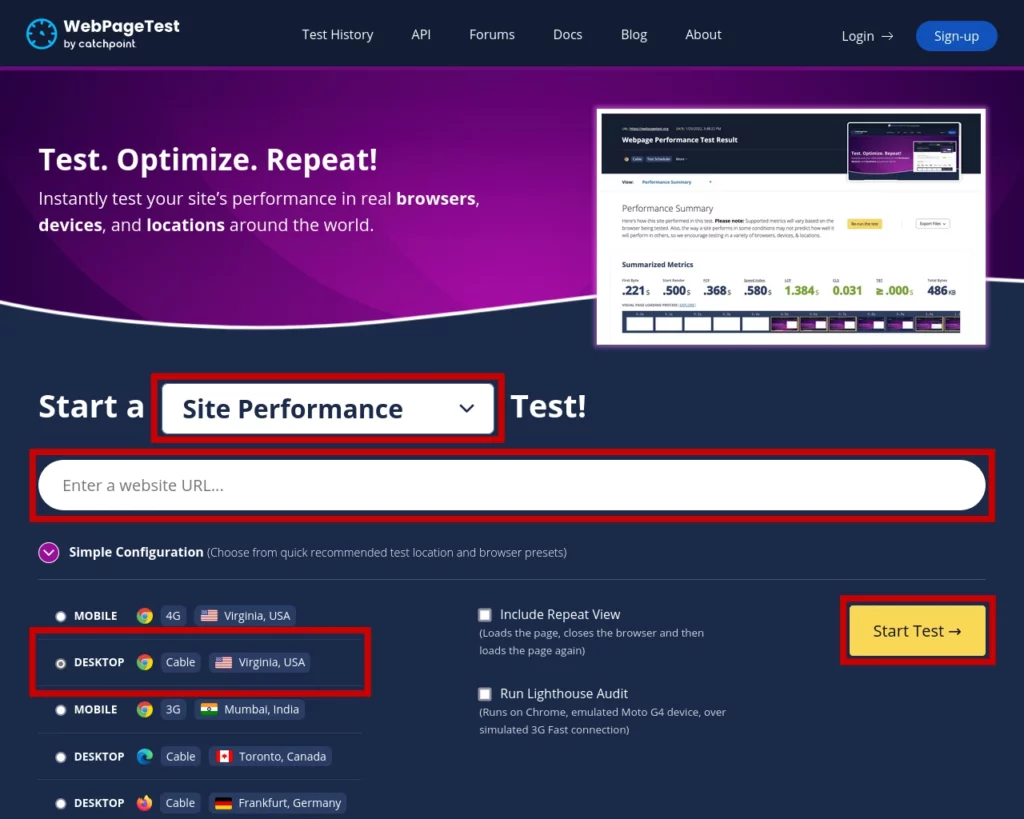
You’ll be placed into a testing queue and so long as there aren’t a lot of tests being requested at the same time as yours, you should have your results within a minute.
When your test completes you should see small representations of each of 3 test runs that were completed on the page. Click any of these to bring up the full test results. Here you’ll see a waterfall graph representing how your page loaded during the test. To give you an example of what we’re looking for after your test completes, we’ll have a look at one of the waterfall graph that I created from this test for my post on why you want to self host your fonts.
Your graphs are most certainly going to be larger than this example, but, this simple graph will make it easier to point out what you’re looking for.
Notice in the graph in the left most column that there are resources loading from fonts.googleapis.com and fonts.gstatic.com.
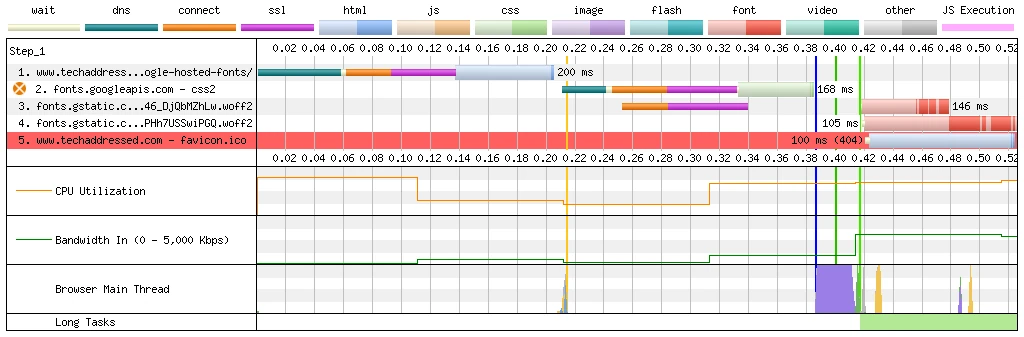
These are the CSS and font files loading from Google Fonts that are part of your website. At the end of this tutorial we’re going to run the exact same test again so you’ll be able to see that these domains are no longer present in your results.
What Fonts Does Your Website Use?
Before we can host your website’s fonts on your server, we first need to know what fonts – and the font weights – that your site uses. Knowing exactly which font weights will let us optimize things as much as possible as each additional weight you have your site load – whether it’s used by your site or not – adds additional data to be downloaded by your visitors which means additional time for pages to load.
After you’ve gone through your website, if you can’t be 100% certain that you’ve got all of the proper font weights, it’s better to err on the side of having too many than not having all of the weights your site uses. Ideally, you want to keep the number of weights down as much as you possibly can while ensuring you’ve got the ones you need.
How To Identify Your Website Fonts & Weights
Determining your site’s fonts is going to be the most time consuming part of this process but you’ll want to make sure that you put the time in so you don’t miss any fonts / weights before you proceed. You’ll want to be sure you’ve got the Fontanello plugin installed that I mentioned earlier.
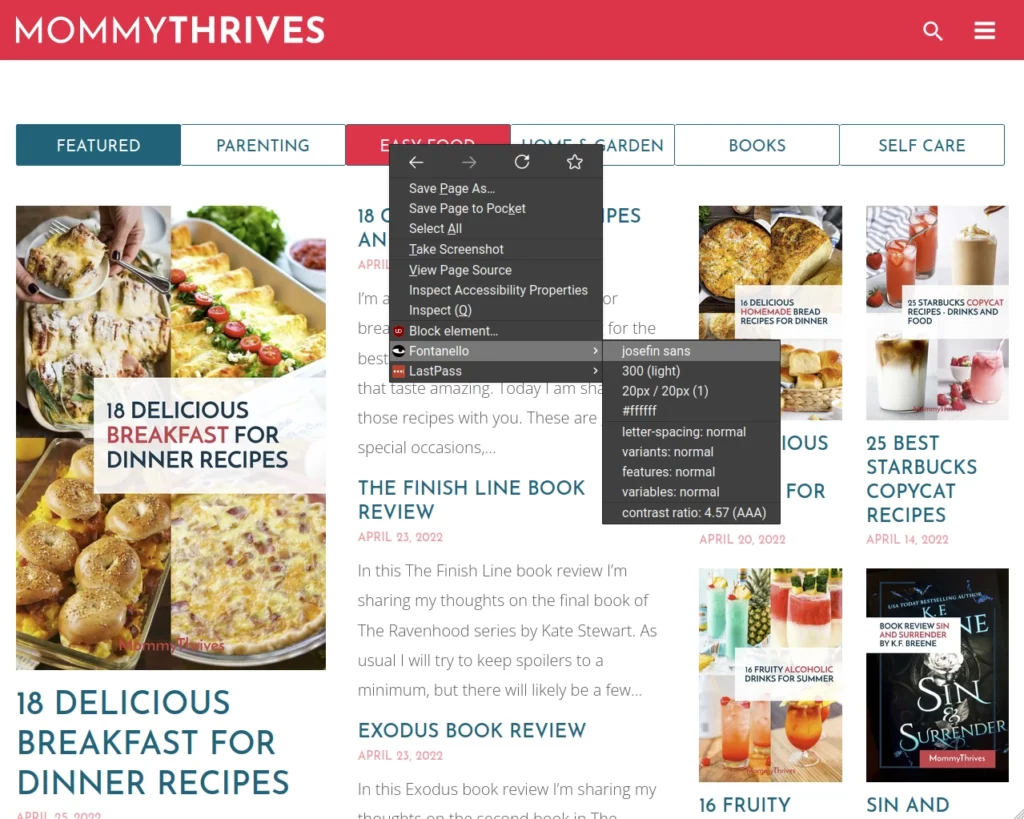
I’m using my wife’s website – MommyThrives – as an example (with her permission, of course). You can see in the screenshot that I’ve right clicked on the Easy Food button at the top of her homepage then went to Fontanello in the menu to display the font information for the text that I’ve clicked on.
For this example, we can see that the button uses the Josefin Sans font – the weight is 300 (light).
For your own site, make a note somewhere of all of the various fonts and weights so that you’ll be able to refer back to them later. The time consuming part of this process is that you’ll need to go through enough of your site to be sure you’ve checked all of the relevant elements of your site.
Be sure to check your site’s headers and footers as well as both posts and pages that are representative of your design. Check all in-page headings, body text, post meta, dates, authors, categories, … basically everything you can think of to be sure you’ve not missed anything.
Once you’ve scoured your site and you’re feeling confident that you know what various fonts and weights your site uses, you’re ready to continue.
After testing, I found that my example site, MommyThrives, uses the following fonts / weights:
- Josefin Sans – 300 / 400 / 500
- Open Sans – 300 / 500 / 600
We’ll use Josefin Sans as we move forward in future screenshots.
Google Webfonts Helper
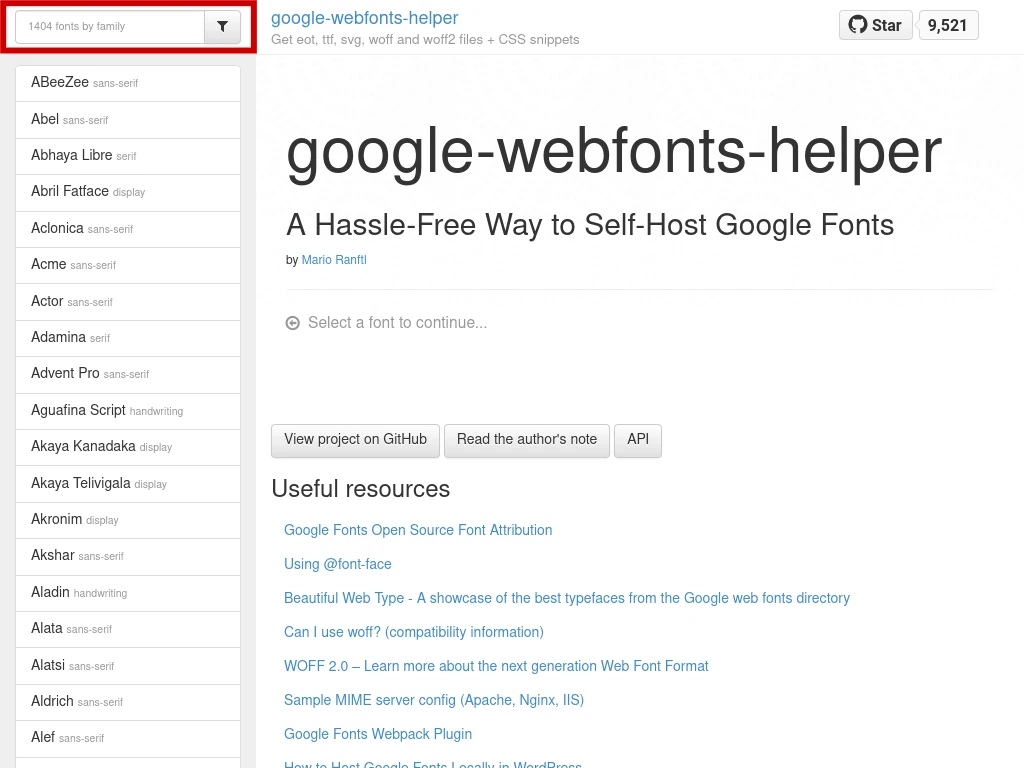
Now that you have all of your site’s font information, we’re going to make use of an extremely useful tool – Google Webfonts Helper – to not only help us download our font files but, more importantly, provide us with CSS code you need to implement the fonts once they’re on your web server.
On the Google Webfonts Helper site, you’ll notice a search box in the top left corner and underneath it a list of all 1400+ fonts it has available from Google. You can scroll through that list if you’d really like, however, it’s obviously much faster to use the search box.
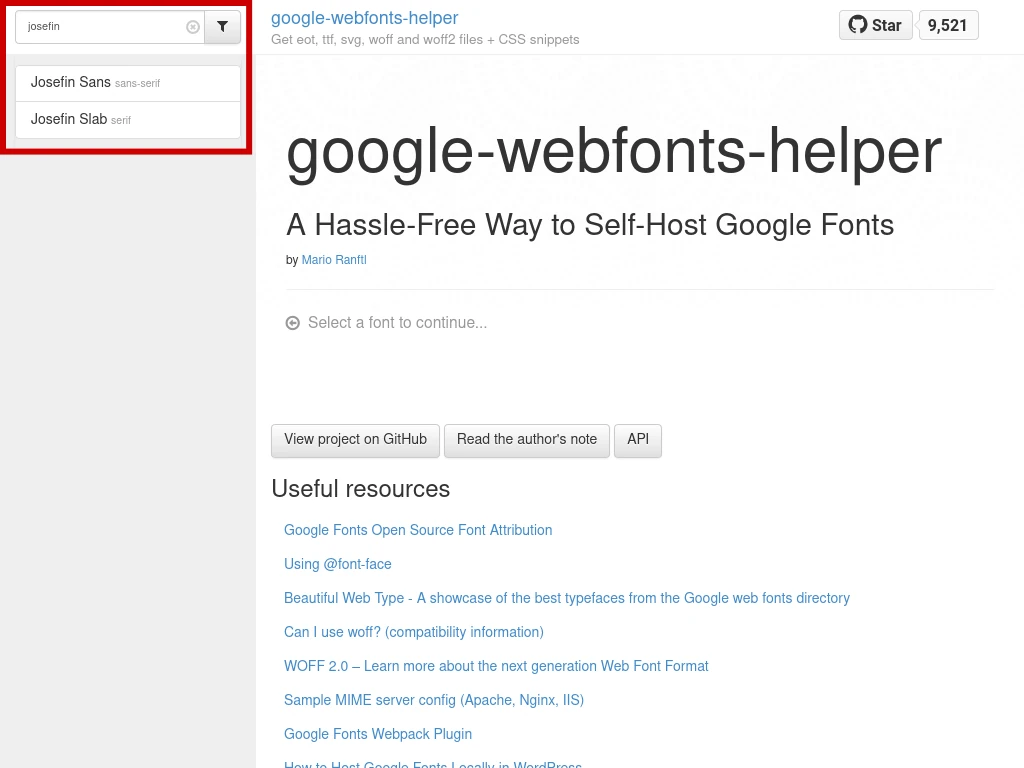
Here I’ve started typing in the font name – notice that the list of fonts updates automatically as you type. Next I’ll click on Josefin Sans in the list
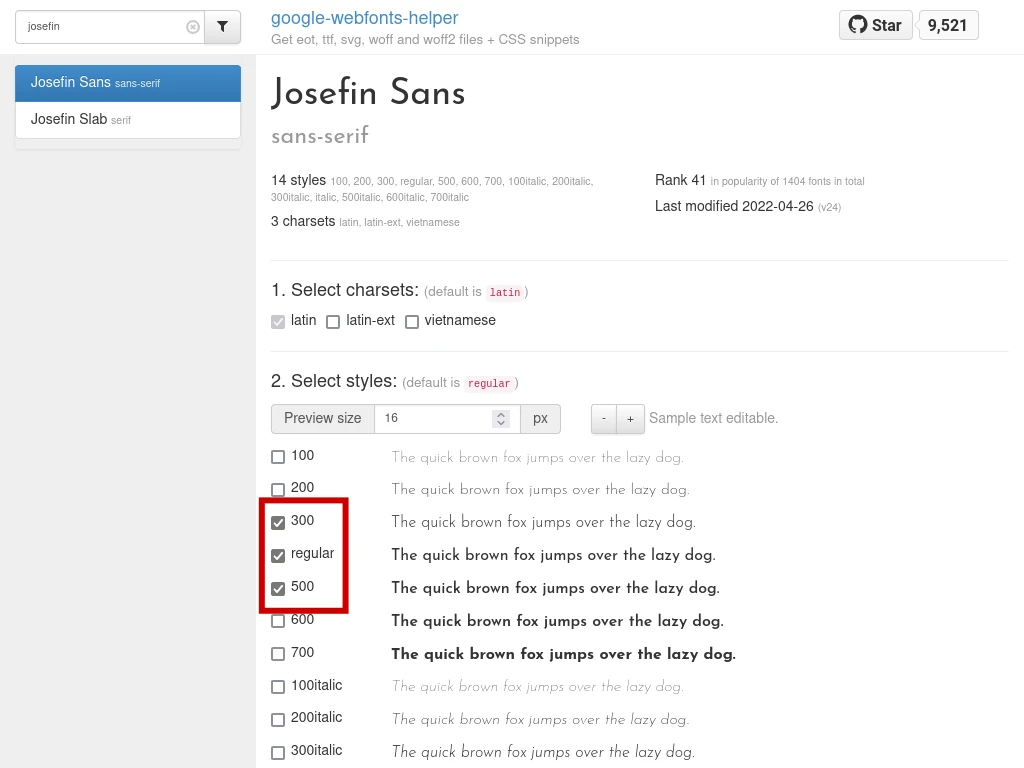
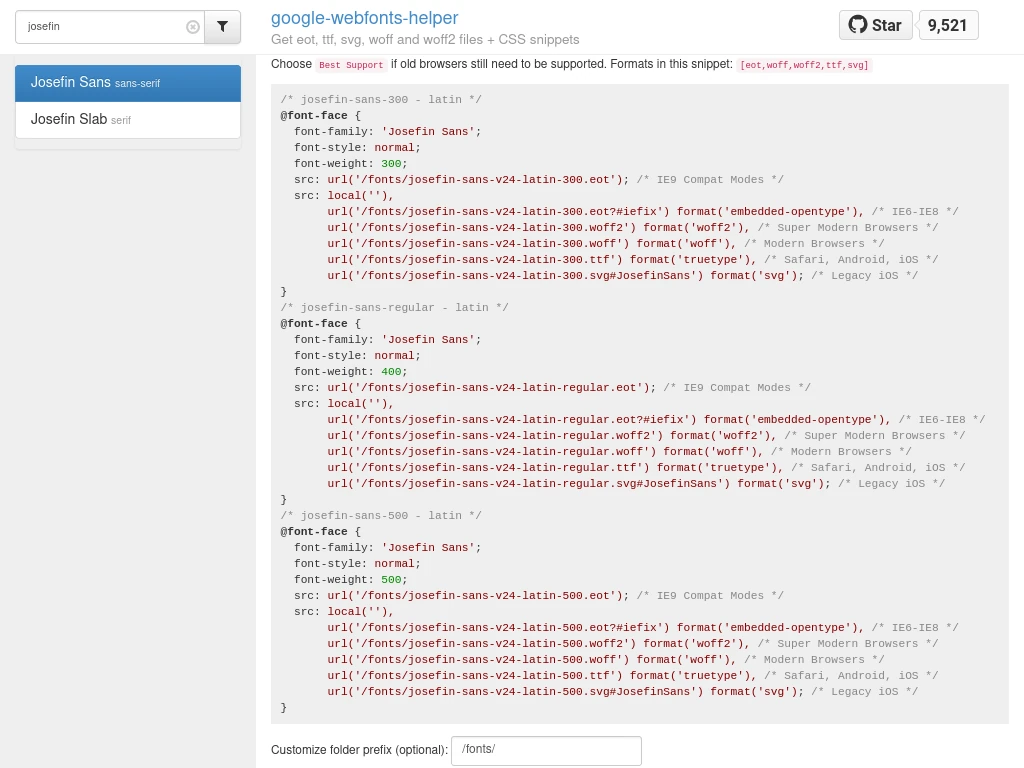
This brings us to the heart of this tool. Here we can select what charactersets, weights, and styles we need to make use of. For our example, and I imagine most people reading this post, we’ll be using the latin character set so we’ll leave that alone.
If you remember from my wife’s website, I said that her site used weights 300, 400, and 500 in Josefin Sans. Here I’ve checked the boxes for these weights – note, weight 400 is generally considered to be regular. After you have found your first font and selected its weights, scroll all the way down to the bottom going past the CSS code in the gray box. We’ll come back to that in a moment.
The next thing I want you to do is click the large blue button under Download Files. This will download to your computer a zip file containing your font with the appropriate weights you selected above. I’d suggest creating a temporary folder somewhere on your PC where you can extract the files from the zip file to until you’re ready to upload all of the files to your web server.
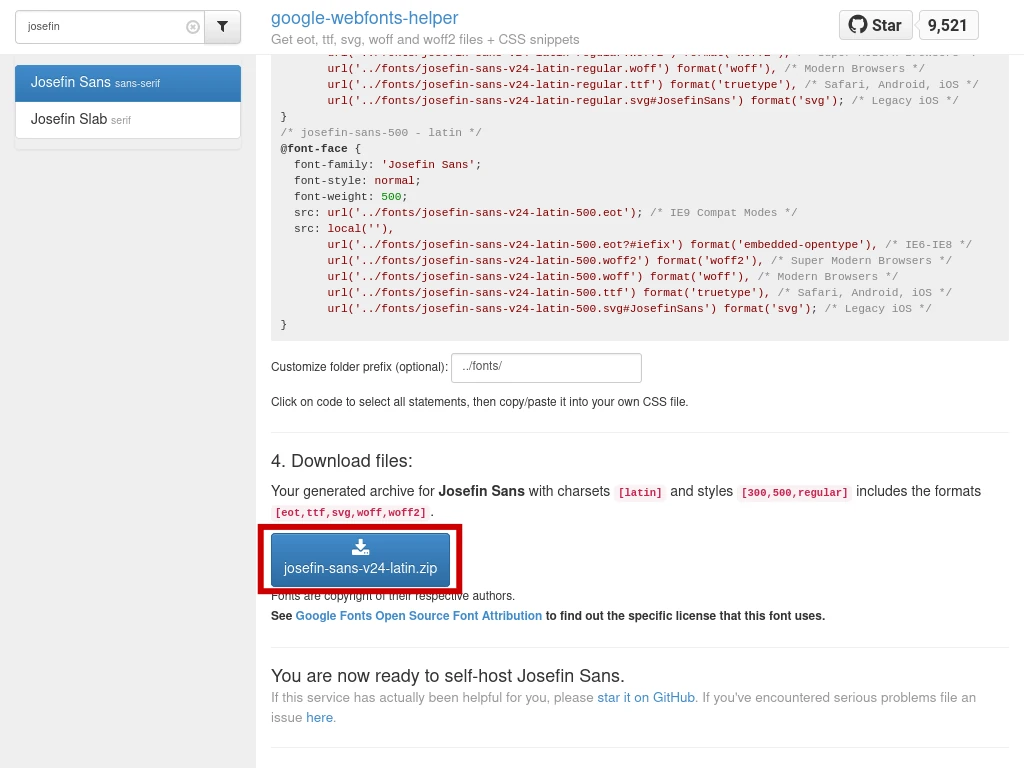
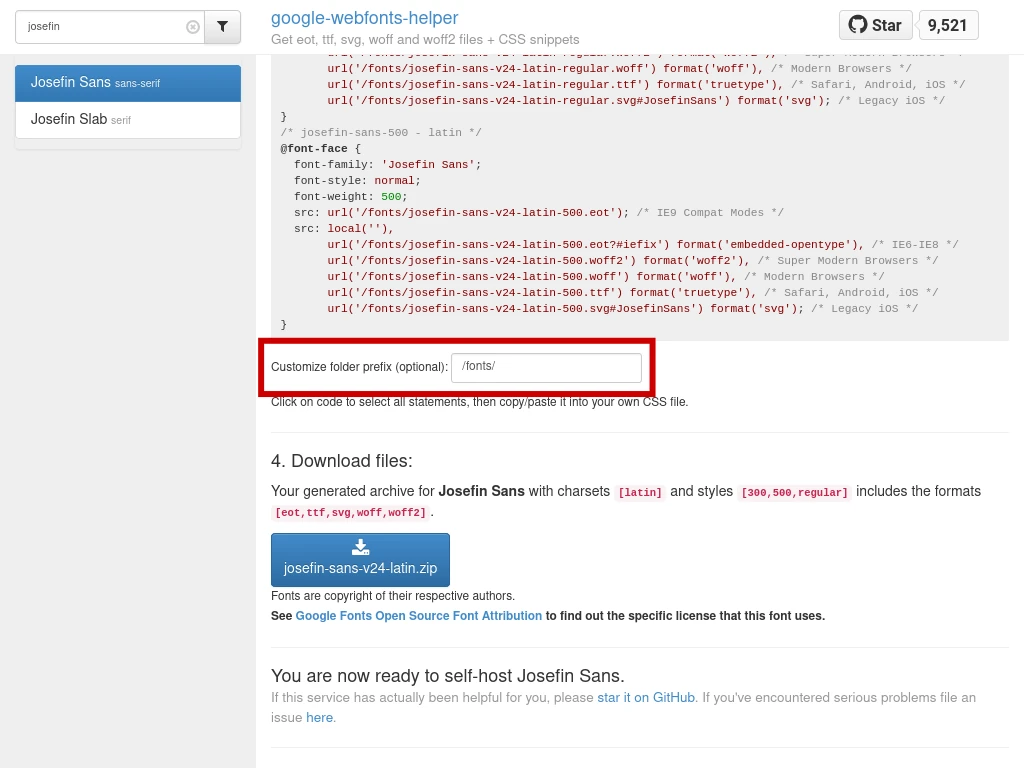
The next thing you need to do is locate a field above the download button labeled Customize Folder Prefix (Optional). They may have this labeled as optional but I consider it to be 100% essential. Here you are going to change the prefix to be /fonts/. The trailing / at the end is crucial so do not forget it.
I told you at the very beginning of this post that you should create a folder on your server at the root of your website called fonts. Making this change will modify the CSS code in the gray box above to use this folder as the location for the uploaded files.
Now go ahead and scroll back up to the beginning of the gray CSS code box. Copy all of this code and paste it into Windows Notepad or the text editor of your choice. We’re going to make a modification to the code.
You’re going to add the font-display property to the CSS code for each of the fonts on your website. If you have two fonts with three weights each, you should be adding this code a total of six times.
font-display: swap;There are multiple options available besides swap for this property. This is the one I find used most commonly, however, you can choose which one works best for you. The fine folks over at CSS-Tricks have written a good post explaining what the various font-display options are.
When you put the font-display property within the CSS code, it should look similar to this.
@font-face {
  font-family: 'Josefin Sans';
  font-display: swap;
  font-style: normal;
  font-weight: 400;
  src: url('../fonts/josefin-sans-v24-latin-regular.eot'); /* IE9 Compat Modes */
  src: local(''),
       url('../fonts/josefin-sans-v24-latin-regular.eot?#iefix') format('embedded-opentype'), /* IE6-IE8 */
       url('../fonts/josefin-sans-v24-latin-regular.woff2') format('woff2'), /* Super Modern Browsers */
       url('../fonts/josefin-sans-v24-latin-regular.woff') format('woff'), /* Modern Browsers */
       url('../fonts/josefin-sans-v24-latin-regular.ttf') format('truetype'), /* Safari, Android, iOS */
       url('../fonts/josefin-sans-v24-latin-regular.svg#JosefinSans') format('svg'); /* Legacy iOS */
}
Repeat this process for each font you’ll be self hosting. Once you’ve saved all of your fonts to your PC, extracted the files to a temporary folder, and compiled all of your CSS code inside Windows Notepad you’re ready to continue.
Upload The Fonts To Your Web Server
When you downloaded the zip files containing your fonts from Google Webfonts Helper, I said you should extract the files into a temporary folder until you’ve uploaded them to your server. Now’s the time to upload these files to your server. It’s best to do this part BEFORE you apply the CSS code to your website so as not to confuse the site into looking for files that don’t yet exist.
Before we began, I mentioned that you’ll need access to upload files to your server. This is a situation where I can’t explain all of the possible ways to upload files to your server as each host has their own method. Hosts that make use of cPanel will often have web based file managers to try to make the process easier for non-technical people.
As I said earlier, you should consult with your hosting company’s documentation to find out how exactly to transfer up files.
Be sure when you upload the font files, that you put them inside a folder called fonts at the root of your website or else the CSS code we’re going to apply to the site next will be looking for the files in the wrong place.
Apply The Font CSS To Your Website
Yet again, much like differences in hosting, depending on how your site was created the process of adding CSS code to your website can vary. If you wrote your website code yourself, CONGRATS! You probably already know how to apply the font CSS code to your site. I don’t need to tell you how to do this.
If your website WAS NOT coded by you and is not using a well documented content management system that you can refer to Google to find how to apply CSS code to your site, then you will need to contact your web developer and have them assist you with applying the code.
If your site was created using a content management system other than WordPress, you’ll want to refer to Google and search for how to apply CSS code to your website via your content management system.
Lastly, if you are using WordPress, I’ll show you here how you should be able to apply this code to your website.
Applying The CSS Inside WordPress
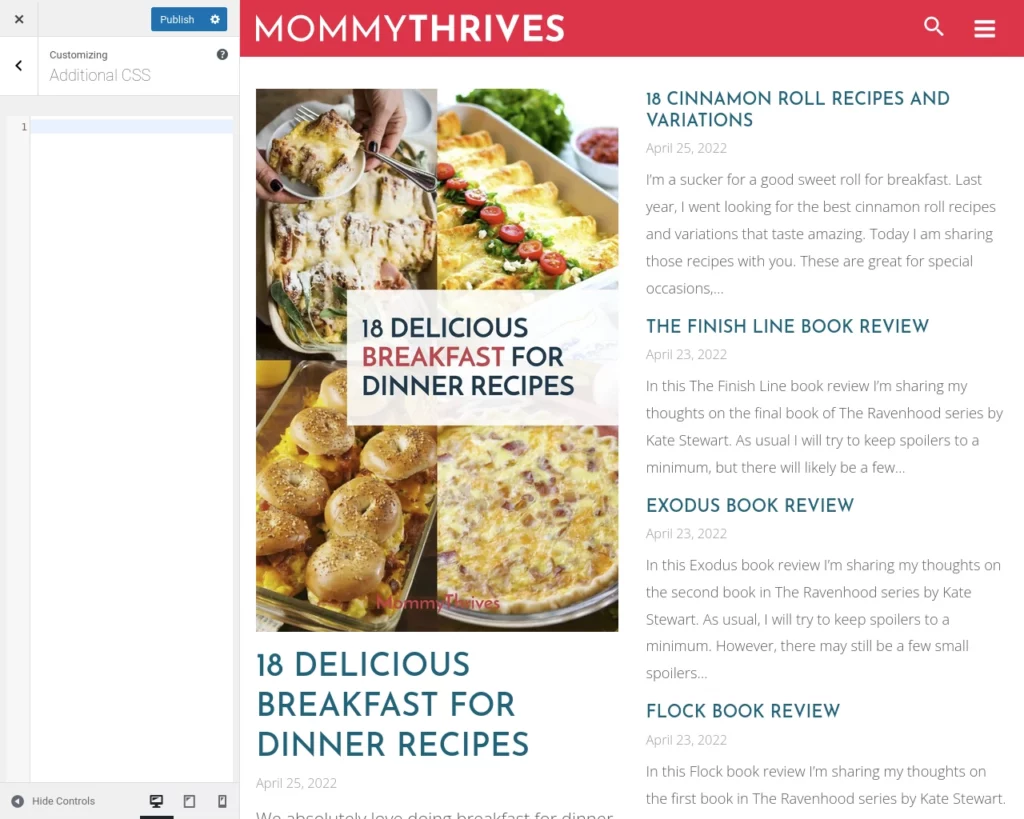
From the WordPress dashboard, on the left find where it says Appearance and then select Customize. This will load the WordPress customizer. Here select Additional CSS, which should look similar to this.
In your Windows Notepad with the CSS code, select all of the code and copy it then paste it into the text field on the left in WordPress. If there’s already code inside your CSS box, put your cursor at the top of the code and hit enter a few times to add some blank lines and then paste your font CSS at the very top.
Once you’ve pasted in the CSS code, click the blue Publish button.
WordPress – Disable Google Fonts
WordPress users will need to ensure that Google Fonts are disabled on their websites in order for all of this to actually improve your website performance. I’m certain there are more ways to do this than I’ll mention here, however the two I’ll point out are using either of these plugins:
Autoptimize
The Autoptimize plugin is very popular – in use by over 1 million websites – and offers a variety of features for optimizing your website performance. I won’t be covering all of the various things it can do for you, however.
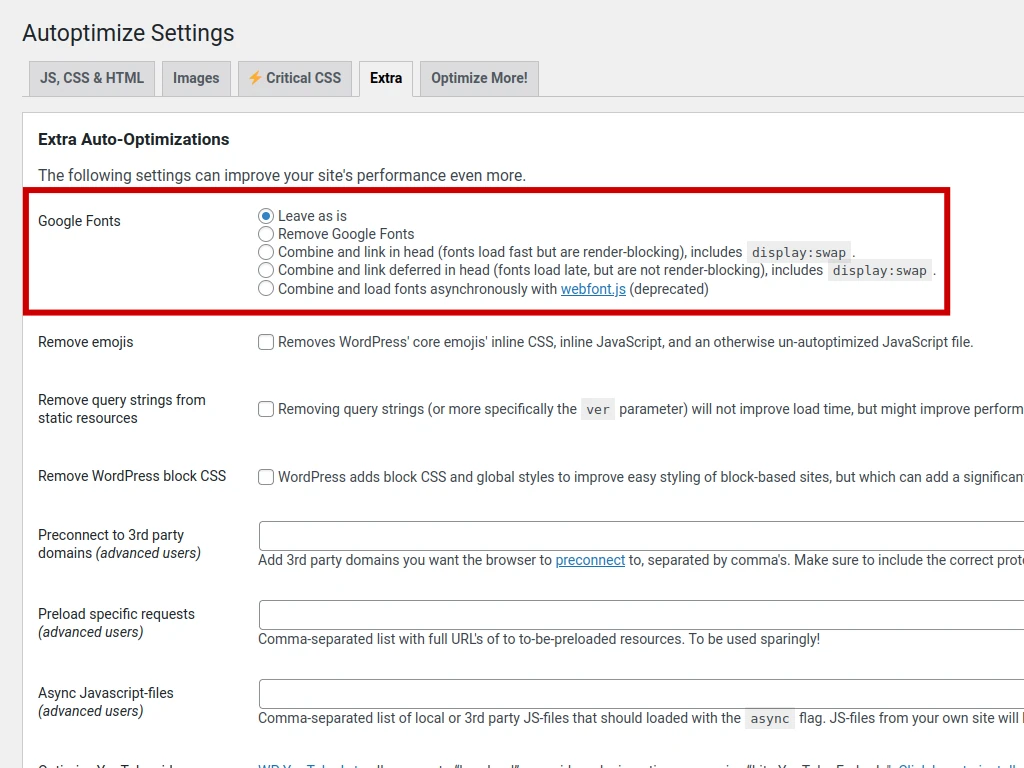
To disable Google Fonts, find Autoptimize under your Settings menu and then go to the Extra tab. You should see a section for Google Fonts – choose Remove Google Fonts then scroll down and click the blue Save Changes button.
Disable and Remove Google Fonts
If you’re not using Autoptimize already on your WordPress website or you want the simplest method possible, simply install the Disable and Remove Google Fonts plugin – there is zero settings or configuration required. Just activate it and you’re good to go.
Did These Changes Work?
The first test you can perform to verify that things are working is to actually view your website. Don’t just load the page normally, however. You’ll want to make sure that you’ve cleared your browser cache so you know that you’re getting the site as it currently exists on the server and not what your browser remembers it to be. If everything on your site appears to LOOK correct, then move on to testing again with webpagetest.org.
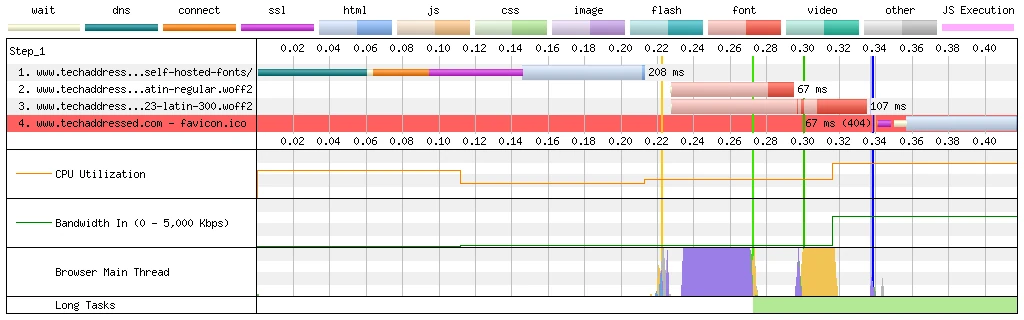
As before, I’ll give you an example from a demo I created. You can see compared to the previous test that the Google Fonts domains are no longer present in my example page. Examine your own test results to confirm the same outcome for your site.
Thanks
If you found this tutorial helpful or have any questions, I encourage you to please share it with others and/or leave a comment below. If you would like to support our efforts to create additional resources like this, please consider making a donation. Your support is greatly appreciated! Thanks for reading and I hope you visit again soon!