This tutorial owes its existence to an accidental oversight on my part. The last thing anyone wants to do is waste a couple hours of time running benchmark tests only to find out that you forgot to alter the CPU type on the VM you’re testing half way through.
During testing to compare virtual machine performance between Proxmox and TrueNAS Scale on identical hardware, I realized I’d done exactly that. When I created the Proxmox VM, I neglected to set the CPU type, leaving it set to the default – making the data I’d collected up to that point seemingly useless.
This tutorial was born out of the desire to not have wasted the effort of testing with the wrong VM setting with the added benefit of being able to have a quantifiable idea of just how much of a performance difference not changing the setting can make.
With the decision made, I thought to myself, “I wonder how many people don’t even bother to change this setting during VM creation.” It is, after all, an easy setting to leave alone and have your VM still function. I decided I’d put a poll out on Mastodon to see if it’s common for people to not change their VM CPU type.

The poll closed with 101 responses – 56% of which indicated they leave their VMs set to the default. The one thing I didn’t think to address with the poll, unfortunately, was whether your choice to use the default was deliberate or not.
With all of that said, what exactly is the impact of leaving the VM CPU type set to the default? Let’s dive into the details and see how changing this setting can significantly improve the performance of your virtual machines.
Table of Contents
What Is The CPU Type Setting?
Virtual machines in Promox are based on QEMU/KVM, which allows for emulation of different CPU types using the CPU TYPE setting. For instance, if you wanted to emulate an old Intel 486 CPU – perhaps you’re looking to setup DOS to play old PC games – the CPU type setting will allow you to do that.
This feature is especially useful for those who wish to setup “Hackintosh” VMs as compatible versions of MacOS only work with specific Intel CPU architectures.
The default value for any new VM’s CPU type, however, is a generic KVM64 type that will work regardless of what CPU architecture your Proxmox host is running on. While this is great for compatibility, it isn’t ideal for performance.
The solution to this performance issue is to modify the CPU type to HOST – which in some systems is referred to as host passthrough – which tells KVM to pass the host CPU through to the VM without modification or abstraction and in doing so deliver superior CPU performance.
Effects On VM Performance
I ran a selection of benchmark tests to demonstrate the kind of effect setting CPU type to host can have on VM performance. While some tests show a negligible difference in performance, other scenarios show a boost of more than 10% – simply by changing a single setting on your Proxmox VM.
Testing Setup
All testing was performed on a Skylake architecture based i5-6500T mini PC – like I’ve covered in a number of previous articles – seeing as I own a number of these devices. Testing was performed with a fresh install of Proxmox as well as a new Debian 11 VM. No other VMs were running during the time of testing.
Host System
| OS Version | Proxmox Virtual Environment 7.3-4 |
| Test System | HP ProDesk 600 G2 Mini |
| CPU | Intel i5-6500T – 4 Cores / 4 Threads |
| Memory | 16GB Dual Channel – 2x 8GB SK Hynix DDR4-2133MT/s (affiliate) |
| Swap | Enabled |
| Boot Disk | TeamGroup MP33 NVMe SSD (affiliate) |
VM Configuration
| VM OS | Debian 11 / Kernel 5.10.0-21-amd64 |
| CPU Cores | 1 – 4 Cores Tested |
| CPU Types | Default (KVM64), Host |
| Memory | 4GB |
| Swap | None |
| VM Disks | ZFS Mirror – 2x Crucial MX500 SATA SSD (affiliate) |
GnuPG Encryption
While I wasn’t originally intending to include single-threaded test results in this tutorial, I opted to run the GnuPG test in hopes that it would prove to be a good example of the main point of this tutorial.

I’d say … point made. By simply changing the CPU type, the VM was able to make use of enhanced CPU instructions to boost performance by 10.8%! Modern CPUs include a set of instructions called AES – short for advanced encryption standard – instructions. Leaving the CPU type set to the default prevents the VM from having access to those instructions.
Linux Kernel Compilation
The Linux kernel compilation test is the most CPU intensive benchmark I ran on these VMs. Tests like this that require longer periods of time to complete often have more pronounced performance differences.
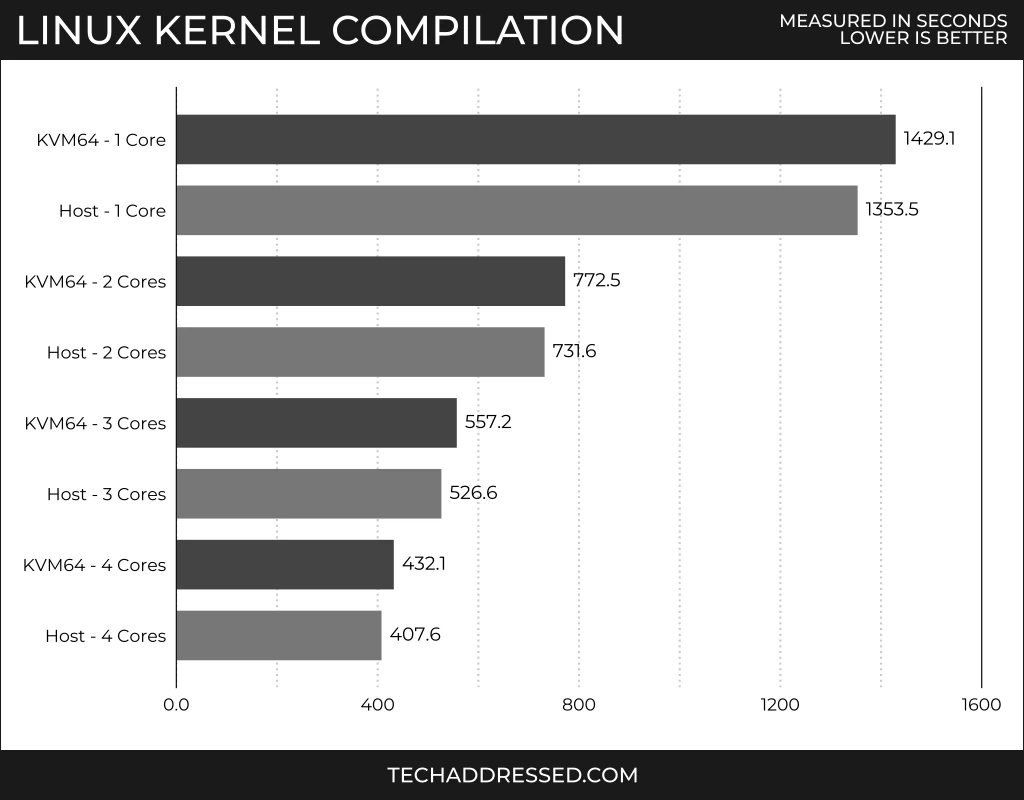
Here we see the single core and dual core results both show a 5.3% improvement after changing the CPU type. The three core test had an even greater improvement at 5.5%, and the four core test topping this test at 5.7% improvement. With any task that requires time to completion – like code compilation or any kind of rendering tasks – a 5% or greater improvement translates into significant time and energy savings.
FFmpeg Encoding
The FFmpeg encoding test results might not look as dramatic as the previous two benchmarks, however, I’ll do my best to put the scores into perspective.
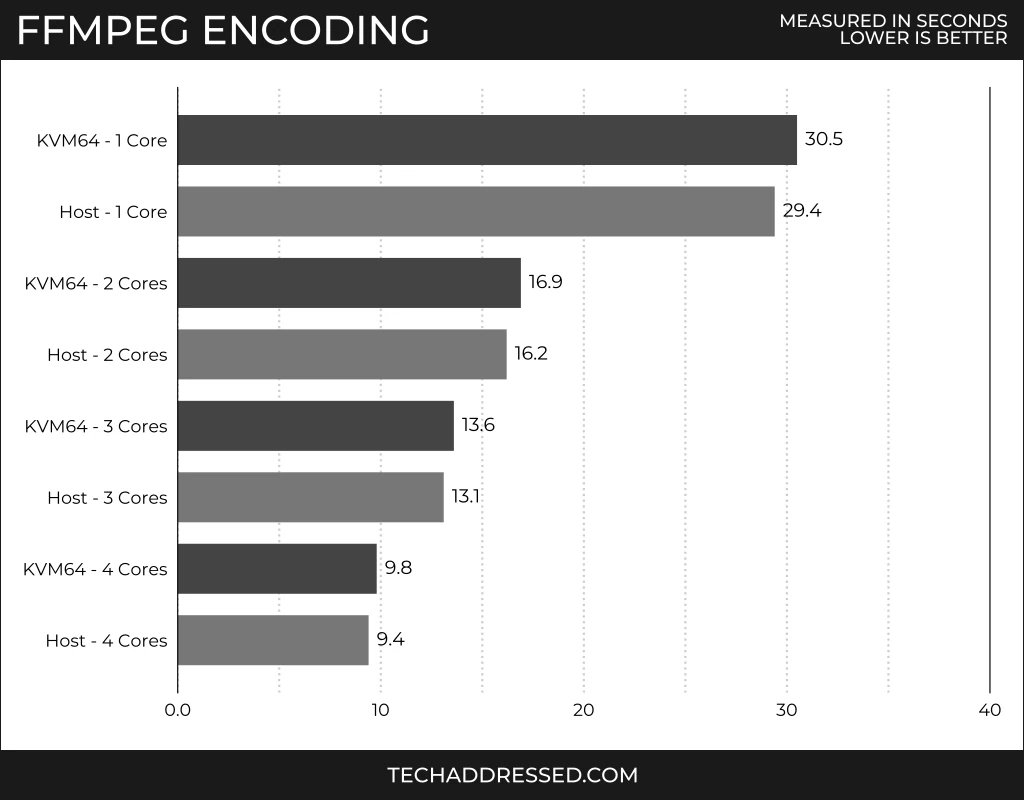
Here we see improvements between 3.5% and 4.1% as we increase the number of cores in the VM. While not nearly as impressive sounding as the last two tests, consider that this test uses a small sample video allowing the test to complete relatively quickly. Like I mentioned previously with regards to time savings, a 4% time savings when performing encoding work across the entire time that these tasks might take can also translate into a real time savings.
A real-world homelab example for exactly what I’m talking about would be setting up a VM to transcode files for your home media server. The sooner your VM completes the task, the sooner those resources are freed up for other VMs.
Sysbench – Memory
Lastly, let’s take a look at one of my favorite tests – the Sysbench memory test. This benchmark doesn’t strictly measure memory bandwidth but, by design, factors in CPU performance to give an idea of how memory sensitive tests would perform.
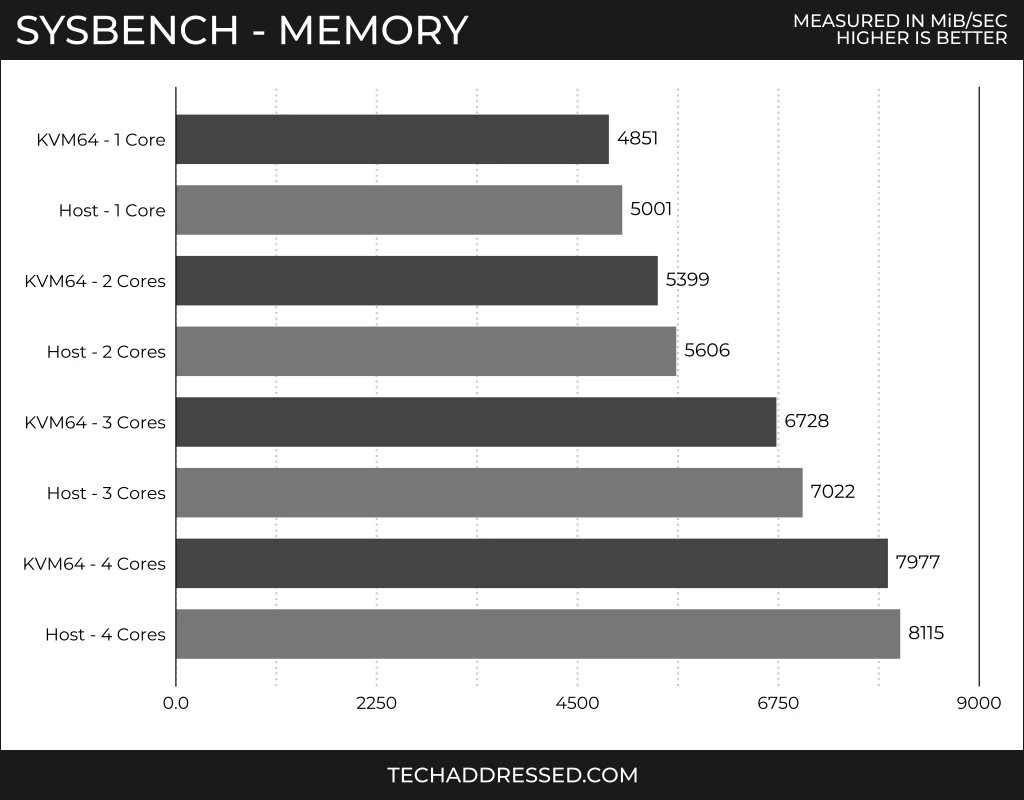
Here we see the single core through three core VMs performing 3.1% to 4.4% better with the CPU type change in place. The outlier here is the quad core test with a mere 1.7% improvement – likely being hampered by the fact that the system is only a quad core system and the hypervisor is running still in the background.
Tests With Little Performance Difference
Unfortunately, not every workload has specialized CPU instructions that will benefit it by adjusting your CPU type. Of my standard test suite, the PHPbench and 7-zip tests showed less than 0.5% difference – which can’t be distinguished from testing variance.
It’s important for you to understand what your VM workloads are like to determine whether making a change will benefit you. At the very least, any task that can benefit from better memory performance – as shown by the Sysbench test – might show an improvement.
When Not To Use The Host Type
While I just wrote over 1000 words telling you to change your CPU type to host, there are situations where that might not be the best setting for your specific virtual environment.
Live Migration / High Availability
If you’re running a high availability Proxmox cluster or make use of live VM migration between systems, you’ll need to carefully consider what CPU type to select for your VMs. If you don’t know anything about the types of CPUs in your host systems, the safest option is to leave your VMs configured to the default for maximum compatibility between hosts, should a VM need to migrate between systems.
If you have a cluster with mixed CPU architectures that have a base commonality to them – say for example some systems are Intel Skylake based Xeons and others are newer Tiger Lake based Xeons – you could set your VMs to use the Skylake Server setting (as opposed to Skylake Client which would correspond to desktop class chips) to allow for the largest common instruction set between host types.
There are a number of resources online that can provide you with information on what instruction sets are available in various CPUs.
If you can’t find what you’re looking for from one of these options, you’ll want to search online for your specific CPU specs.
How To Modify The CPU Type
Once you know what CPU type you’re going to use for your VMs, setting the type is pretty straightforward.
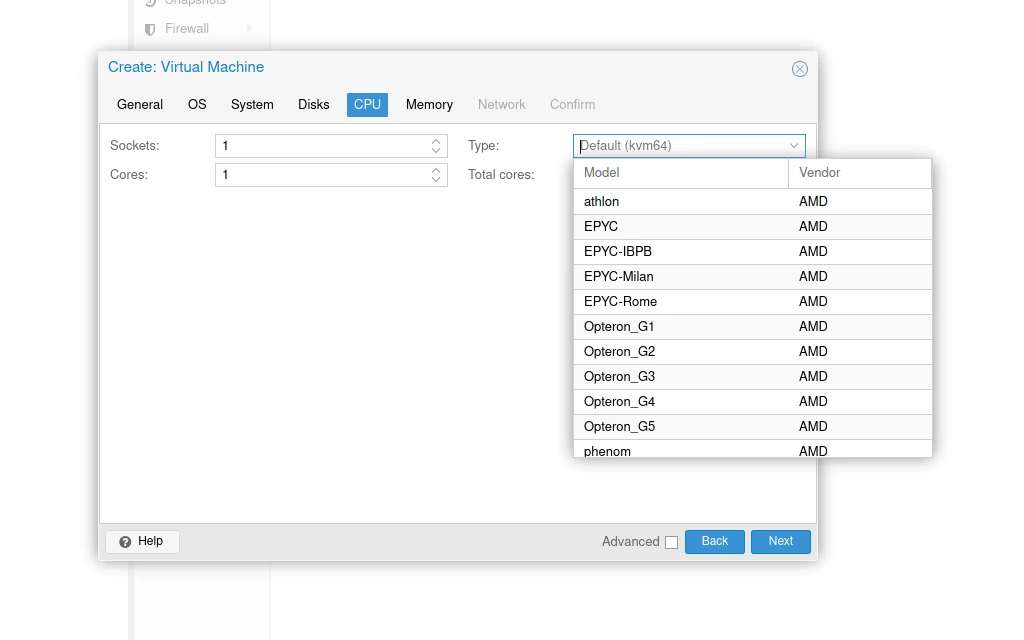
During VM Creation
If you’re creating a new VM in Proxmox, as you step through the creation process, on the CPU step, select the TYPE dropdown then scroll to locate your desired setting.
On Existing VMs
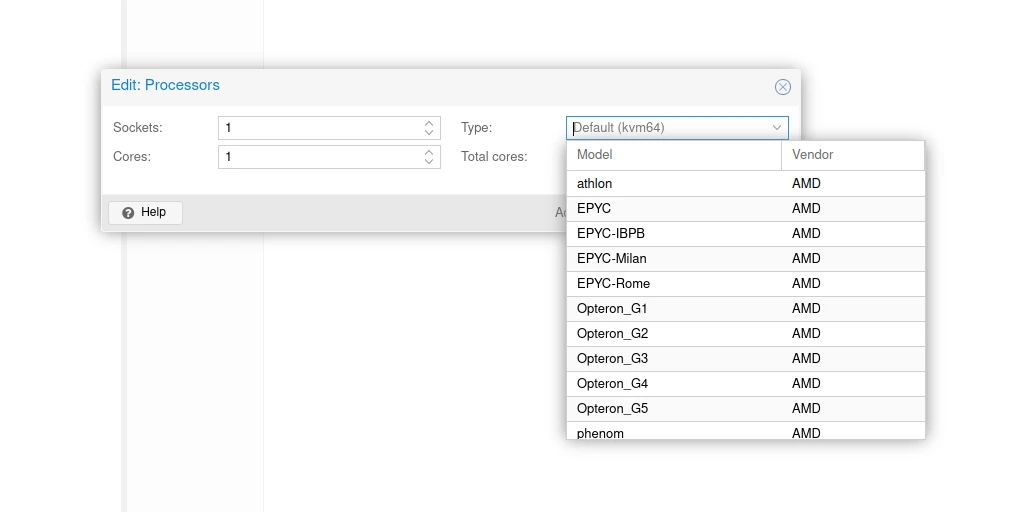
If you need to modify the setting on an existing VM, go into the VM’s hardware list and double click on PROCESSORS (or highlight and click the EDIT button).

This will bring up the EDIT PROCESSORS modal. Click on the TYPE dropdown and find your desired setting.
Closing
As I’ve demonstrated, using the host CPU type in your Proxmox VMs from the default to the host setting can have a major impact on their performance in situations where it’s safe to use. If you’re looking to improve the performance of your VMs – especially if you aren’t making use of live migration / high availability – I highly recommend giving this simple setting change a try. Whether you’re creating a new VM or modifying an existing one, the process is straightforward and well worth the effort.
If you found this tutorial helpful and would like to support our efforts to create additional resources like this, please consider making a donation. Your support is greatly appreciated!
If you can’t make a donation, please consider sharing this tutorial with others who may be interested. If you have questions about anything regarding this review, please be sure to leave them in the comments below. Thanks for reading, and I hope you visit again soon!


Definitely generally good advice. Do note that sometimes there can be odd specific issues with hardware/OS combinations, and it may take a while to realize the source of the issue, like this one:
https://www.reddit.com/r/Proxmox/comments/wjx5ru/windows_10_vm_install_immediately_fails_to/
>Here’s the solution to a problem I was having, that I wasn’t able to find reference to with the information I had. Partly for others, and partly for myself when I inevitably forget and come looking again…
>I have an old TR 1950X system I’m using as a test machine, and I was trying to setup a windows VM. I’d get it set up EXACTLY like the VM on my primary machine, but after starting it and hitting a key to run from the install disk, it would do nothing else than fail to that fucking pale blue screen with a frowny face and SYSTEM THREAD EXCEPTION NOT HANDLED.
>After far too much time f***ing around, I discovered that it does not like the CPU being set to Host, but if I set it to EPYC then things run just fine and the install can proceed. Presumably one of the CPU instructions/feature enablements getting passed through causes an issue somewhere.
>My Fedora-36 test VM does not seem affected negatively using Host
There is reportedly an alternative solution as well that came up later in the thread:
>I think this might be the same issue as is present on first-gen Ryzen CPUs. Maybe setting the kvm module to ignore_msrs would fix the issue on Threadripper aswell?
>Add ‘options kvm ignore_msrs=1 report_ignored_msrs=0’ to ‘/etc/modprobe.d/kvm.conf’
>OP’s solution worked for me but I was in a position where I could try yours without any downtime. It also worked!* Thank you. I haven’t finished installing or anything yet so there might be Other Consequences.
>ETA: Windows 10 and 11, TR1920X
Hey, thanks for the tip!
Great article, and indeed you can get extra performance by using the host CPU in Proxmox, but there is a downside in a mixed CPU environment; for example, if you have a cluster with Intel an AMD CPU, KVM64 is a safe bet if you want to move nodes from an Intel node to an AMD node or vice-versa.
If you don’t need migration between nodes or all your nodes are from the same manufacturer and family, host is the best and fastest option
Just ran a handful of quick benchmarks on an ubuntu-minimal VM with 8GB of allocated RAM (host: Ryzen 5 5600G).
Geekbench results:
Default KVM64: Single Core = 934, Multi Core = 3965
Host Passthrough: Single Core = 1826, Multi Core = 7137
Though, this result is little misleading. The main performance increase came from tests that seem to have a ‘graphic component’. I’m not sure the specifics of how AMD and/or geekbench treat processors with integrated graphics (even though its a CPU benchmark which should be pure CPU calculation), but it does seem clear that the default KVM64 does not pass on certain functionality from the host processor. And if you can set the processor type to HOST, and are using the VM for certain applications, you would see this noticeable increase.
Looking at the tests that did not involve and ‘graphic component’, I saw a similar ~10% -15% increase in performance. Thanks for the article!
You’re welcome! Thanks for the insight about the graphics related tests.