If you’ve setup a TrueNAS Scale server and intend to run applications, such as Pi-hole for example, on it, you’ll need to ensure you have basic networking configured properly before you’ll be able to do much in the way of installing apps. Here I’ve prepared a quick tutorial of how to modify the necessary settings.
Before We Begin
A quick note before we begin … on the screenshots in this tutorial, I’ve outlined the important parts on the images with red rectangles to make them easier for you to locate.
TrueNAS Dashboard
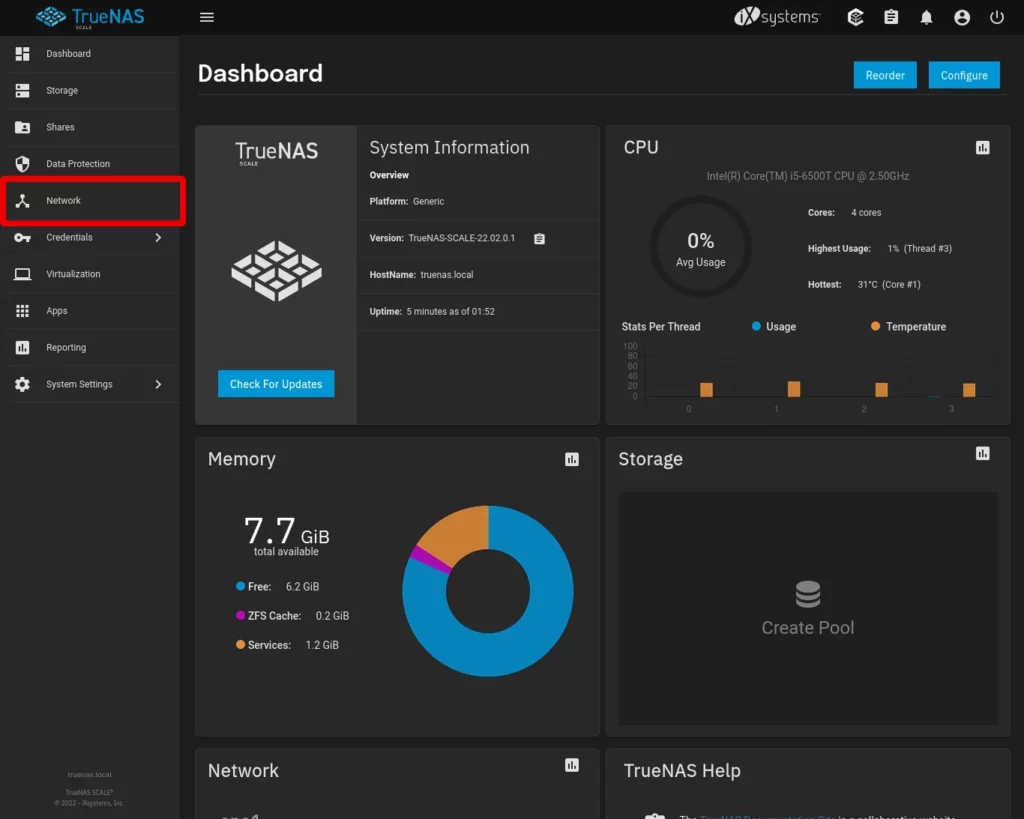
Starting from the main TrueNAS Dashboard, we want to click on Network on the left. This will take us to the Network Dashboard.
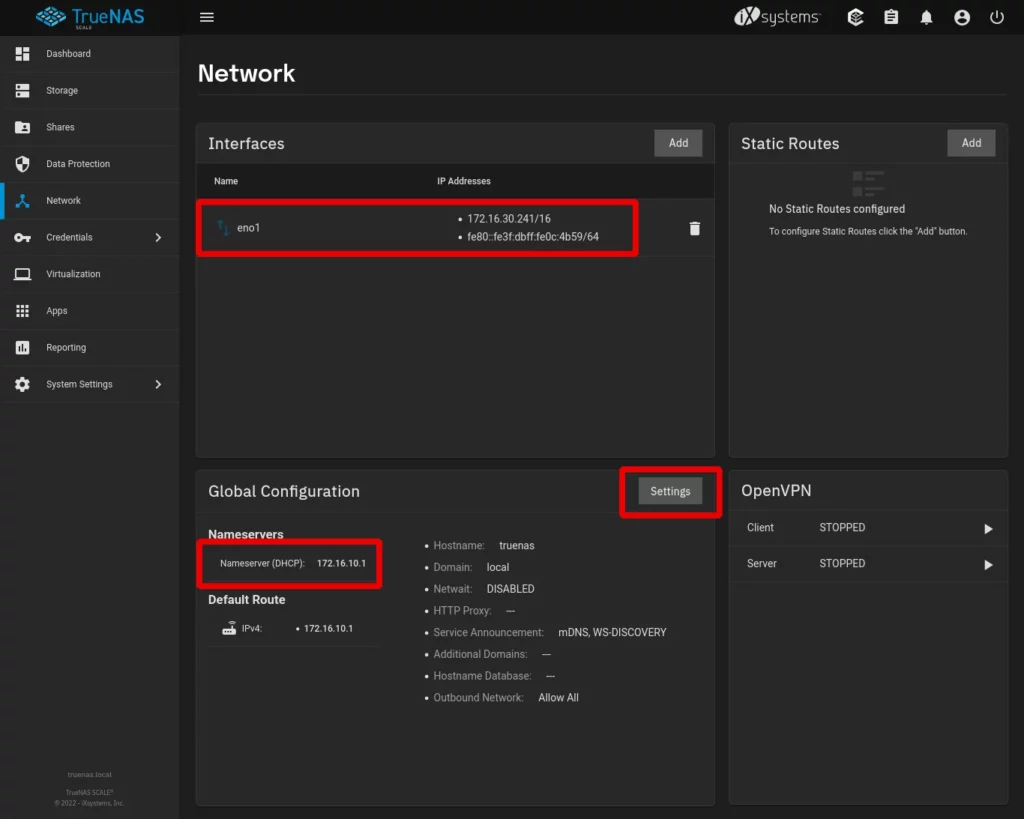
Network Dashboard – Dynamic IP
By default, your TrueNAS Scale system will be configured to obtain its network settings via DHCP (Dynamic Host Configuration Protocol). You can identify that this is the case from inside the Global Configuration section of the screen. If you look at the current Nameservers value you’ll see it says (DHCP) to indicate this value was assigned via DHCP.
Generally speaking, when dealing with servers we prefer to have statically assigned IP addresses – this way we predictably know what the address is and that it won’t ever change without us making the change ourselves. This can be accomplished either manually on the server itself or through creating an IP reservation on your network’s DHCP server.
I’m assuming that if you’re reading this tutorial, you don’t already know how to an IP reservation in a DHCP server. Seeing as that’s a bit more advanced, for the purposes of this tutorial, we’ll be proceeding with making the static IP assignment manually inside the server itself.
To assign our static IP address, we’ll begin by clicking on the network interface under the Interfaces section of the dashboard. I’ve highlighted a large rectangle to show that this entire area is clickable – just be sure not to click the Trash Can icon at the end or it’ll ask if you want to delete your interface.
Edit Interface
Once you’ve clicked on the interface in the dashboard, you’ll see the EDIT INTERFACE panel on the right of your screen. When configured for DHCP, you’ll see that the DHCP checkbox is selected and there’s no IP address specified under IP Addresses.
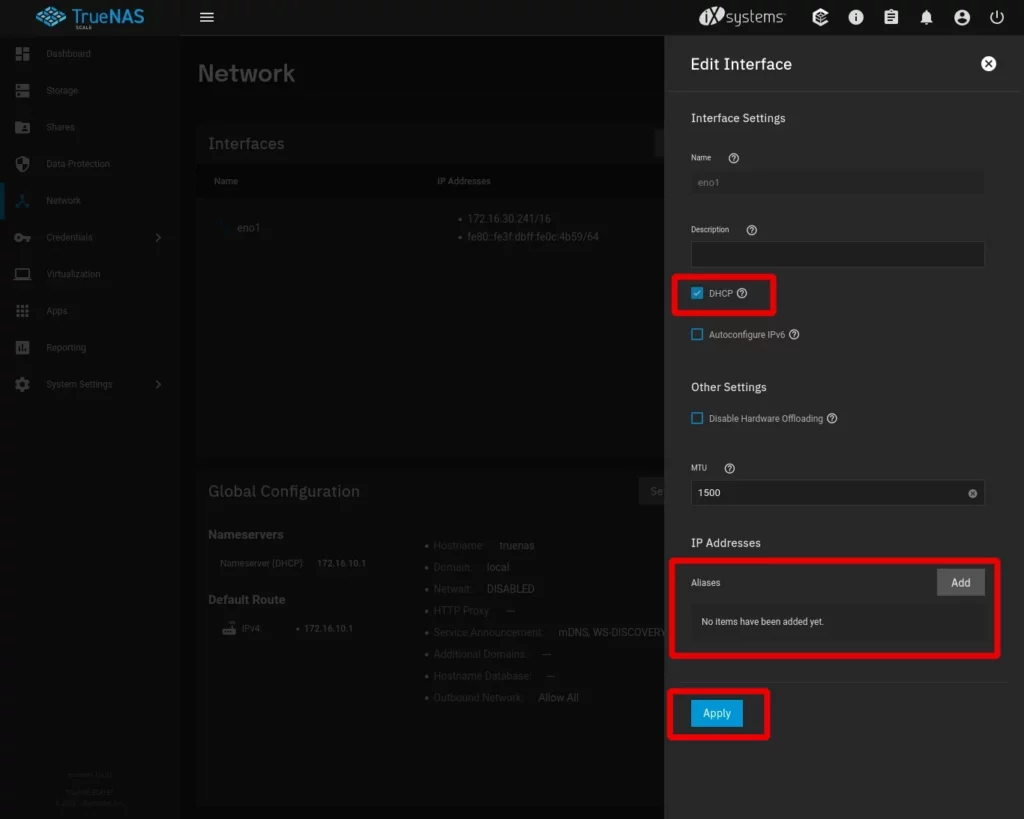
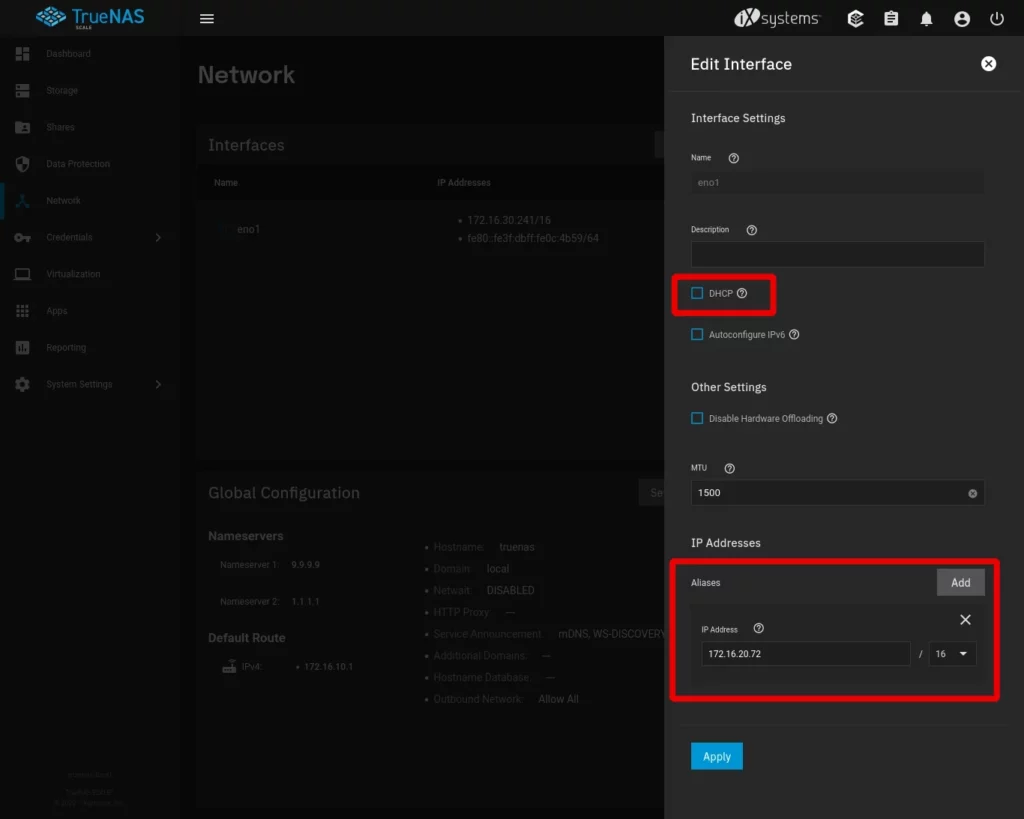
To configure our interface with a static IP address, uncheck the DHCP checkbox then, under IP Addresses, click the Add button. Type in your desired IP address in the specified box as well as the subnet mask using the dropdown box to the right. If you’re unsure what subnet mask to use, if your IP address looks something like 192.168.xxx.xxx, then your subnet value should be 24.
Once you’ve made the setting changes, click the APPLY button.
Global Configuration
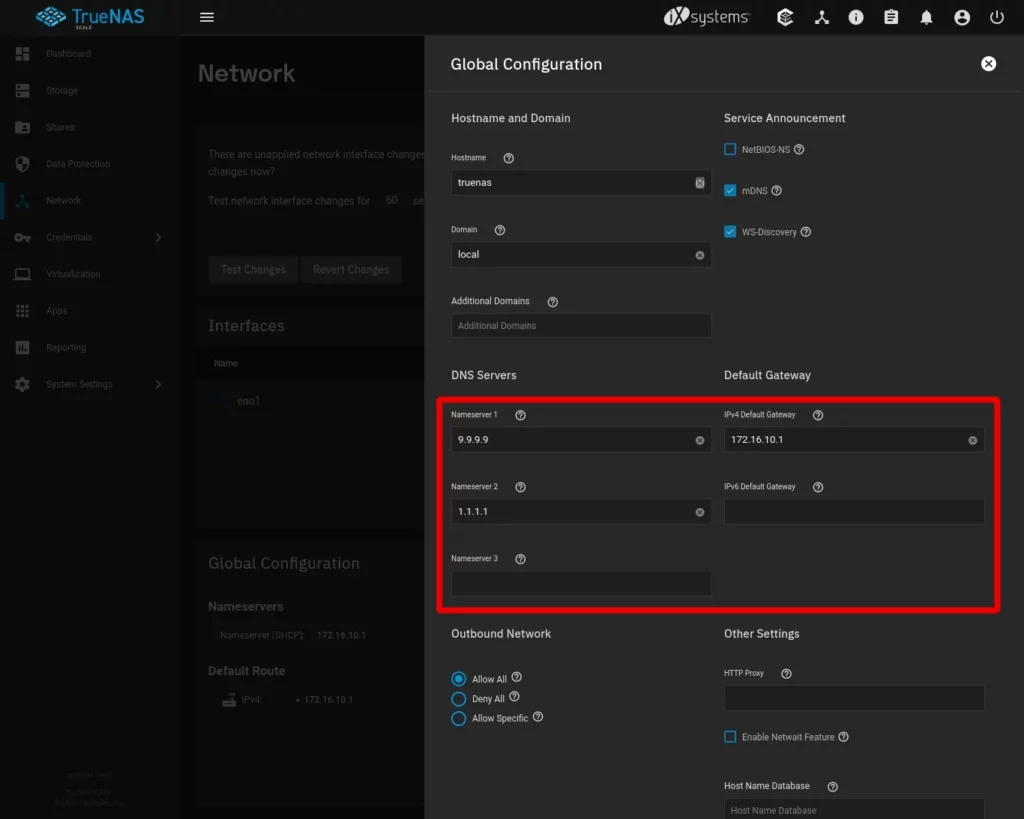
This brings us back to our Network Dashboard. Next, we need to configure our server to know what IP addresses to use for DNS servers as well as our network gateway. Click the Settings button to bring up the Global Configuration panel.
Here we need to provide at minimum one Nameserver and the IPv4 Default Gateway. In my example, I’ve specified two different DNS servers – 9.9.9.9 and 1.1.1.1 – one server from Quad9 and the other from Cloudflare. You can use these values or any valid DNS servers you wish.
For our gateway value, this will be dependent upon how your network is configured. I can make an educated guess though for the average home network’s gateway value. If your server’s IP address is, for example, 192.168.1.100 then it’s likely your gateway value should be 192.168.1.1.
Once you’ve entered in your values, scroll down (if necessary) and click the Save button.
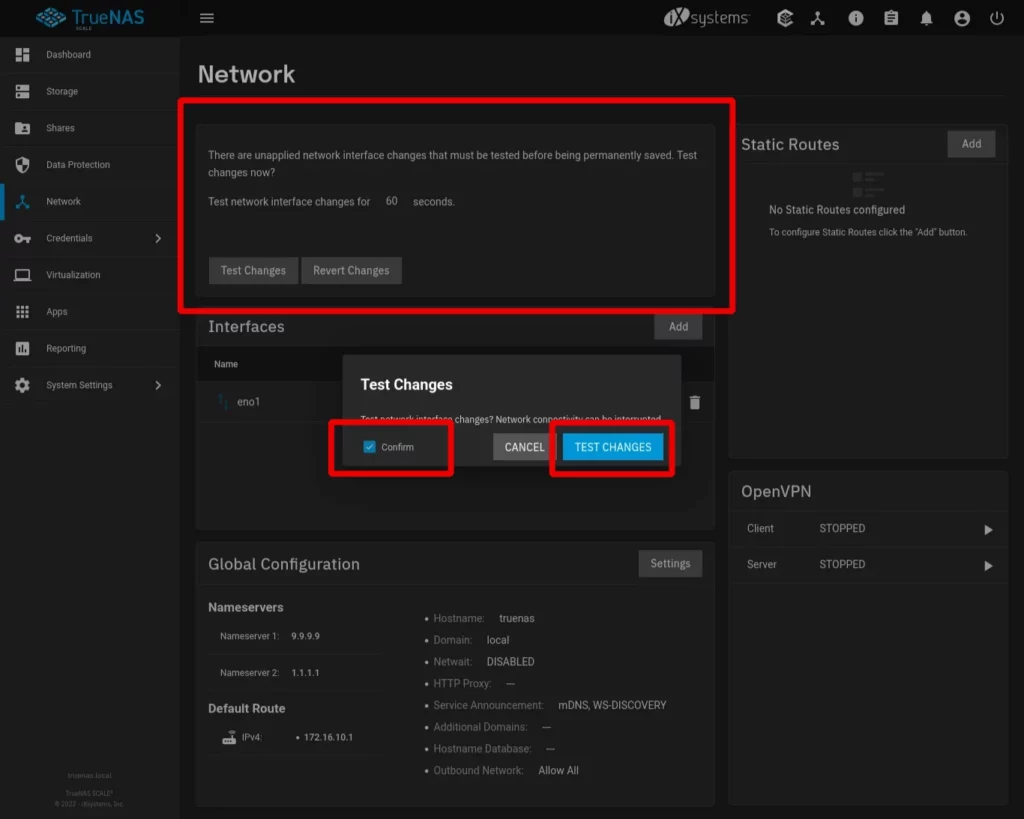
Test Changes
You’ll notice, now, when we’re back in our Network Dashboard that there’s a box that’s appeared informing us that our changes haven’t been applied yet with a button that says Test Changes. After you click this button, you’ll be presented with a Test Changes dialog message, where you need to check the Confirm box and then click Test Changes. Note – once you’ve clicked this button you’ll have 60 seconds to complete the next step.
Login Using New IP Address
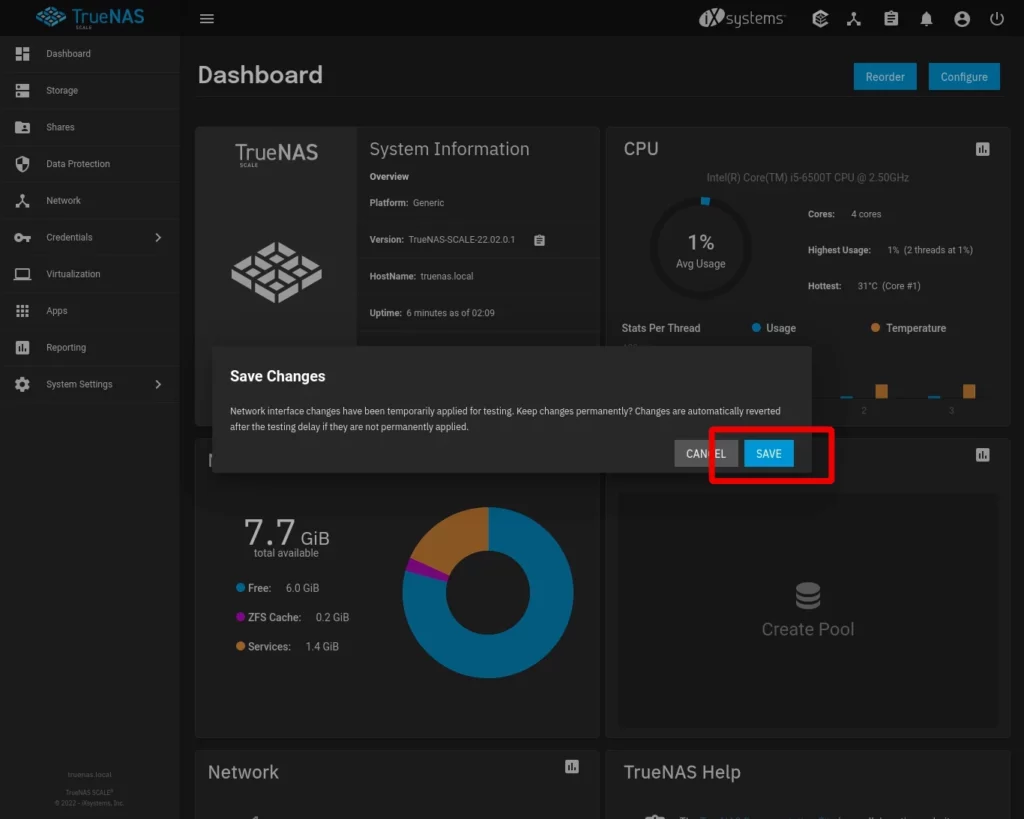
Once you’ve clicked Test Changes, you’ll need to login using the new IP address you’ve just specified. When you type the new IP address into your browser, you should be presented with a login box. If for some reason this does not work, wait for a minute and you’ll be able to login again using the old IP address to make corrections.
Save Changes
If you were able to login successfully after modifying the IP address settings, you’ll be presented with a Save Changes dialog as soon as you login. Once you click the Save button these new network settings will be made permanent.
Network Dashboard – Static IP
Now, if we go back to our Network Dashboard you can see our interface has our new IP address specified and the nameservers are now the values we provided instead of the settings applied via DHCP.

And with that, congratulations! You’ve successfully configured basic static networking for your TrueNAS Scale server.
Thanks
If you found this tutorial helpful and would like to support our efforts to create additional resources like this, please consider making a donation. Your support is greatly appreciated!
If you can’t make a donation, please consider sharing this tutorial with others who may be interested. If you have questions about anything regarding this tutorial, please be sure to leave them in the comments below. Thanks for reading, and I hope you visit again soon!