This short tutorial shows you how to add and verify SSH keys to a Gitea server. Configuring your Gitea account with a SSH key provides a level of security to your interactions with the server. These instructions should work regardless of how you’ve setup your Gitea server. This tutorial is part of a series on hosting your own Gitea server.
Before We Begin
A quick note that screenshots in this tutorial have important fields and buttons highlighted to make them easy for you to identify.
SSH Key Generation
You can skip this step if you already have a SSH key created that you intend to use. If you don’t already have a SSH key generated, however, you can generate a new key from a terminal with this command:
ssh-keygenHere’s an example of what this process should look like:
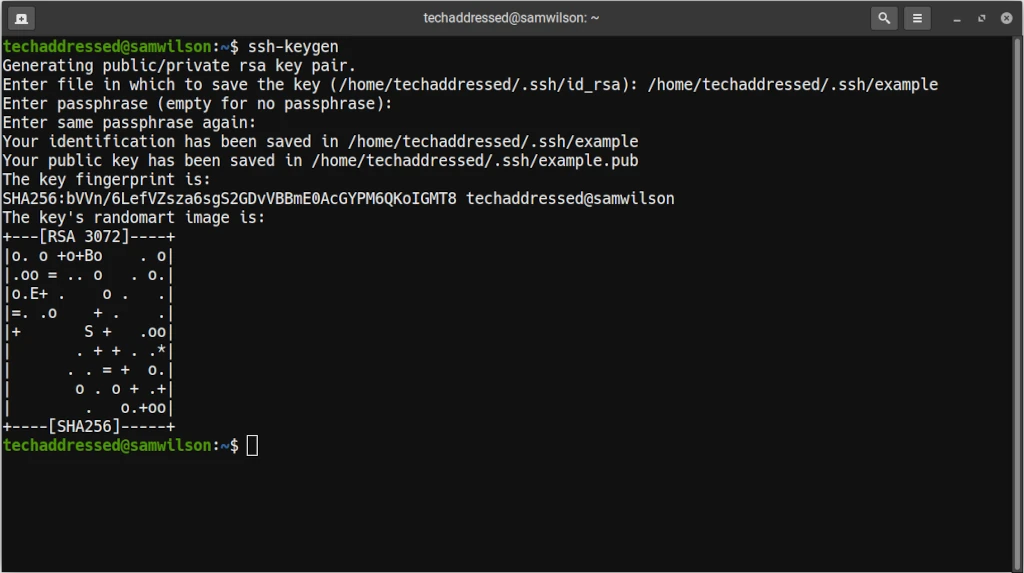
The decision of whether or not to include a passphrase in your SSH key is up to you, however doing so adds an extra layer of security to your key.
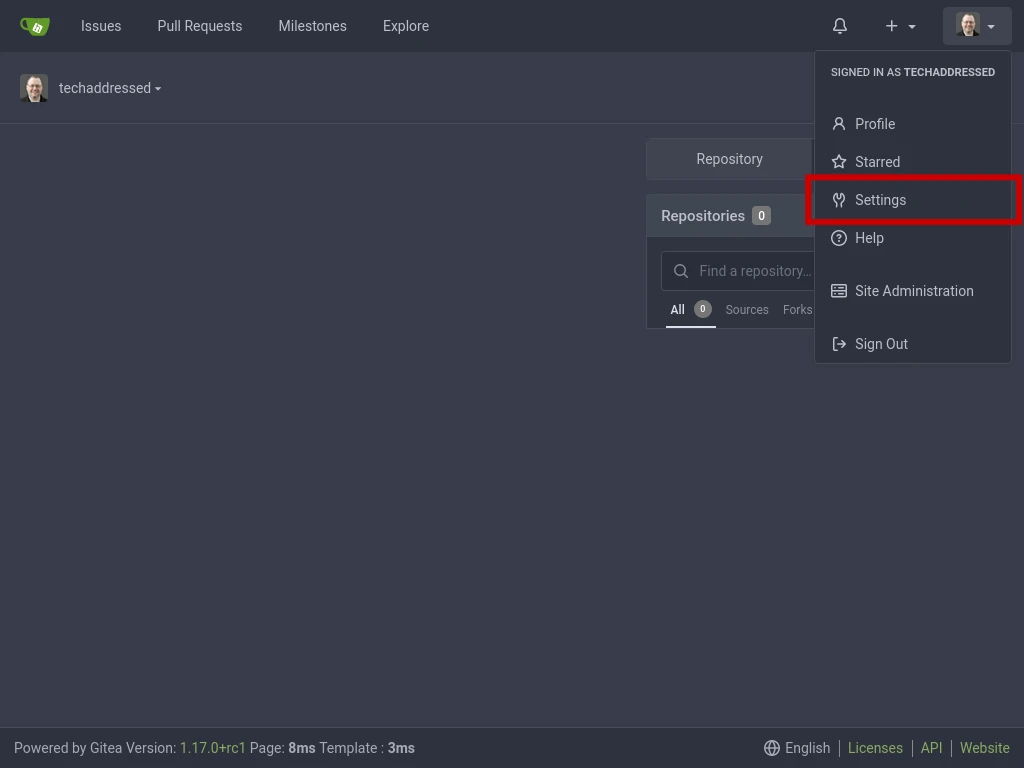
Gitea SSH Key Dashboard
First, login to your Gitea account.
To add your SSH key to your Gitea account, you’ll need to navigate to the SSH/GPG KEY DASHBOARD. Use the drop down menu in the top right of your screen and select SETTINGS.
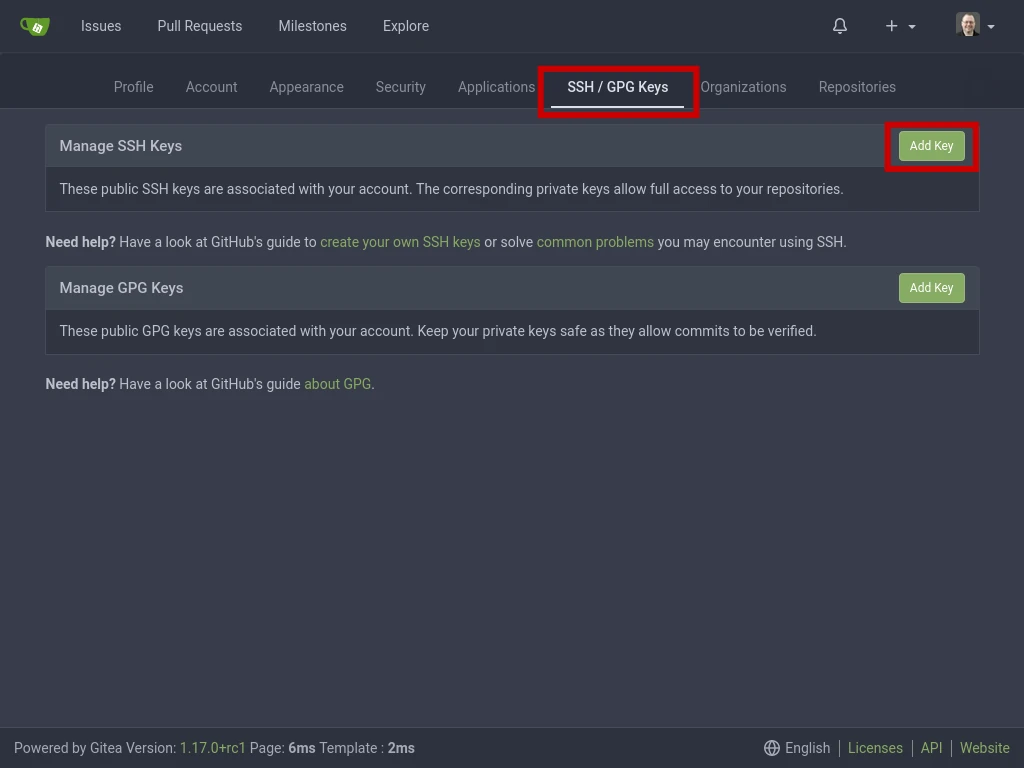
Next, select the SSH/GPG KEYS tab. To add your SSH key, click the appropriate ADD KEY button as highlighted in the screenshot below.
Adding Your Public Key
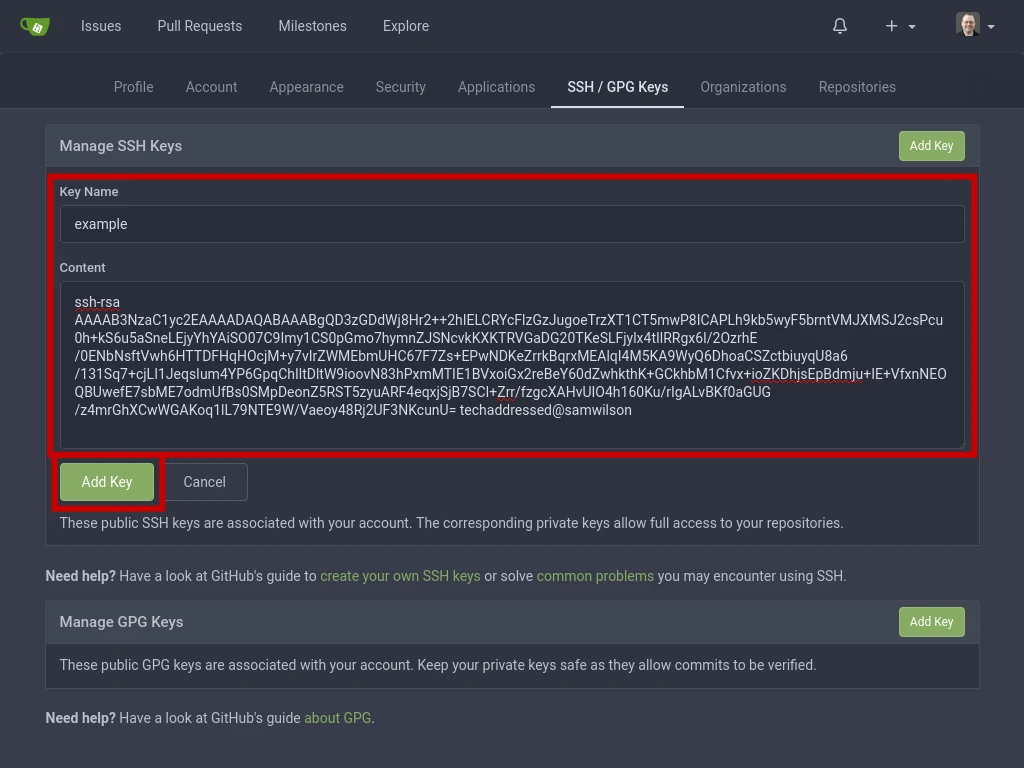
Next, you’ll need to copy your public SSH key into the clipboard in order to be able to paste it into Gitea. Make sure you’re using the public key that ends in .pub and not your private key that doesn’t have a file extension.
To display your key, from the terminal run this command:
cat ~/.ssh/example.pubThe output should be similar to this. With the public key displayed, highlight the entire key and copy it to the clipboard.

Back in Gitea, enter the key name in the KEY NAME box and paste your public key into the CONTENT box. Next click the green ADD KEY button under where you’ve pasted your key in.
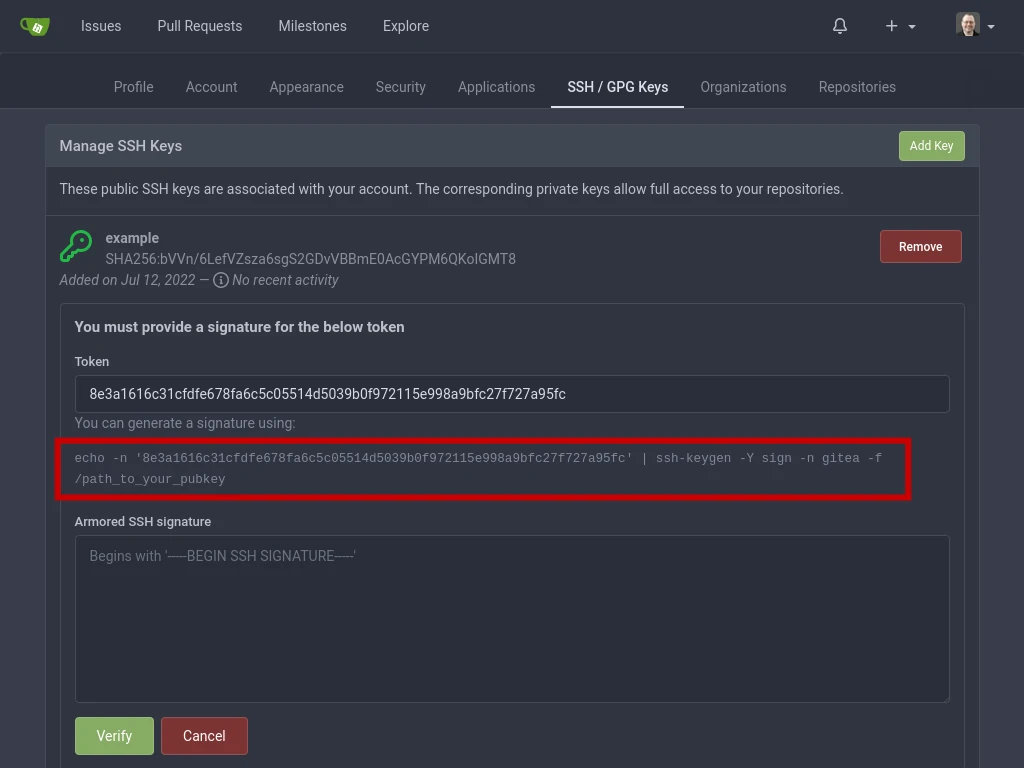
SSH Key Verification
Next, you should verify your SSH key with Gitea.
To begin verification, click the green VERIFY button. Please note that once you begin the verification process you’ll need to complete it relatively quickly as this process does timeout if you take too long, causing you to have to restart the verification process.

In the screenshot below you’ll see that I’ve highlighted a terminal command. Copy this command into your terminal – be sure to change the part at the end that says /path_to_your_pubkey to actually be the path to your public key file.
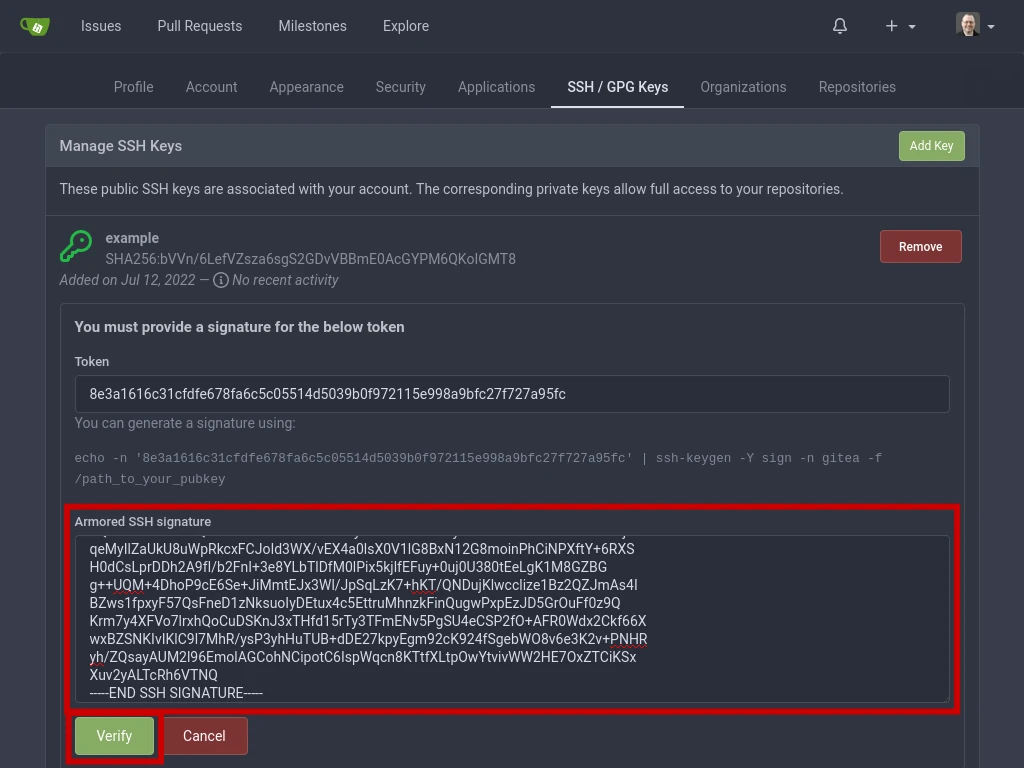
Your terminal will look similar to this example if you’ve done it correctly. You need to copy this entire SSH signature, starting from —–BEGIN SSH SIGNATURE —– all the way to —–END SSH SIGNATURE—– to the clipboard.

Paste the signature into the ARMORED SSH SIGNATURE box and click the green VERIFY button.
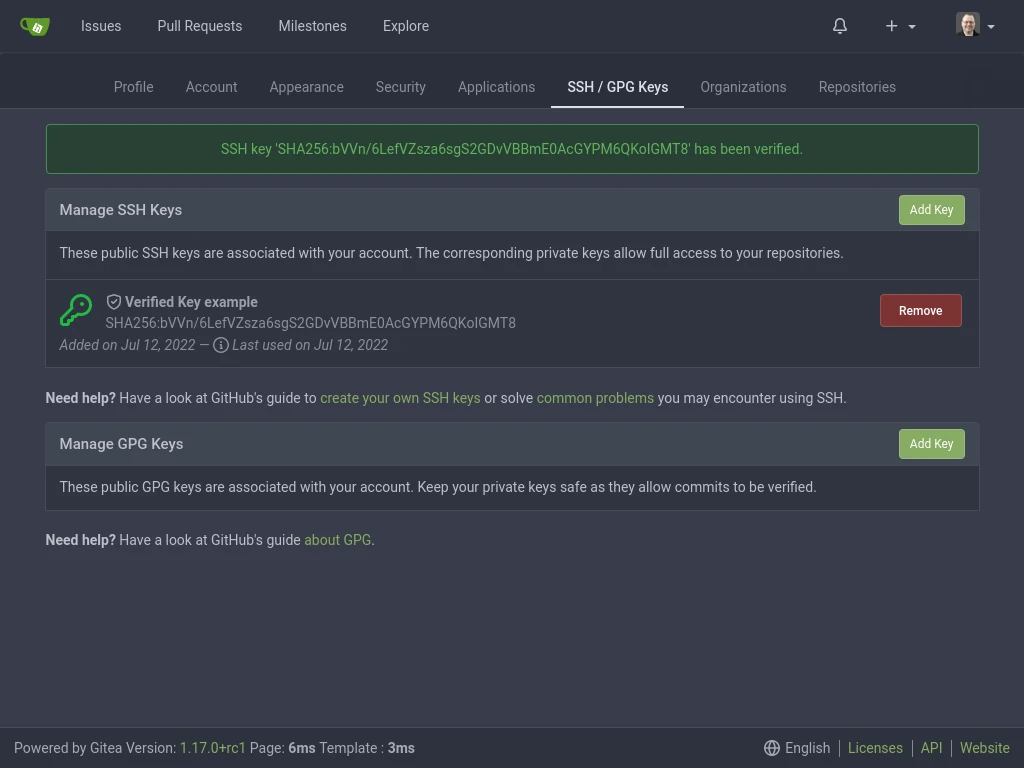
Congrats! Your Gitea SSH key should now be verified and ready to use.
Conclusion
If you found this tutorial helpful and would like to support our efforts to create additional resources like this, please consider making a donation. Your support is greatly appreciated!
If you can’t make a donation, please consider sharing this tutorial with others who may be interested. If you have questions about anything regarding this tutorial, please be sure to leave them in the comments below. Thanks for reading, and I hope you visit again soon!


Hi Robert,
Thanks for this tutorial, I have followed step by step and works fine when copy this command “echo -n ‘16720b…ba5c3’ | ssh-keygen -Y sign -n gitea -f ../.ssh/id_rsa.pub” into linux terminal like (Ubuntu or Debian or Raspbian) but on my MacBook Pro with High Sierra IOS, doesn’t works and terminal shows me “ssh-keygen: illegal option — Y”
Do you know how I can execute this command in my High Sierra MacBook?
Thanks and best regards
Hey Cesario … apologies it’s taken a few days to see your comment. I don’t have a Mac available to me but I’ll reach out to some friends and see if any of them are able to help find an answer.
The consensus I’m getting from people I was able to consult with is that your version of ssh-keygen doesn’t include this option. It’s been 15+ years since I’ve last worked on a Mac. If you can somehow update your version of ssh-keygen (possibly using homebrew) that would resolve the issue. Short of that, I’d look into opening an issue with the developers requesting how they’d like this to be done on older versions of MacOS.
https://github.com/go-gitea/gitea
hi Cesario
please forgive me, I do not wish to ask stupid questions.
I hate to ask, but could it be a copy and paste error, in the past when using OSX found that some characters wouldn’t paste as intended, I’m sure if it’s an encoding issues with Linux/OSX.
also on your comment there is a space between – and Y also the – looks longer on my screen than the one higher up in the “ssh-keygen -Y” part of your comment.
finally is the version of ssh on OSX does it have a -Y command line parameter
$ ssh-keygen –help