CrowdSec is an innovative tool that I find incredibly helpful for protecting my own Linux servers as well as the servers I manage for others. It helps you detect and prevent threats on your Linux system in real-time by implementing a community / crowd-sourced approach to threat intelligence. When the CrowdSec agent identifies a potential threat, the boucners you deploy then protect your system from the attack. As the developers describe it, CrowdSec is not your typical Fail2Ban clone.
In this tutorial, we’ll step through the process of installing and configuring CrowdSec on your choice of Linux distributions – such as Debian, Ubuntu, RedHat Enterprise Linux, and more. Additionally, I’ve personally tested the installation procedures for each of these distros to ensure that they work as intended.
To make the tutorial as accessible as possible while providing as much information as possible, I have implemented a “Choose Your Own” format to provide exactly the tutorial you want. Why have a half-dozen separate tutorials or more when you can put everything into one and still make it easy to use. Simply select which distro you’re deploying to, choose whether you’d prefer to use the official install script or to manually setup the necessary package repositories for installing CrowdSec.
Filter distros By Package Type
Select Your Distro
Script Or Manual Setup?
- Choosing SCRIPT provides instructions using curl | bash to run a setup script for the CrowdSec repository.
- Choosing MANUAL involves setting up the necessary package repository yourself.
Before We Begin
A few quick notes before we begin the tutorial.
- This tutorial assumes you’re using a non-root account to access your Linux based system. For this reason, all examples make use of sudo. If you are using the root account, you really should setup a non-root account.
- This tutorial assumes you know how to access your Linux based system – either directly or remotely via SSH.
- Where necessary, this tutorial uses the nano text editor, though, any editor you’d prefer to use will work.
That’s it. We’re ready to go!
DEB BASED DISTROS (Debian / Ubuntu)
Installing CrowdSec on Debian / Ubuntu / Raspberry Pi OS is a straightforward process that can be completed in a matter of minutes. This tutorial will guide you through the process of setting up the necessary package repository, installing the CrowdSec agent, installing your first bouncer, adding your IPs to a whitelist, and discussing the CrowdSec Web Console.
Officially Supported Configurations
Before modifying your system, it’s important to know in advance exactly which distro versions are officially supported by CrowdSec and on what CPU architectures. Refer to the table, below, for full details.
| VERSION | CODE NAME | CPU TYPES |
|---|---|---|
| 12 | Bookworm | amd64 (x86) arm64 (aarch64) armhf (aarch32) |
| 11 | Bullseye | amd64 (x86) arm64 (aarch64) armhf (aarch32) |
| 10 | Buster | amd64 (x86) arm64 (aarch64) armhf (aarch32) |
| VERSION | CODE NAME | CPU TYPES |
|---|---|---|
| 22.10 | Kinetic | amd64 (x86) arm64 (aarch64) |
| 22.04 | Jammy | amd64 (x86) arm64 (aarch64) |
| 20.04 | Focal | amd64 (x86) arm64 (aarch64) |
| 18.04 | Bionic | amd64 (x86) arm64 (aarch64) |
| 16.04 | Xenial | amd64 (x86) arm64 (aarch64) |
| VERSION | CODE NAME | CPU TYPES |
|---|---|---|
| 11 | Bullseye | amd64 (x86) armhf (aarch32) |
| 10 | Buster | amd64 (x86) armhf (aarch32) |
Considering that many .deb based Linux distros are derived from both Debian and Ubuntu, there’s a strong likelihood that you can get CrowdSec working on some of those unsupported distros – though there’s no guarantees.
If you’re using an ARM based system, it’s also important to note that not every distro has both 32 bit and 64 bit packages available.
Ubuntu users on 32 bit ARM based systems should note that even though Ubuntu has a 32 bit OS available, CrowdSec doesn’t have a package available for 32 bit Ubuntu.
Raspberry Pi OS (Raspbian) users on 64 bit versions of the OS should note that even though Raspbian has a 64 bit OS available, CrowdSec doesn’t have a package available for 64 bit Raspbian.
Lastly, with regards to supported distros – while newer versions of Debian / Raspberry Pi OS have CrowdSec available in their own repositories, this package tends to not be the most recent version available. At the time of creating this tutorial, the most recent version is 1.4.6 while Debian / Raspberry Pi OS only has version 1.4.2 for Bookworm and version 1.0.9 for Bullseye. Therefore, it is advisable to use the version found in CrowdSec’s repository.
Please note – while I plan to keep the information in this tutorial updated as new versions are supported / old versions are removed, a general rule to keep in mind on whether or not a specific version of Debian / Ubuntu / Raspberry Pi OS has support for CrowdSec – in the event that you’re reading this before I’ve been able to update and these tables are no longer current – is whether that version is still receiving official support from the distro maintainers.
Script-Based Setup
You’ve opted for the easier script-based method of setting up the CrowdSec package repository for Debian / Ubuntu / Raspberry Pi OS based systems.
Prerequisites
Before you do anything else, it’s always a smart idea to make sure your operating system / software is completely up-to-date.
sudo apt update && sudo apt dist-upgrade -yIf any updates that require a reboot, such as a new Linux kernel version, were installed, be sure to reboot your system before proceeding.
sudo rebootNext, ensure that the packages you need to complete this tutorial are installed. If you don’t wish to use the nano editor because you prefer a different editor, you can omit it from the list of packages.
sudo apt install curl nano -yOnce all of the required packages are installed / configured properly, you’re ready to move on to setting up the CrowdSec package repository.
Run The Repository Setup Script
Run the following command to download and execute the CrowdSec repository setup script.
curl -s https://packagecloud.io/install/repositories/crowdsec/crowdsec/script.deb.sh | sudo bashOnce the script has completed, you’re ready to move on to installing the CrowdSec agent.
Manual Setup
You’ve opted to eschew the ease of running the available setup script and, instead, opted for a manual setup up the CrowdSec package repository.
Prerequisites
Before you do anything else, it’s always a smart idea to make sure your operating system / software is completely up-to-date.
sudo apt update && sudo apt dist-upgrade -yIf any updates that require a reboot, such as a new Linux kernel version, were installed, be sure to reboot your system before proceeding.
sudo rebootNext, ensure that the packages you need to complete this tutorial are installed. If you don’t wish to use the nano editor because you prefer a different editor, you can omit it from the list of packages.
sudo apt install curl gnupg apt-transport-https nano debian-archive-keyring -ysudo apt install curl gnupg apt-transport-https nano -yOnce the required packages are installed, you’re ready to move on to setting up the CrowdSec package repository.
Repository Setup
To setup the CrowdSec package repository manually, first ensure that your system has a keyrings folder in place. This is where the key that is used to digitally sign the repository is stored.
sudo mkdir -p /etc/apt/keyrings/Next, install the repository’s key.
curl -fsSL https://packagecloud.io/crowdsec/crowdsec/gpgkey | gpg --dearmor > ~/crowdsec_crowdsec-archive-keyring.gpgNow, move the key into the previously created keyring folder.
sudo mv ~/crowdsec_crowdsec-archive-keyring.gpg /etc/apt/keyrings/With the key for the repository in place, you need to tell the operating system about the repository. To do this, you need to create an apt source file inside nano or the editor of your choice.
sudo nano /etc/apt/sources.list.d/crowdsec_crowdsec.listCopy and paste the following information into the open editor.
deb [signed-by=/etc/apt/keyrings/crowdsec_crowdsec-archive-keyring.gpg] https://packagecloud.io/crowdsec/crowdsec/distro codename main
deb-src [signed-by=/etc/apt/keyrings/crowdsec_crowdsec-archive-keyring.gpg] https://packagecloud.io/crowdsec/crowdsec/distro codename main
Take note where I have the words DISTRO and CODENAME. You need to replace these with the appropriate information for your system. For example, if you’re running Debian Bullseye on your system, you’d change the distro to debian and the codename to bullseye. If necessary, refer back to the table at the beginning of this tutorial for information on your distro version’s codename.
Once you’ve got the proper distro and version specified, save the file by pressing CTRL + O and then ENTER to confirm, then press CTRL + X to exit nano.
Once your apt source file is saved, it’s time to update the package information on the system.
sudo apt updateIf this completed without any errors, you’re ready to move on to installing the CrowdSec agent. If, however, you received an error during the update, double check that you have the key file installed properly and that your apt source file is correct.
RPM Based Distros (RHEL / CentOS)
Installing CrowdSec on RedHat Enterprise Linux / CentOS Stream versions 8 and up is a straightforward process that can be completed in a matter of minutes. This tutorial will guide you through the process of setting up the necessary package repository, installing the CrowdSec agent, installing your first bouncer, adding your IPs to a whitelist, and discussing the CrowdSec Web Console.
Officially Supported Configurations
Before modifying your system, it’s important to know in advance exactly which distro versions are officially supported by CrowdSec and on what CPU architectures. Refer to the table, below, for full details.
| DISTRO | CPU TYPES |
|---|---|
| RHEL 9 | amd64 (x86) arm64 (aarch64) |
| RHEL 8 | amd64 (x86) arm64 (aarch64) |
| CentOS Stream 9 | amd64 (x86) arm64 (aarch64) |
| CentOS Stream 8 | amd64 (x86) arm64 (aarch64) |
| DISTRO | CPU TYPES |
|---|---|
| CloudLinux 9 | amd64 (x86) |
| CloudLinux 8 | amd64 (x86) |
| DISTRO | CPU TYPES |
|---|---|
| Amazon Linux 2 | amd64 (x86) arm64 (aarch64) |
Considering that many .rpm based Linux distros are derived from RedHat Enterprise Linux, there’s a likelihood that you can get CrowdSec working on some of those unsupported distros – though there’s no guarantees.
One exception I will mention, however, of a .rpm based distro that does not work at this time is Fedora. I’ve tried installing CrowdSec both via script and manually and run into problems either way that it fails to start. If I ever find that this problem has been resolved, I’ll be sure to update this tutorial.
Please note – while I plan to keep the information in this tutorial updated as new versions are supported / old versions are removed, a general rule to keep in mind on whether or not a specific version of RHEL / CentOS / etc… has support for CrowdSec – in the event that you’re reading this before I’ve been able to update and these tables are no longer current – is whether that version is still receiving official support from the distro maintainers.
Script-Based Setup
You’ve opted for the easier script-based method of setting up the CrowdSec package repository for RHEL / CentOS Stream / etc… based systems.
Prerequisites
Before you do anything else, it’s always a smart idea to make sure your operating system / software is completely up-to-date.
sudo dnf update -ysudo yum update -yIf any updates that require a reboot, such as a new Linux kernel version, were installed, be sure to reboot your system before proceeding.
sudo rebootNext, ensure that the packages you need to complete this tutorial are installed. If you don’t wish to use the nano editor because you prefer a different editor, you can omit it from the list of packages.
sudo dnf install curl python3-gpg nano -ysudo yum install curl nano -yOnce all of the required packages are installed / configured properly, you’re ready to move on to setting up the CrowdSec package repository.
Run The Repository Setup Script
Run the following command to download and execute the CrowdSec repository setup script.
curl -s https://packagecloud.io/install/repositories/crowdsec/crowdsec/script.rpm.sh | sudo bashOnce the script has completed, you’re ready to move on to installing the CrowdSec agent.
Manual Setup
You’ve opted to eschew the ease of running the available setup script and, instead, opted for a manual setup up the CrowdSec package repository.
Prerequisites
Before you do anything else, it’s always a smart idea to make sure your operating system / software is completely up-to-date.
sudo dnf update -ysudo yum update -yIf any updates that require a reboot, such as a new Linux kernel version, were installed, be sure to reboot your system before proceeding.
sudo rebootNext, ensure that the packages you need to complete this tutorial are installed. If you don’t wish to use the nano editor because you prefer a different editor, you can omit it from the list of packages.
sudo dnf install curl python3-gpg yum-utils nano -ysudo yum install curl pygpgme yum-utils nano -yOnce the required packages are installed, you’re ready to move on to setting up the CrowdSec package repository.
Repository Setup
To setup the CrowdSec package repository manually, you need to tell the operating system about the repository. To do this, you need to create a repo file using nano or the editor of your choice.
sudo nano /etc/yum.repos.d/crowdsec_crowdsec.repoCopy and paste the following information into the open editor.
[crowdsec_crowdsec]
name=crowdsec_crowdsec
baseurl=https://packagecloud.io/crowdsec/crowdsec/el/X/$basearch
repo_gpgcheck=1
gpgcheck=1
enabled=1
gpgkey=https://packagecloud.io/crowdsec/crowdsec/gpgkey
       https://packagecloud.io/crowdsec/crowdsec/gpgkey/crowdsec-crowdsec-B78D1222C9AD2D5D.pub.gpg
       https://packagecloud.io/crowdsec/crowdsec/gpgkey/crowdsec-crowdsec-FED78314A2468CCF.pub.gpg
       https://packagecloud.io/crowdsec/crowdsec/gpgkey/crowdsec-crowdsec-EDE2C695EC9A5A5C.pub.gpg
sslverify=1
sslcacert=/etc/pki/tls/certs/ca-bundle.crt
metadata_expire=300

[crowdsec_crowdsec-source]
name=crowdsec_crowdsec-source
baseurl=https://packagecloud.io/crowdsec/crowdsec/el/X/SRPMS
repo_gpgcheck=1
gpgcheck=1
enabled=1
gpgkey=https://packagecloud.io/crowdsec/crowdsec/gpgkey
       https://packagecloud.io/crowdsec/crowdsec/gpgkey/crowdsec-crowdsec-B78D1222C9AD2D5D.pub.gpg
       https://packagecloud.io/crowdsec/crowdsec/gpgkey/crowdsec-crowdsec-FED78314A2468CCF.pub.gpg
       https://packagecloud.io/crowdsec/crowdsec/gpgkey/crowdsec-crowdsec-EDE2C695EC9A5A5C.pub.gpg
sslverify=1
sslcacert=/etc/pki/tls/certs/ca-bundle.crt
metadata_expire=300
[crowdsec_crowdsec]
name=crowdsec_crowdsec
baseurl=https://packagecloud.io/crowdsec/crowdsec/el/6/$basearch
repo_gpgcheck=1
gpgcheck=1
enabled=1
gpgkey=https://packagecloud.io/crowdsec/crowdsec/gpgkey
https://packagecloud.io/crowdsec/crowdsec/gpgkey/crowdsec-crowdsec-B78D1222C9AD2D5D.pub.gpg
https://packagecloud.io/crowdsec/crowdsec/gpgkey/crowdsec-crowdsec-FED78314A2468CCF.pub.gpg
https://packagecloud.io/crowdsec/crowdsec/gpgkey/crowdsec-crowdsec-EDE2C695EC9A5A5C.pub.gpg
sslverify=1
sslcacert=/etc/pki/tls/certs/ca-bundle.crt
metadata_expire=300
[crowdsec_crowdsec-source]
name=crowdsec_crowdsec-source
baseurl=https://packagecloud.io/crowdsec/crowdsec/el/6/SRPMS
repo_gpgcheck=1
gpgcheck=1
enabled=1
gpgkey=https://packagecloud.io/crowdsec/crowdsec/gpgkey
https://packagecloud.io/crowdsec/crowdsec/gpgkey/crowdsec-crowdsec-B78D1222C9AD2D5D.pub.gpg
https://packagecloud.io/crowdsec/crowdsec/gpgkey/crowdsec-crowdsec-FED78314A2468CCF.pub.gpg
https://packagecloud.io/crowdsec/crowdsec/gpgkey/crowdsec-crowdsec-EDE2C695EC9A5A5C.pub.gpg
sslverify=1
sslcacert=/etc/pki/tls/certs/ca-bundle.crt
metadata_expire=300Take note where I have X in the BASEURL. You need to replace this with the appropriate version of your operating system. For example, if you’re running RHEL 9 on your system, you’d change the X to 9.
When you’re ready, save the file by pressing CTRL + O and then ENTER to confirm, then press CTRL + X to exit nano. Once your repo file is saved, it’s time to enable it on the system.
sudo dnf -q makecache -y --disablerepo='*' --enablerepo='crowdsec_crowdsec'
sudo dnf -q makecache -y --disablerepo='*' --enablerepo='crowdsec_crowdsec-source'
sudo yum -q makecache -y --disablerepo='*' --enablerepo='crowdsec_crowdsec'
sudo yum -q makecache -y --disablerepo='*' --enablerepo='crowdsec_crowdsec-source'If this completed without any errors, you’re ready to move on to installing the CrowdSec agent. If, however, you received an error during the update, double check that your repo file is correct.
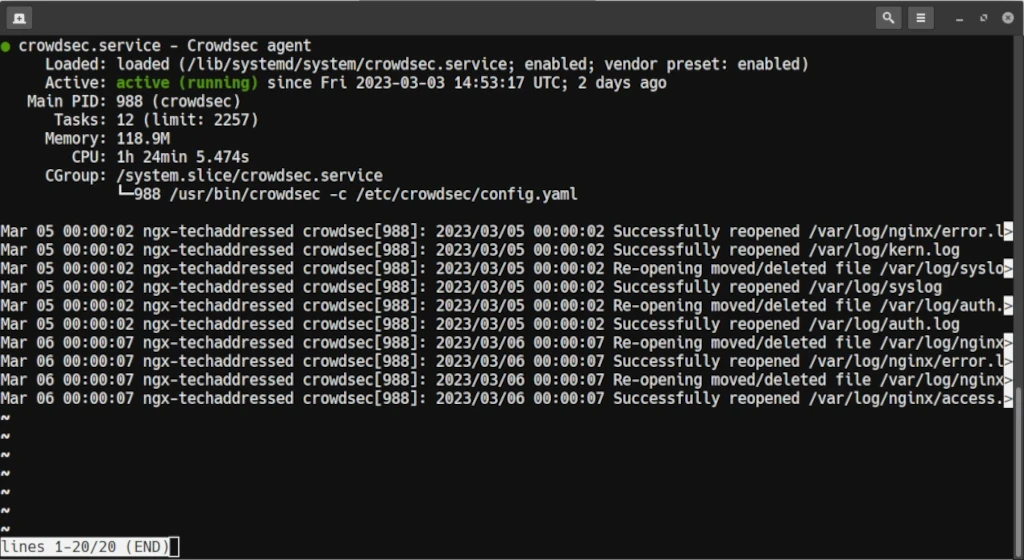
Agent Installation
With your system configured with the necessary package repository, installing the CrowdSec agent is simple.
sudo apt install crowdsec -ysudo dnf install crowdsec -ysudo yum install crowdsec -yOnce the package installation is complete, verify that the Crowdsec agent is active.
sudo systemctl status crowdsecIf everything is working properly, it should look similar to this.
With the agent installed and working, you’re ready to install bouncers.
Bouncer installation
Now that you’ve got the CrowdSec agent installed on your system, you’re ready to setup bouncers.
While most CrowdSec bouncers are installed directly to your server, like demonstrated below, there are a few – most notably the WordPress bouncer – that are not.
Additionally, some bouncers have dependencies that you’ll need to ensure are satisfied before installing. Details on the bouncer packages and their dependencies can be found in the CrowdSec bouncers hub.
To install a bouncer, simply find the desired bouncer from the hub, linked above, and install using your package manager, as shown here.
sudo apt install crowdsec-firewall-bouncer-iptables -ysudo dnf install crowdsec-firewall-bouncer-iptables -ysudo yum install crowdsec-firewall-bouncer-iptables -yAs you might imagine, webservers and reverse proxies are great places to deploy CrowdSec. There are bouncers for Nginx, PHP, and Cloudflare – just to name a few.
Whitelist Your IP Addresses
Now that you’ve completed your software installs, you want to be sure to setup a whiltelist of your own IP addresses so you don’t accidentally lock yourself out of the system. Take it from me, this can and likely will happen at some point if you don’t. Next thing you know, you need local console access to the system to fix it, which is less than convenient.
Out-of-the-box, CrowdSec includes a whitelists.yaml file that includes your standard local IP ranges.
- 192.168.0.0/16
- 172.16.0.0/12
- 10.0.0.0/8
- 127.0.0.1
- ::1
If your server is on your local network, you should be already good to go. However, if your server is in the cloud or you use an IP range that’s outside of the pre-defined defaults, you’ll need to create a custom whitelist. To do this we’re going to create a mywhitelists.yaml file.
sudo nano /etc/crowdsec/parsers/s02-enrich/mywhitelists.yamlCopy and paste the following configuration into the file.
name: crowdsecurity/whitelists
description: "Whitelist events from my ip addresses"
whitelist:
  reason: "my ip addresses / ranges"
#  ip:
#    - "x.x.x.x"
#  cidr:
#    - "x.x.x.x/xx"
Uncomment either the IP and/or CIDR lines and replace the x‘s. If you need to whitelist multiple addresses or ranges, each gets its own line. Once you’ve made all the necessary changes, press CTRL + O then ENTER to save, then CTRL + X to exit nano.
Lastly, reload CrowdSec for your whitelist to take effect.
sudo systemctl reload crowdsecOnce that’s complete, your custom whitelist should be applied. There are more advanced options for setting up whitelists for CrowdSec, such as creating a whitelist based on a user agent string, however I won’t be covering those configurations in this tutorial.
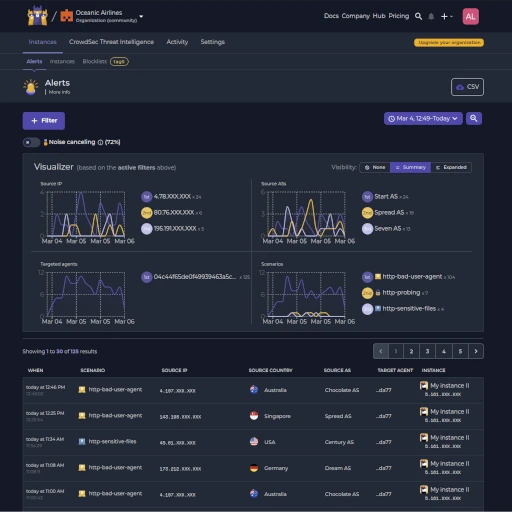
CrowdSec Web Console
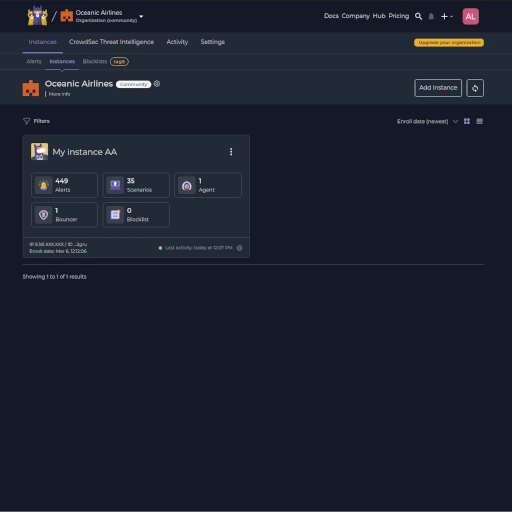
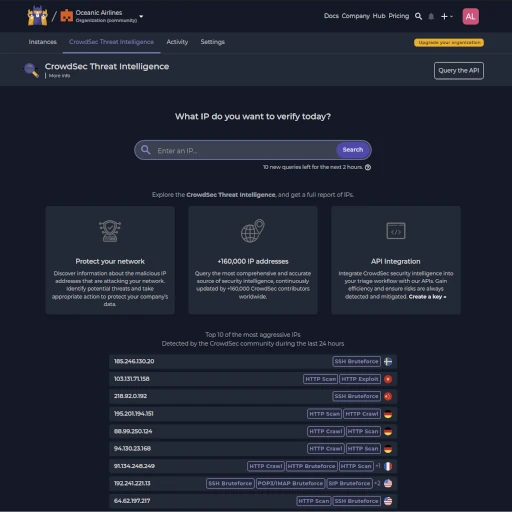
The CrowdSec web console is a user-friendly dashboard that provides a centralized view of security events detected by the CrowdSec agents and intelligence tools such as a database of every IP address that has been reported by the global network of systems with CrowdSec agents deployed and a new Blocklists feature that allows you to add additional curated lists of bad actors to your systems.
Use of the web console is completely optional. You can choose to deploy CrowdSec to your systems without registering an account on the web client if you choose. Use of the web console is 100% free and signing up only takes a few moments.
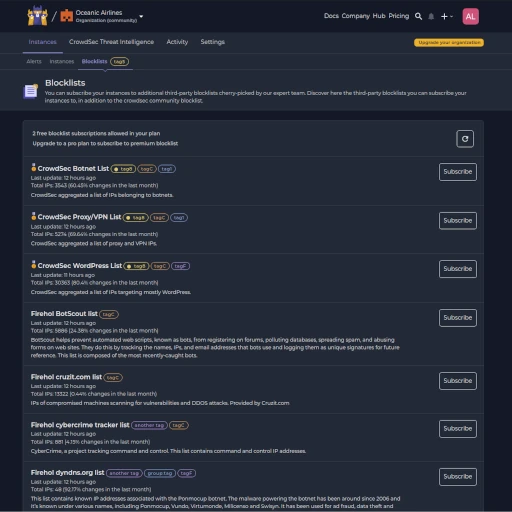
With your free community account, CrowdSec provides free access to two non-premium blocklists of your choice. Upgrading to a paid enterprise plan allows enables access to these additional blocklists as well as other benefits such as increased data retention, additional users, and additional IP intelligence searches beyond the standard 50 queries allowed per day.
Enrolling An Instance
Enrolling one of your CrowdSec agent instances into your web console account is easy.
From the Instances page, click the ADD INSTANCE button.
This will give you a command to run in the terminal on your system. Simply copy / paste.

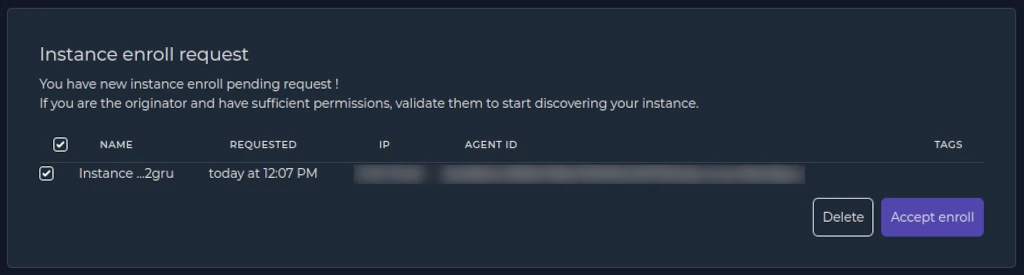
Once that’s complete, go back and refresh your web console and you’ll be asked to accept the enrollment. Do so by clicking the blue ACCEPT ENROLL button.
Lastly, once you’ve accepted the enrollment, restart CrowdSec on the newly enrolled system.
sudo systemctl restart crowdsecAnd that’s it! Super easy.
Wrapping Up
Congratulations on completing this tutorial and for taking steps to improve the security of your public facing Linux systems. By joining the CrowdSec community, you are not only benefiting from its cutting-edge threat detection and prevention capabilities, but also contributing to the community’s collaborative approach to cybersecurity through its crowd-sourced threat intelligence sharing.
Remember, even though you’ve deployed a really useful tool to help keep your system secure, that system security is an ongoing process and not just something that is solved by deploying a tool. Please be sure to keep your system updated and monitor your logs and the web console regularly to stay on top of potential threats.
With all of that said, what are your thoughts on this “Choose Your Own” tutorial format? It is intended to help anyone looking to deploy CrowdSec on Linux in the manner they’d prefer as quickly and easily as possible. If you have any feedback you’d like to share, or suggestions for future tutorials that could benefit from this format, I’d love to hear from you about it. Please respond with your feedback in the comments section, below.
If you found this tutorial helpful and would like to support our efforts to create additional resources like this, please consider making a donation. Your support is greatly appreciated!
If you can’t make a donation, please consider sharing this tutorial with others who may be interested. If you have questions about anything regarding this review, please be sure to leave them in the comments below. Thanks for reading, and I hope you visit again soon!