If you run multiple services on your network – especially using Docker – hosting a Nginx reverse proxy is an invaluable tool for making accessing those services easier. With this guide, you’ll have Nginx setup and configured in no time.
While the bulk of the information regarding configuring Nginx will apply to any Nginx install, the scripts / instructions specific to installing the software will only work on Debian / Ubuntu.
Before We Begin
Important information you need before you proceed.
Prerequisites
There are a few things you’ll need to have in advance to complete this tutorial.
- You need a domain / subdomain to be proxied. If you haven’t already registered a domain and need a registrar, I highly recommend Namecheap (affiliate) as an affordable registrar. Every domain includes the option for free private registration – nobody wants to get harassed because their domain info is public and you shouldn’t have to pay extra for the privilege.
- You need to know how to configure DNS for your domains / subdomains.
- You need somewhere to host your reverse proxy – either in your own network or in the cloud. If you’re in need of a cloud server, I can personally recommend both Linode (affiliate) and DigitalOcean (affiliate) as quality service providers.
If you’re proxying to services inside your own network, putting your proxy in the cloud is worth considering. Instead of DNS pointing to your home IP address it points to the cloud proxy – no need to reveal your IP address to the public. I do exactly this for the services I host in my own homelab.
Let me know in the comments, below, if you’re interested in knowing how I do this without having to open up firewall ports on my home network.
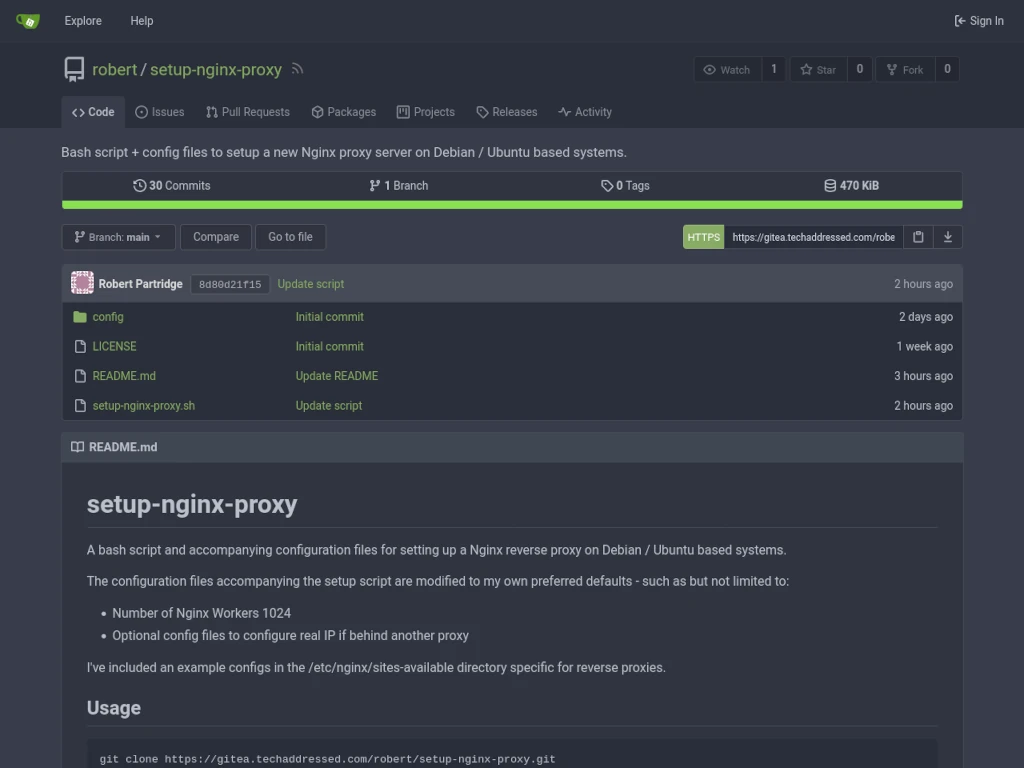
Git REpository
This tutorial makes use of a bash script and configuration files I’ve collected into a git repository specifically for the use when setting up a Nginx reverse proxy.
I hate duplicating effort. You could also say that I have a preference for automating tasks – especially tasks that I’m going to end up doing multiple times, like server configurations. Simply put – I don’t want to do things manually every time I need to setup a reverse proxy. Taking this approach saves me time and ensures that I don’t screw something up.
Because I’ve already tested that this system works as intended, I can be relatively certain that future systems deployed using this method are going to work.
If you’re the type that likes to know all the details of how to do something – I get you. I go over the heart of the script for those who’d prefer to do things themselves.
If you find yourself wondering what is happening or why I’ve done something the way I’ve done it – please leave a comment below on this tutorial and I will do my absolute best to explain. I’m always open to answering questions.
With that said – let’s get started.
Cloning The Repository
Before you can clone the git repository, you’ll need to ensure that git is installed on your system.
sudo apt install git -yOnce you’re certain git is installed, clone the repository to your system with this command.
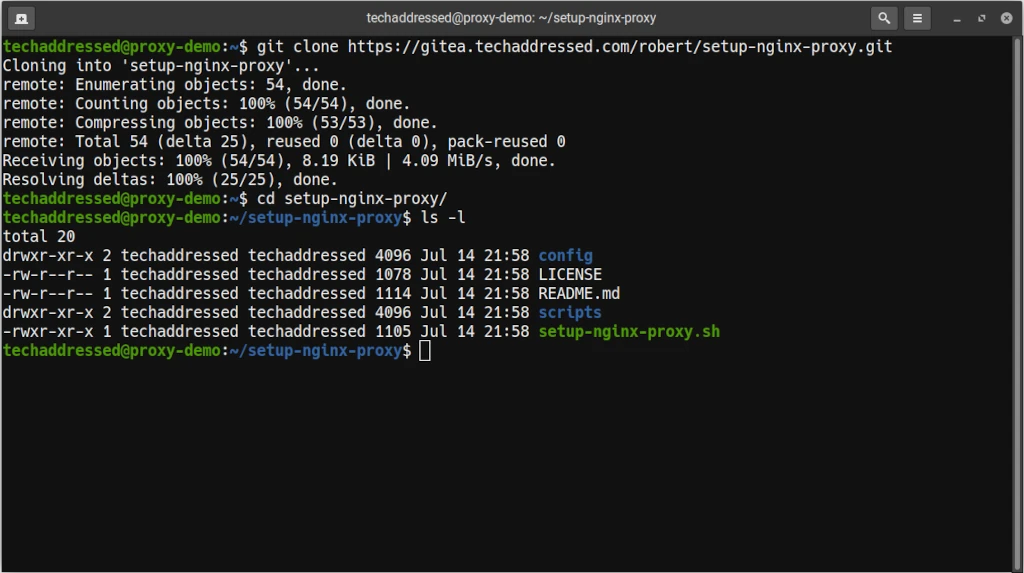
git clone https://forge.techaddressed.com/robert/setup-nginx-proxy.gitNext change to the directory that was created.
cd setup-nginx-proxyIf you take a listing of the files, you should see they match the files in the git repository.
ls -lWhen you’re done, your terminal should look similar to this.
Run The Setup Script
From the setup-nginx-proxy directory you’re able to run the setup-nginx-proxy.sh script. Important – the script checks if you’ve run it with root privileges so be sure you use sudo if you’re not already root.
sudo ./setup-nginx-proxy.shThe script will check for root permissions. If you forget it will tell you.
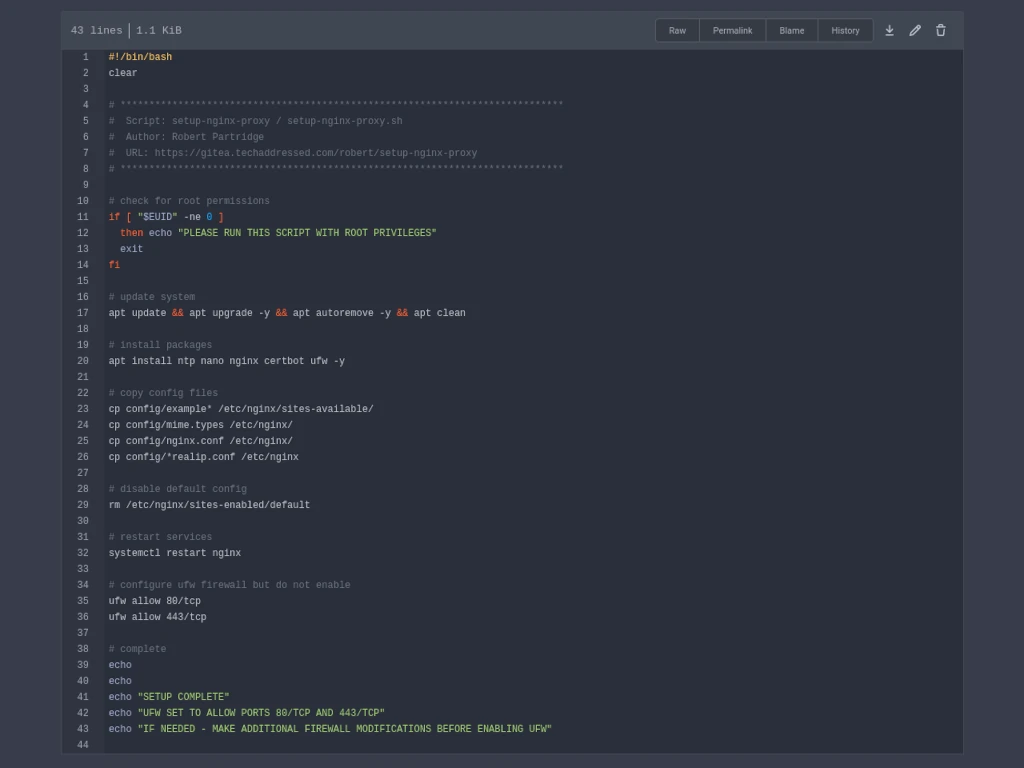
Setup Script Basics
Besides deploying my custom configuration files, the setup script does three basic things.
1 – Update The System
sudo apt update && sudo apt upgrade -y && sudo apt autoremove -y && sudo apt clean2 – Install Packages
sudo apt install ntp nginx certbot ufw -yYou can opt to not install certbot if you intend to obtain SSL certificates from another source.
3 – Setup Firewall Ports
sudo ufw allow 80/tcp
sudo ufw allow 443/tcp
Firewall
While the script has specified ports to open in the firewall, I intentionally left out enabling the firewall. If you have additional ports that need configured – such as your SSH port (default is port 22) that allows you to remotely access the system – you’ll want to be sure they’re configured before you enable the firewall.
Once you’re ready, enable the firewall with this command.
sudo ufw enableHaving the software installed and telling UFW what ports to allow will only get you so far.
Configuration Files
As I’ve mentioned, the setup script copies into place my modified and custom config files that I deploy with my systems – saving me from having to setup the configurations myself. If you’ve opted to use my config files, they can save you some headache – especially the real ip configs.
Here are some brief details the config files.
mime.types
Implementing my updated mime.types file isn’t really necessary if your Nginx system is only ever going to function as a reverse proxy. I install my modified mime.types file anyway because there’s always a chance that a the system might end up also becoming a web server.
The modifications I’ve made to this file are mostly for supporting web font mime types. Like I said – this isn’t entirely necessary, but if you ever end up using the system as more than a proxy it can be useful.
nginx.conf
My modified nginx.conf file increases the number of Nginx worker connections to 1024 – allowing for improved performance without becoming overwhelming on other system resources – as well as increases the client max body size to 8MB – allowing for larger content requests than the default.
Additionally, I have setup – yet disabled – two additional optional config files you can use if your system is behind another reverse proxy to ensure the proper source IP address is forwarded to your servers – nginx-cloudflare-realip.conf and nginx-internal-realip.conf.
*-realip.conf
As I just mentioned above, I have setup three optional config files for use behind another reverse proxy. Without the necessary real IP configuration in place your server logs will show all of it’s traffic as having originated with the previous reverse proxy instead of the originating IP.
To enable one of these configs, uncomment the appropriate line in nginx.conf. Here’s a quick explanation on when to use which config.
nginx-cloudflare-realip.conf
This one is simple enough to explain. Enable this configuration if your reverse proxy is behind Cloudflare’s reverse proxy.
nginx-internal-realip.conf
Enable this configuration if – for some reason – your reverse proxy is behind another reverse proxy on your private 10.x.x.x, 172.x.x.x, or 192.168.x.x network. More often I use this config for web servers behind a reverse proxy than on a reverse proxy system.
Example Configurations
Now comes the really important part of setting up your system – setting up server blocks. My setup script places two example files in the /etc/nginx/sites-available directory that you can use as templates for configuring your server.
I explain how to use one of these two files, example-redirect-80, below. This example shows how to setup your reverse proxy such that unencrypted HTTP on port 80 gets redirected over to encrypted HTTPS on port 443. The other file, example-standard, works in the same basic way but without the redirect.
example-redirect-80
Let’s start by examining the configuration example. I’ve commented out the lines in this configuration that need modification so that they’re easily identified when you’re working with the example file on your server. Be sure to uncomment them after you make adjustments.
Let’s quickly go over what needs modified.
server {
    listen 80;
#    server_name www.yourdomain.ext yourdomain.ext;
    return 301 https://$host$request_uri;
}

server {
    listen 443 ssl http2 ;
#    server_name www.yourdomain.ext yourdomain.ext;

    http2_push_preload on;

#    ssl_certificate /etc/letsencrypt/live/yourdomain.ext/fullchain.pem;
#    ssl_certificate_key /etc/letsencrypt/live/yourdomain.ext/privkey.pem;

    add_header Strict-Transport-Security "max-age=31536000";

    location / {
        proxy_set_header X-Forwarded-Host $host:$server_port;
        proxy_set_header X-Forwarded-Server $host;
        proxy_set_header X-Forwarded-For $proxy_add_x_forwarded_for;
        proxy_pass_request_headers on;
#        proxy_pass http://localhost:####;
#        proxy_pass http://###.###.###.###:####;
    }
}
yourdomain.ext
Anywhere you see www.yourdomain.ext or yourdomain.ext should be replaced with whatever domain you’re setting up on the server.
If, for example, you’re setting up a proxy for what I’ll term a primary domain – techaddressed.com for example – it’s probably best you setup both the domain and the www subdomain wherever you specify a server_name, as I’ve shown in the example, to account for the large number of people who insist on typing in www for any website as if it were a requirement for it to work.
If you’re using a subdomain – like forge.techaddressed.com – you only need to specify the subdomain itself.
#### / ###.###.###.###:####
Anywhere you see a series of pound signs / number signs / hash marks – pick which name you prefer – is meant to represent a digit. In this example, you’ll either be specifying a port number or an IP address and port number – as you’ll notice on the proxy_pass lines.
Which Proxy Pass To Use
I’ve specifyied two separate proxy_pass lines in the example configuration but you should only ever use ONE of these – not both. Uncomment only the line appropriate to your needs.
If you’re proxying to a service that’s hosted on the same server as the reverse proxy – for example a service running in a Docker container – use the proxy_pass to localhost.
If you’re proxying to something on an entirely different server – like a separate web server – use the proxy_pass to an IP / IP + port number.
HTTP vs HTTPS
If you’re reverse proxying to a service that’s expecting a connection via HTTPS instead of via HTTP, be sure you adjust the proxy_pass line accordingly.
Getting Your Reverse Proxy Working
Let’s take everything I’ve gone over above and step through how to put it to use.
Hypothetical Scenario
To help illustrate how to put all of this together, let’s consider this hypothetical scenario.
You’ve decided to setup your own Whoogle search site using Docker and you want Nginx to provide SSL encryption and remove the necessity of including port 5000 in your Whoogle URL.
The domain for this site will be whoogle.techaddressed.com. You’ve decided to use Certbot to obtain SSL certificates for your domain. Additionally, let’s assume that your domain is using Cloudflare for its DNS but with the Cloudflare reverse proxy disabled.
Enabling the Cloudflare reverse proxy creates extra configuration necessary to allow Certbot to function properly – which would greatly increase the length of this tutorial. If you’re intending to use Certbot behind Cloudflare’s reverse proxy, I’ve written a tutorial that shows you what you need to know to get this working.
1 – Setup DNS For Your Domain / Subdomain
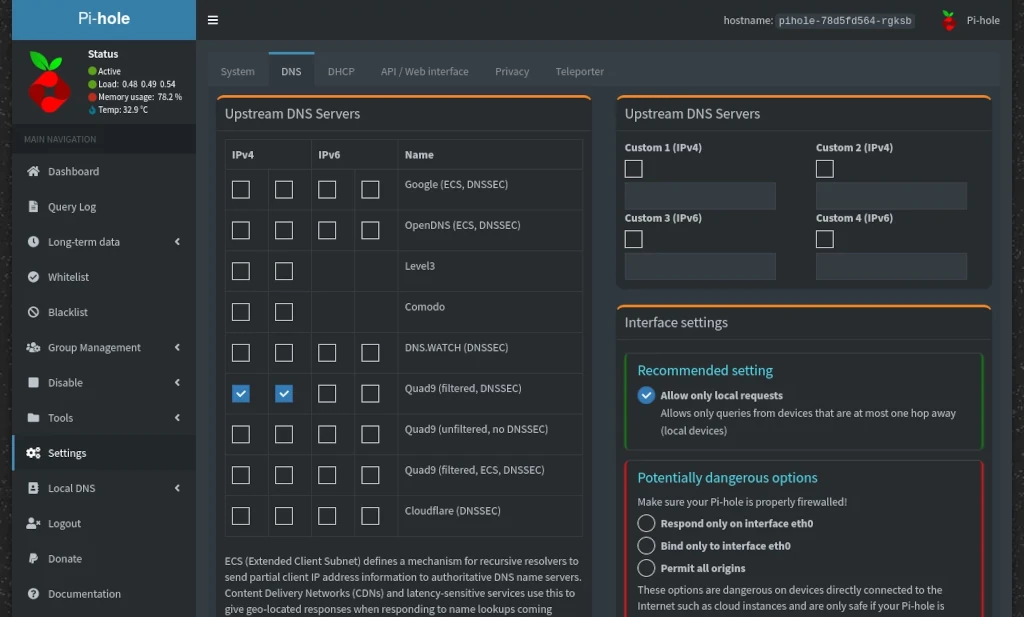
While I can’t go over the exact interface for every service that might be hosting your DNS, the principles will be the same regardless.
In short, you’ll need what’s called an A record setup for your domain which will point to the IP address of the system hosting your reverse proxy. On Cloudflare, it would look something like this:
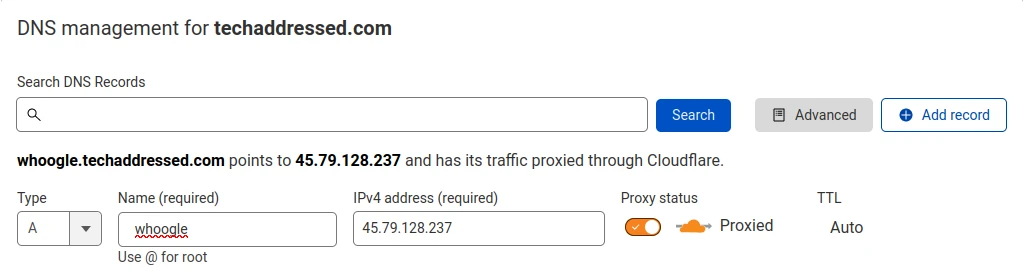
For our hypothetical example I specified that we’re going NOT using Cloudflare’s reverse proxy so their proxy is disabled in my settings.
2 – SSL Certificates
Before you setup your reverse proxy configuration, you need to setup your SSL certificates. If you don’t have your certificates in place first, your configuration test will fail.
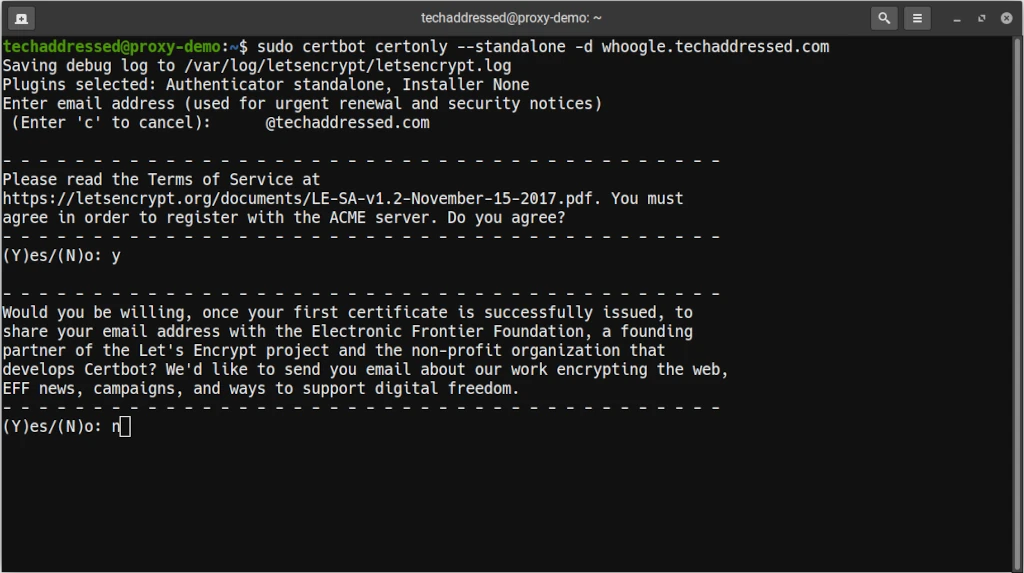
To obtain a free certificate for the example domain using Certbot from Let’s Encrypt, you’d run this command:
sudo certbot certonly --standalone -d whoogle.techaddressed.comCertbot will ask you to provide an email address to send renewal and security notices to. Additionally, you’ll be required to accept the terms of service. Lastly, you’ll be asked if you’d like to join the EFF mailing list.
If everything goes without issue you’ll be congratulated and notified where your certificates have been stored. Certbot will always place your certificates in a directory named for the domain they were issued to.
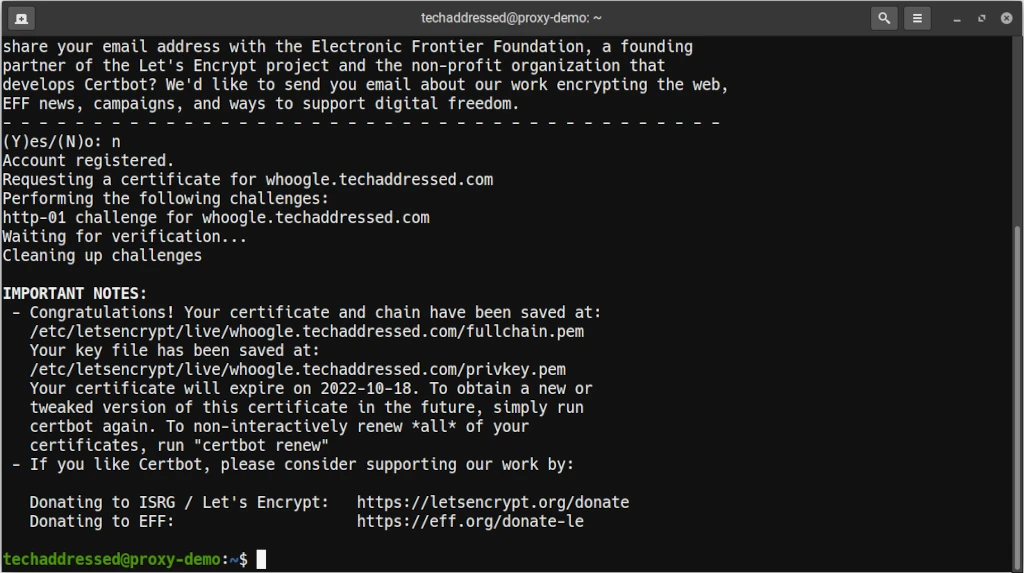
For our example, the certificate files are stored in /etc/letsencrypt/live/whoogle.techaddressed.com/. As I already demonstrated earlier, my example Nginx configuration files have this directory structure already in place where all you need to do is replace the example domain with the actual one.
3 – Setup Your Server Blocks
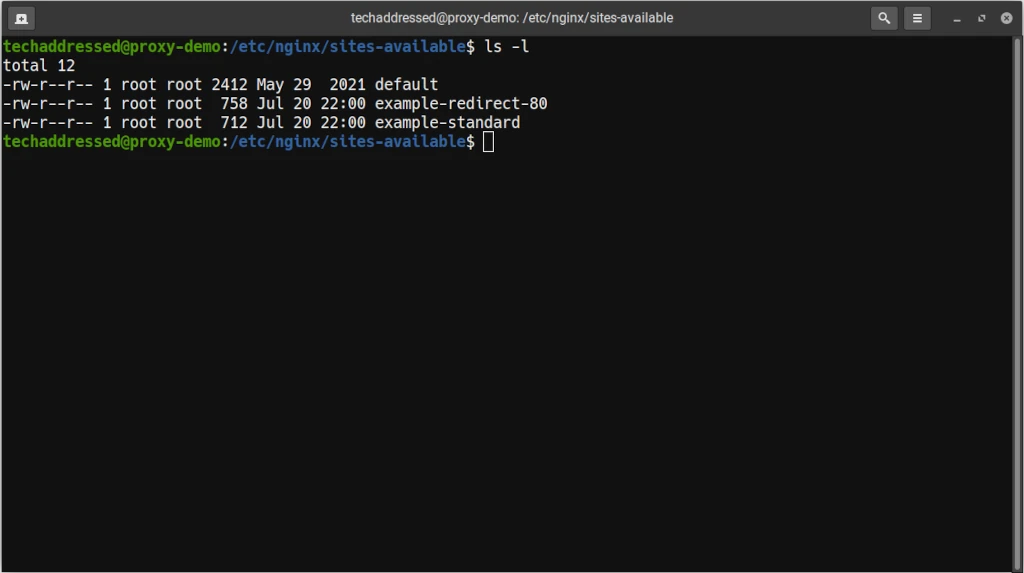
To setup your server blocks, start by creating a copy of the example file found in /etc/nginx/sites-available on your server. To change to that directory run:
cd /etc/nginx/sites-availableOnce there, you can get a listing of the files in the directory with:
ls -lWhich should return a result similar to this:
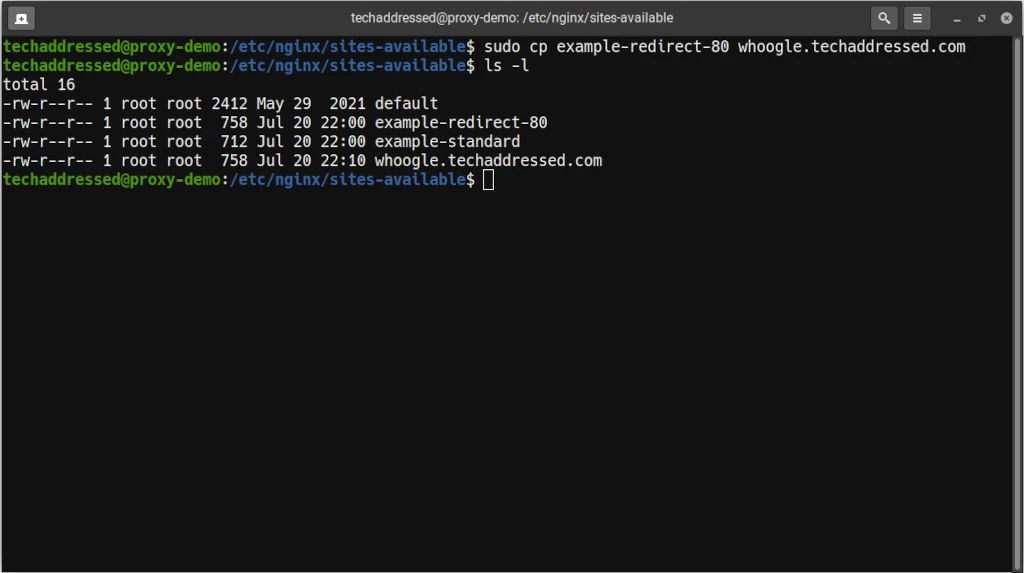
Copy the example file to a new file specific to what you’re going to reverse proxy. For our hypothetical example domain – whoogle.techaddressed.com – you might do something like this:
sudo cp example-redirect-80 whoogle.techaddressed.comWhich should return a result like this when you list the files again:
You can edit the new file using the nano editor like this:
sudo nano whoogle.techaddressed.comWhen you’re finished making the necessary modifications, press CTRL + X on the keyboard and when prompted to save press Y for yes. The resulting configuration should look like this:
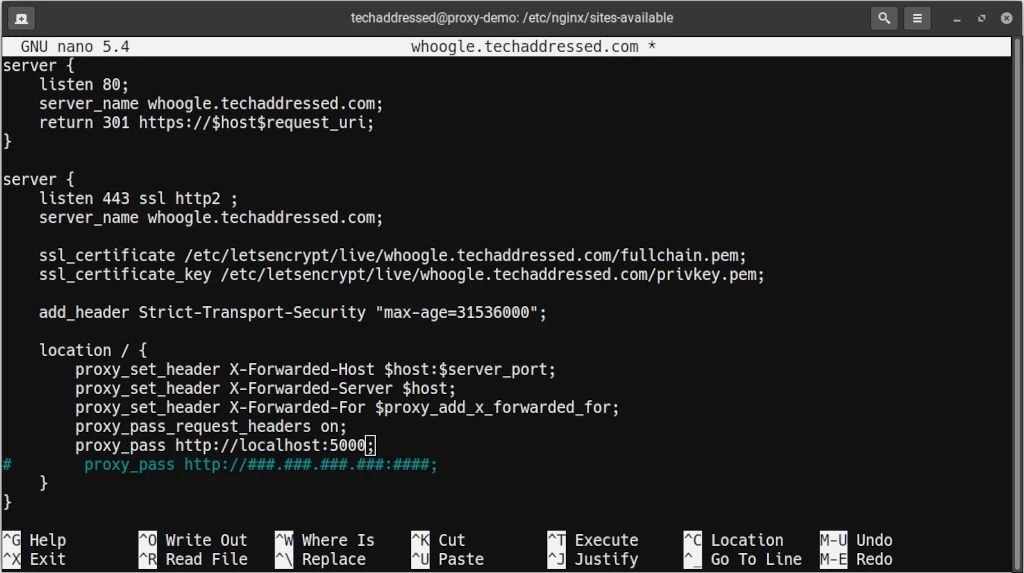
While this creates the configuration file with your server blocks, you’ll now need to enable it. Nginx will only actively use configurations that are found in /etc/nginx/sites-enabled. To enable your new config, we’re going to create a symbolic link to the file in the sites-enabled directory.
Change to the sites-enabled directory:
cd ../sites-enabled/Now run:
sudo ln -s ../sites-available/whoogle.techaddressed.com .You can verify that this worked by listing the files in the sites-enabled directory:
ls -lWhich should return results like this:
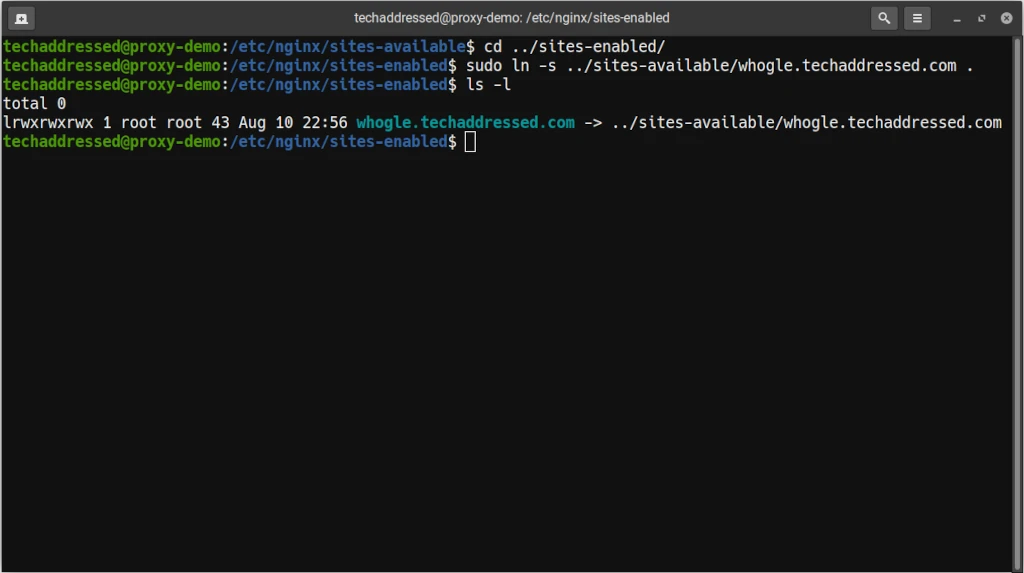
Now that you’ve added your configuration to sites-enabled, it’s time to test that your configuration works.
4 – Test Your Nginx Configuration
Nginx includes a command for testing that your configuration is correct before you attempt to make the changes you’ve made live. From the terminal run:
sudo nginx -tIf everything went smoothly, your result should look similar to this:
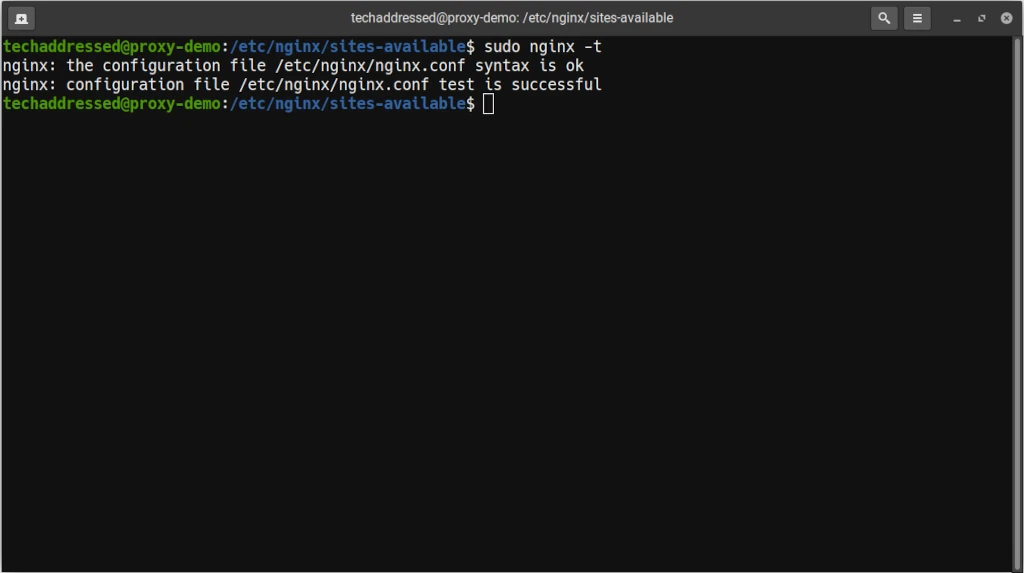
However, if Nginx detected a problem with your configuration it will give you an error and tell you on what line of what file the error exists for you to attempt to correct it. For example:
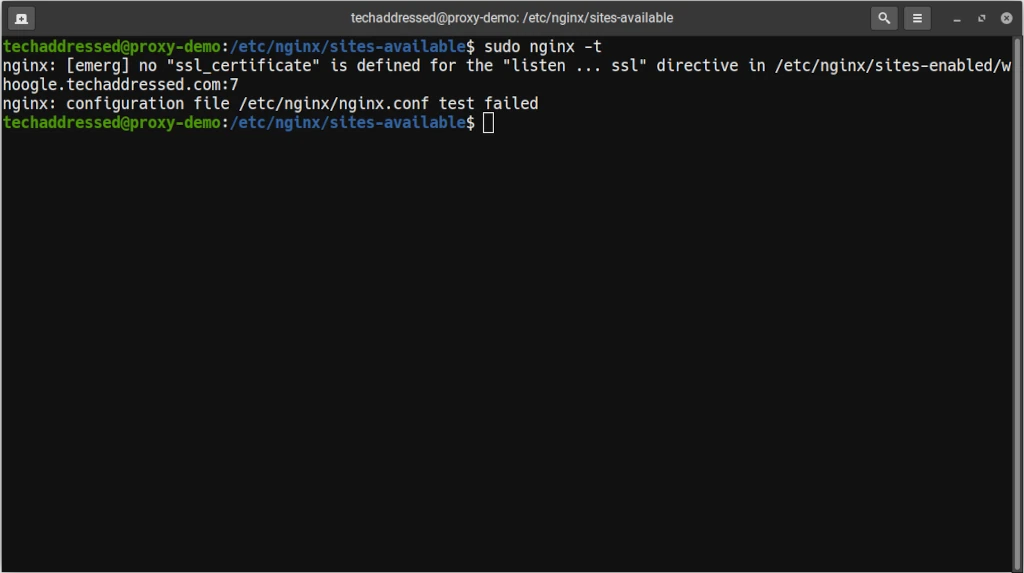
After you’ve made corrections, test your configuration again. When you’ve got no configuration errors, you’re ready now to enable your changes.
5 – Enable Your Nginx Configuration
To enable your new Nginx configuration run:
sudo systemctl restart nginxTo test that everything is working properly run:
sudo systemctl status nginxIf Nginx is working you’ll get a result similar to this:
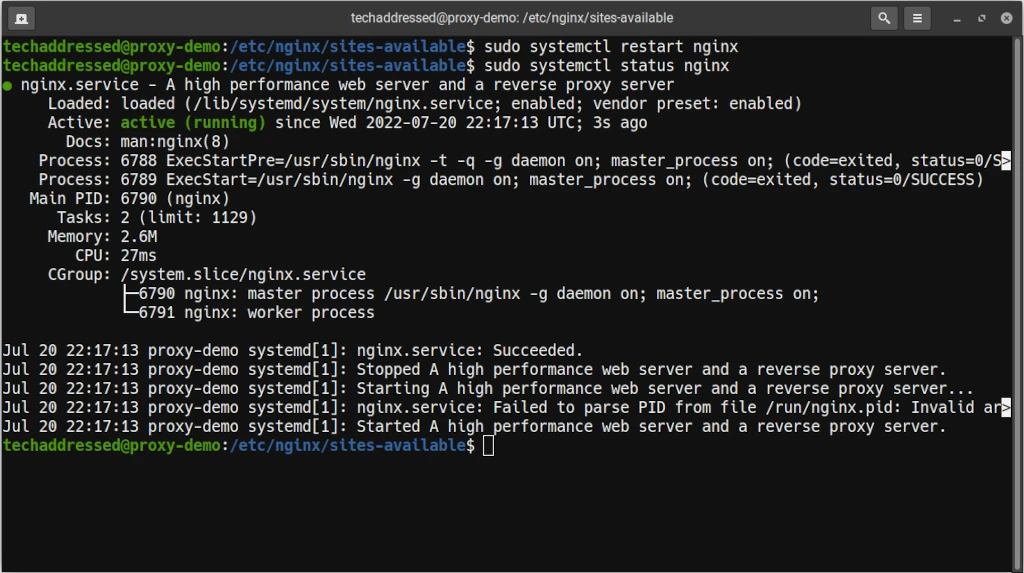
With the changes applied in Nginx, it’s time to make sure your system is working as intended.
6 – Testing
To test that everything is working, simply browse to the domain you’ve configured in your reverse proxy. For our example, it’s whoogle.techaddressed.com.
Please note that I’ve not left this service running after completing the creation of this tutorial as I don’t wish to run a publicly accessible Whoogle instance.

If you get any result aside from the service you’re expecting, you’ll need to go back and check the configuration again.
Depending on what it is that you’re attempting to reverse proxy, you may need to check it’s configuration as well that it’s expecting a connection through the domain you’re using. For example – software like Whoogle and Nextcloud have configuration options to specify from which domains it should respond to requests.
Conclusion
You should now have a working Nginx reverse proxy. As always, if you have questions regarding this tutorial, please don’t hesitate to ask in the comment section below. I’m always willing to help explain something better if needed.
If you found this tutorial helpful and would like to support our efforts to create additional resources like this, please consider making a donation. Your support is greatly appreciated! Thanks for reading and I hope you visit again soon!


How can I make that the ipv4 will not open my subdomain web?
Example:
subdomain.domain.com is poiting to goggle
And the ipv4 is also pointing to goggle webs
How can I make that the ipv4 and other subdomain will not open subdomain.domain.com (Goggle) ?
I have 3 Subdomain all of them opening the same thing from subdomain.domain.com
Is your server configured to listen for the subdomains? In the event that your server receives a request for a domain / subdomain it doesn’t know, it could return back the page for a domain / subdomain it does know.