This tutorial covers the steps necessary to setup a working Gitea server using Docker / Docker Compose. I’ve created this tutorial with Debian 11, however it should also work fine for Ubuntu as well. The docker specific parts of this tutorial should work regardless of underlying Linux distro. If necessary, this tutorial will be updated to reflect any necessary changes.
I wasn’t originally planning on creating this tutorial as the official website has a generous amount of documentation. Then I tried to use it to setup my own server in the cloud via Linode and – let’s just say it could be easier to follow in places, especially when it comes to SSH. They have five ways to configure SSH passthrough for your container, for example.
In the end, I opted to not setup a passthrough at all for SSH and instead setup a direct connection to the Gitea container by using different SSH ports on the host and container – which is how I’ll be handling SSH in this tutorial.
Get a $100 credit good for 60 days to try out Linode for yourself through this link (affiliate).
Getting Your Host Server Ready
First things first we need to make sure your server has the prerequisite software installed and the server is preconfigured properly.
Network Settings – Static IP
In order for your Gitea server to work as you’d expect, it’s highly recommended that your server has a static IP address. If you’re installing to a cloud server you’ll have a static IP by default. If you’re installing to a virtual machine or physical server in your homelab, you’ll need to be sure to configure a static IP yourself.
If you need a tutorial on how to modify the network config of either Debian or Ubuntu, I’ve got you covered.
Necessary Packages
Start off your package installation by ensuring that your server is completely updated with this command:
sudo apt update && sudo apt upgrade -yOnce this process completes, you’ll need to install these packages:
sudo apt install docker.io docker-compose ufwOptional – Modify Your Host Server User Account
If you access your server as a user other than root – and you should NOT be accessing your server as root – this next step is optional for if you don’t want to have to use sudo to run docker commands on your server. If you access your server as root you can skip this step.
To modify your user account to be a member of the docker group, run this command:
sudo usermod -aG docker usernameFirewall
Next up – configure and enable a firewall. Assuming you’re connecting to your server via SSH, you’ll want to make sure you’ve opened the necessary port so you’ll be able to get reconnected. If you’ve configured SSH on your server to use a non-standard port, you should specify that port here instead. This tutorial assumes that SSH is using the default port 22.
sudo ufw allow 22/tcpNow you’re ready to enable the firewall.
sudo ufw enableMake a note of which SSH port you’re using on your host system regardless of which port it is. You’ll want to be sure to not use the same external port for your Gitea container for SSH when you setup your Docker Compose file.
Create Host Directories & Files
You’ll need somewhere to store your Gitea container’s files – let’s create a directory called docker in your home directory for this purpose. In addition to your Docker directory, you’ll need a directory under Docker specifically for Gitea then two directories under Gitea – one for a SSH authorized_keys file and one for your Gitea data.
You can accomplish all of that with a single command:
mkdir -p ~/docker/gitea/{data,ssh}In order to allow SSH key authentication with Gitea, you’ll need to create an empty authorized keys file that Gitea will use for persistent key storage.
touch ~/docker/gitea/ssh/authorized_keysNext, change the permissions on this file so that it’s read+write for the owner only.
chmod 600 ~/docker/gitea/ssh/authorized_keysOptional – Domain / Subdomain
It’s possible to use your Gitea server using just the IP address and service port – a domain is by no means required. However, if you intend to you use a domain or subdomain for your Gitea server, it’s helpful to have decided what domain/subdomain you’re using and have the DNS preconfigured to allow time for the settings to propagate.
Additionally, I recommend that you sort out some way of obtaining SSL certificates for your domain – whether through HTTPS Everywhere’s certbot or by obtaining a free certificate from Cloudflare or however else you intend to obtain your certificates. Using SSL/HTTPS only helps protect you and your server from prying eyes.
The process for obtaining certificates in any of these manners is outside the scope of this tutorial.
Setup Your Docker Compose File
It’s possible to use Gitea with a variety of options for your back end database, such as:
- SQLite
- MariaDB (MySQL)
- PostgreSQL
Depending on your preferences or performance needs one of these options may suit you better than the others. SQLite is the easiest of the three to setup while the others are better suited to servers that will experience heavy use from multiple users.
I’ve provided documentation for setting up your Gitea server with all of the database options listed above. The documentation for SQLite is displayed by default. Switch to a different database option using the buttons below.
Setup Gitea With SQLite
Setup Gitea With MariaDB
Setup Gitea With PostgreSQL
We’re going to use Docker Compose to configure and start our Gitea server. To do this, we need to create a docker-compose.yml file. We’ll do this using the nano editor. If you have another editor preference you’re welcome to use whatever you like.
nano ~/docker/gitea/docker-compose.ymlCopy the configuration below and paste it into nano.
version: "3"

networks:
  gitea:
    external: false

services:
  server:
    image: gitea/gitea:latest
    container_name: gitea
    environment:
      - USER_UID=1000
      - USER_GID=1000
    restart: unless-stopped
    networks:
      - gitea
    volumes:
      - ./data:/data
      - ./ssh:/data/git/.ssh
      - /etc/timezone:/etc/timezone:ro
      - /etc/localtime:/etc/localtime:ro
    ports:
      - "3000:3000"
      - "2222:22"
version: "3"
networks:
gitea:
external: false
services:
server:
image: gitea/gitea:latest
container_name: gitea
environment:
- USER_UID=1000
- USER_GID=1000
- GITEA__database__DB_TYPE=mysql
- GITEA__database__HOST=db:3306
- GITEA__database__NAME=gitea
- GITEA__database__USER=gitea
- GITEA__database__PASSWD=strongpassword
restart: unless-stopped
networks:
- gitea
volumes:
- ./data:/data
- ./ssh:/data/git/.ssh
- /etc/timezone:/etc/timezone:ro
- /etc/localtime:/etc/localtime:ro
ports:
- "3000:3000"
- "2222:22"
depends_on:
- db
db:
image: mariadb:latest
restart: unless-stopped
environment:
- MYSQL_ROOT_PASSWORD=strongpassword
- MYSQL_USER=gitea
- MYSQL_PASSWORD=strongpassword
- MYSQL_DATABASE=gitea
networks:
- gitea
volumes:
- ./mariadb:/var/lib/mysqlversion: "3"
networks:
gitea:
external: false
services:
server:
image: gitea/gitea:latest
container_name: gitea
environment:
- USER_UID=1000
- USER_GID=1000
- GITEA__database__DB_TYPE=postgres
- GITEA__database__HOST=db:5432
- GITEA__database__NAME=gitea
- GITEA__database__USER=gitea
- GITEA__database__PASSWD=strongpassword
restart: unless-stopped
networks:
- gitea
volumes:
- ./data:/data
- ./ssh:/data/git/.ssh
- /etc/timezone:/etc/timezone:ro
- /etc/localtime:/etc/localtime:ro
ports:
- "3000:3000"
- "2222:22"
depends_on:
- db
db:
image: postgres:latest
restart: unless-stopped
environment:
- POSTGRES_USER=gitea
- POSTGRES_PASSWORD=strongpassword
- POSTGRES_DB=gitea
networks:
- gitea
volumes:
- ./postgres:/var/lib/postgresql/dataAfter making any necessary adjustments, save and exit nano by pressing CTRL + X and answering Y when asked if you wish to save before exiting. Below, I explain a few of configurations in this Docker Compose file to help you understand some of the settings.
Image
Notice how the end of the image setting – after the colon it says latest. This ensures that we’re always pulling down the most recent update of the container when we implement this configuration.
Environment
This section is for configuring environment variables used inside the Docker container.
The USER_UID and USER_GID values need to match the UID and GID of whatever host account owns the directories you created earlier in this tutorial. Run these commands if you aren’t sure what your account’s UID and GID values are.
id -u    # displays your account's uid
id -g    # displays your account's gid
The remaining environment variables all serve to tell Gitea how to connect to your MariaDB database. While you could modify the database name and database user, there really isn’t much point to doing so. That said, though, be sure to use a STRONG password for the root and database passwords.
The remaining environment variables all serve to tell Gitea how to connect to your PostgreSQL database. While you could modify the database name and database user, there really isn’t much point to doing so. That said, though, be sure to use a STRONG password for the database password.
Restart
Setting the restart value to unless-stopped ensures that your container will restart anytime that Docker detects it’s not running – unless you’ve stopped it yourself.
Setting the restart value to unless-stopped ensures that your containers will restart anytime that Docker detects they’re not running – unless you’ve stopped them yourself.
Volumes
The volumes settings map locations from your container host to locations inside your Docker containers. These mappings allow for persistent data storage – data storage that will survive deleting the container.
Here we’re telling docker to map the ~/docker/gitea/data and ~/docker/gitea/ssh folders that we created earlier inside the container as /data and /data/git/.ssh, respectively. The additional two volumes for the Gitea container pass through read-only information pertaining to time and timezone from your host system into the container.
Ports
If you’re unfamiliar with how ports work in Docker containers, the port number on the left of the colon is the external port that the container is listening for on your host system while the port on the right of the colon is the port it is mapped to inside the container.
Here, Gitea is using ports 3000 and 22 inside the container for the app’s web interface and SSH, respectively. With this configuration, Gitea will also listen externally on port 3000 and I’ve specified port 2222 as the external port for the container to use for SSH connections.
Remember that I mentioned earlier that we want to be sure that your host system and your Gitea container are not both using the same port for SSH. Use whichever ports you like for SSH, just make sure they aren’t the same on the host and container.
DB
The DB section specifies the creation of a MariaDB container with its own settings for when to restart the container, environment variables, volumes, etc …
The DB section specifies the creation of a PostgreSQL container with its own settings for when to restart the container, environment variables, volumes, etc …
With regards to the environment variables for the MariaDB container, it’s critical to be certain that the username, database name, and password all match the values specified in the Gitea container’s environment variables.
With regards to the environment variables for the PostgreSQL container, it’s critical to be certain that the username, database name, and password all match the values specified in the Gitea container’s environment variables.
Optional – Nginx Reverse Proxy
I highly recommend you use some form of reverse proxy to allow for encrypted transmissions with your Gitea server – whether you choose to use Nginx or something else like HAProxy. I recommend having this proxy in place BEFORE you create your Gitea server as it will make the process of configuring your server a little easier.
If you’ve never setup a reverse proxy before, I have a tutorial – How To Setup A Basic Nginx Reverse Proxy – that shows you everything you need.
Creating Your Container(s)
Now that you’ve got your host server ready, created your Docker Compose file with your Gitea server configuration, and optionally setup a reverse proxy, you’re ready to create your container(s).
First, navigate to the gitea directory you created earlier:
cd ~/docker/giteaNow, create your container(s) using the Docker Compose configuration:
docker-compose up -dThe “-d” at the end tells docker to run the new container(s) in the background using detached mode. Without this, your terminal not return to a prompt as the new container(s) will have the foreground attention.
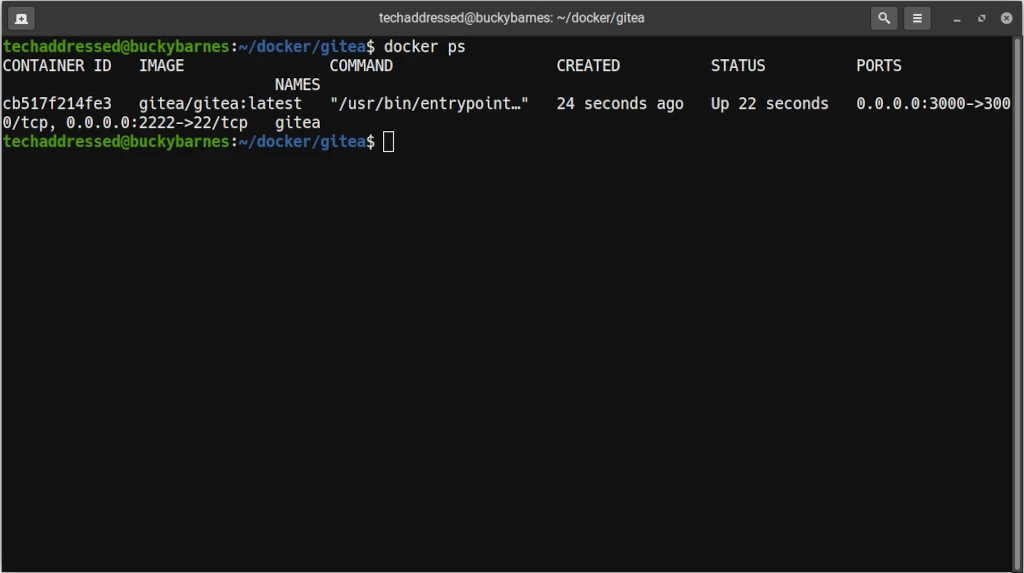
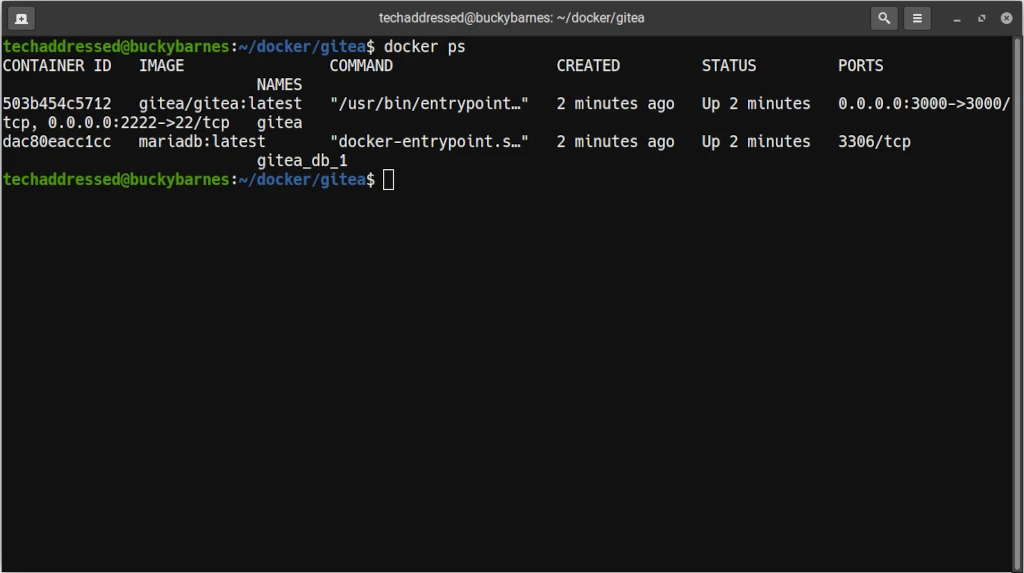
Run this command to check that your running container(s) are running:
docker psThe result should look similar to this:

Gitea Initial Configuration
Now that your Gitea container(s) are up and running, you need to complete the initial configuration in a browser in order to finish setting up your server.
If you’ve already implemented a reverse proxy to allow for a hostname with SSL certificate, load the wizard using the hostname as you would access the system normally:
https://yourhostname.here/If you’ve not configured your system to use a reverse proxy, instead load the wizard using your host’s IP address and the external port:
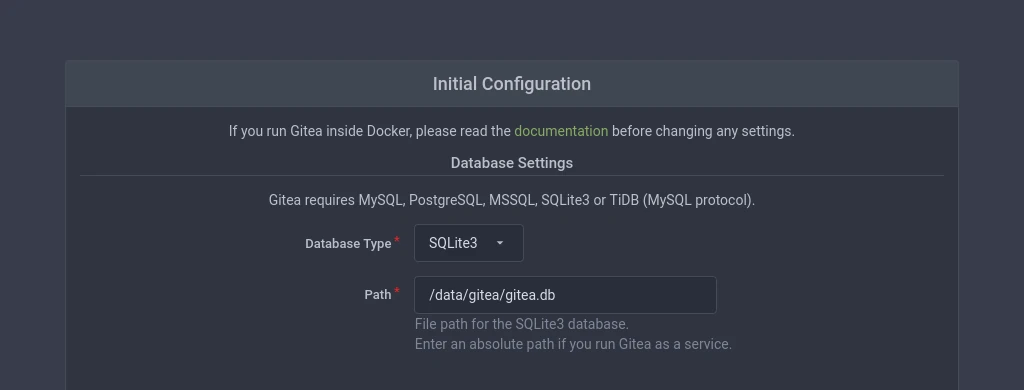
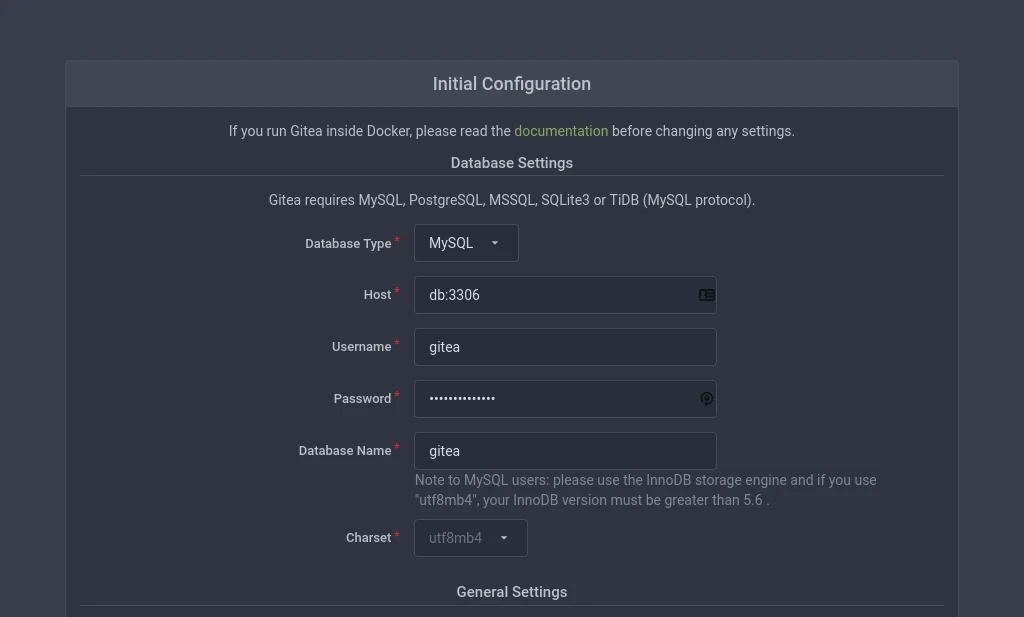
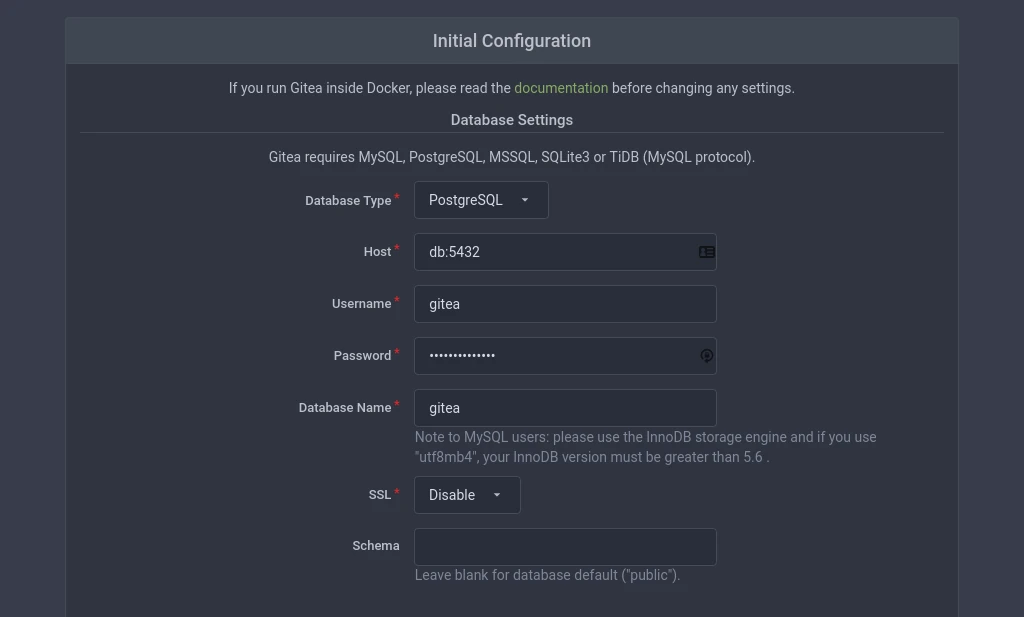
http://###.###.###.###:3000/The initial configuraiton is broken into a few sections. The first section is settings related to your Gitea server’s database. These settings will be automatically filled in using values we specified in the Docker Compose file. You don’t need to modify them at all.
Next up are general settings for your server. I’ve denoted with red outlines the settings you should be worried about here.
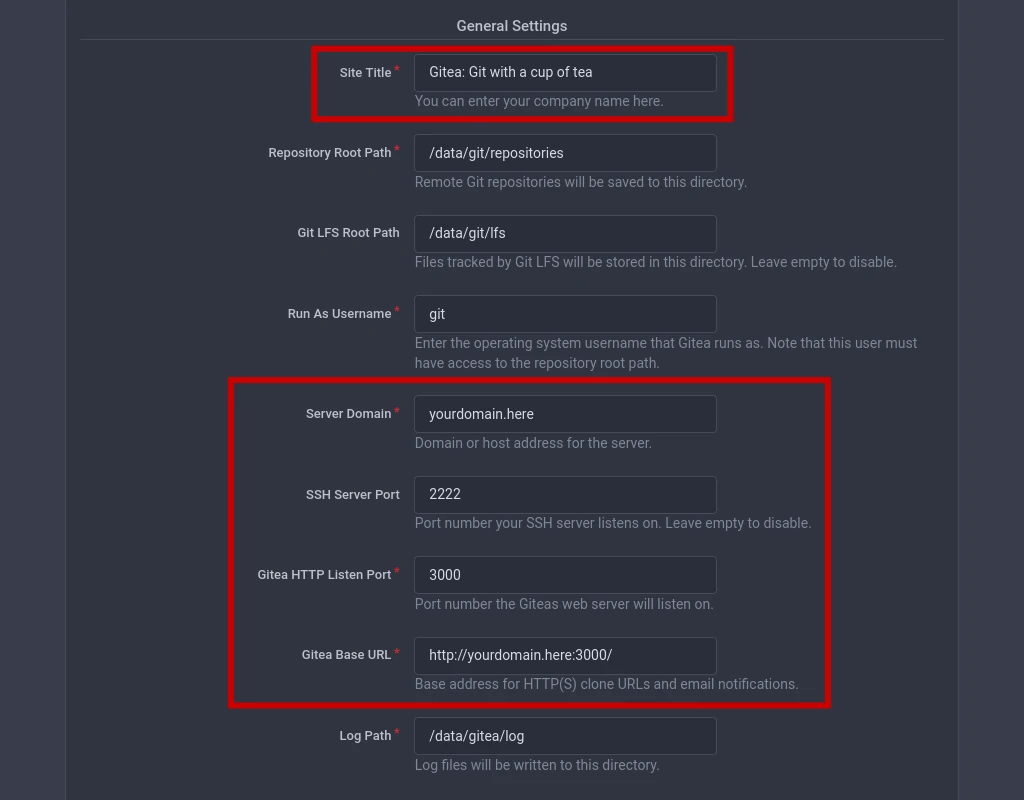
I’ll briefly go over the highlighted settings here:
- Site Title – This is your Gitea server site title. Set it to whatever you wish it to say.
- Server Domain – Set this to the domain you intend to access the server from. If you’re not using a domain, put in your host server’s IP address.
- SSH Server Port – Set this to the external SSH port you specified in the Docker Compose file. For my example, I used port 2222.
- Gitea HTTP Listen Port – Set this to the external port you specified for Gitea itself. The example config uses port 3000.
- Gitea Base URL – Set this to the actual URL you’ll use to access the server. If you’ve setup a proxy with SSL, you won’t need to specify a port in the URL and be sure to specify https instead of just http. If you’re not using a hostname, be sure to use your host IP address in place of a domain.
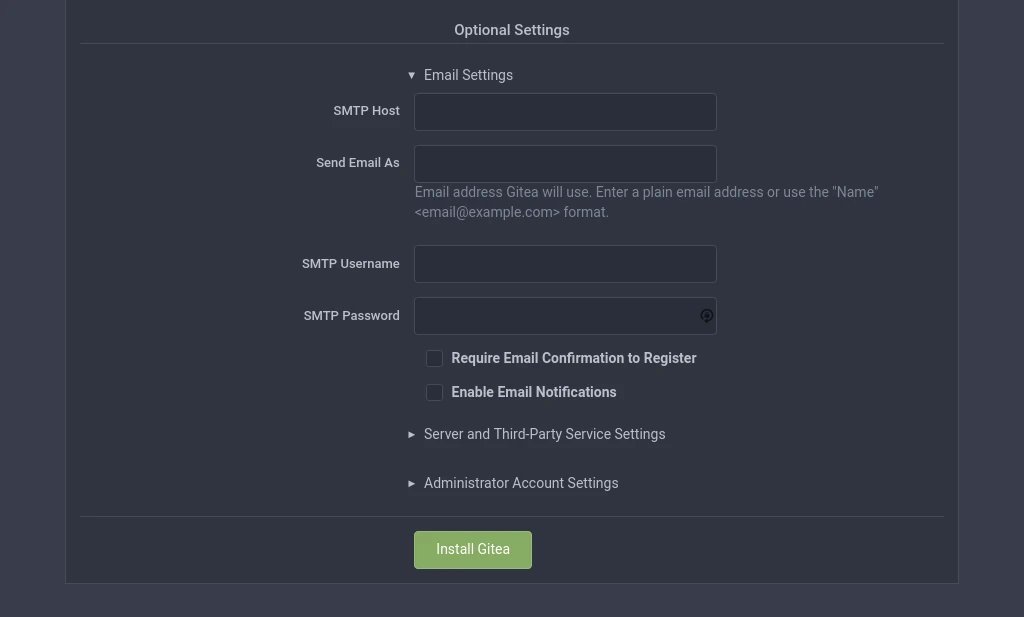
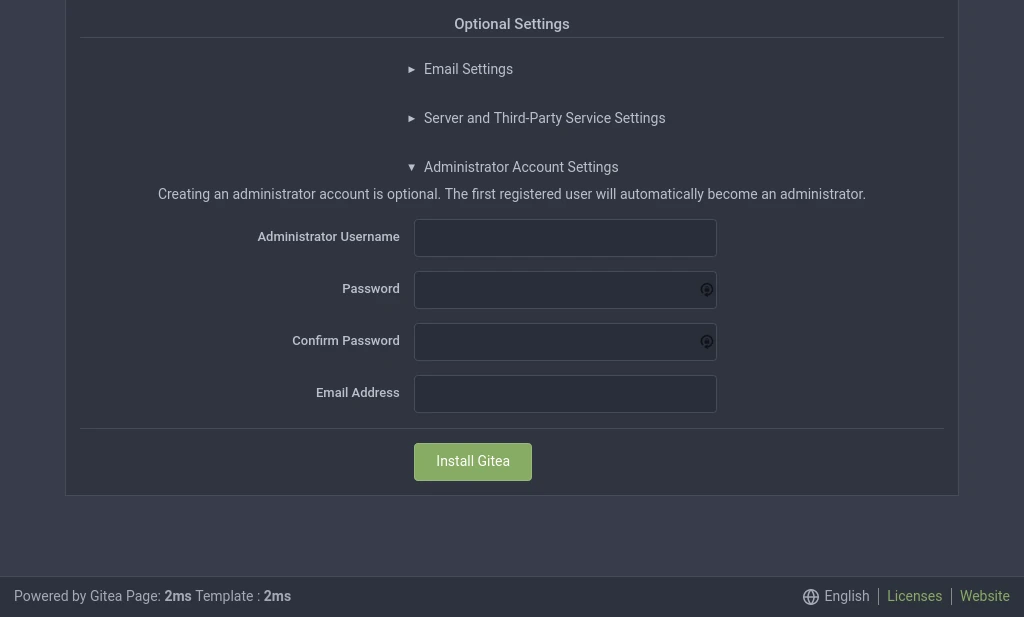
Last up are the optional settings – the first part of which are Email related settings. I recommend that you should complete this section with settings for a SMTP email account you have access to if you want your server to be able to send email messages.
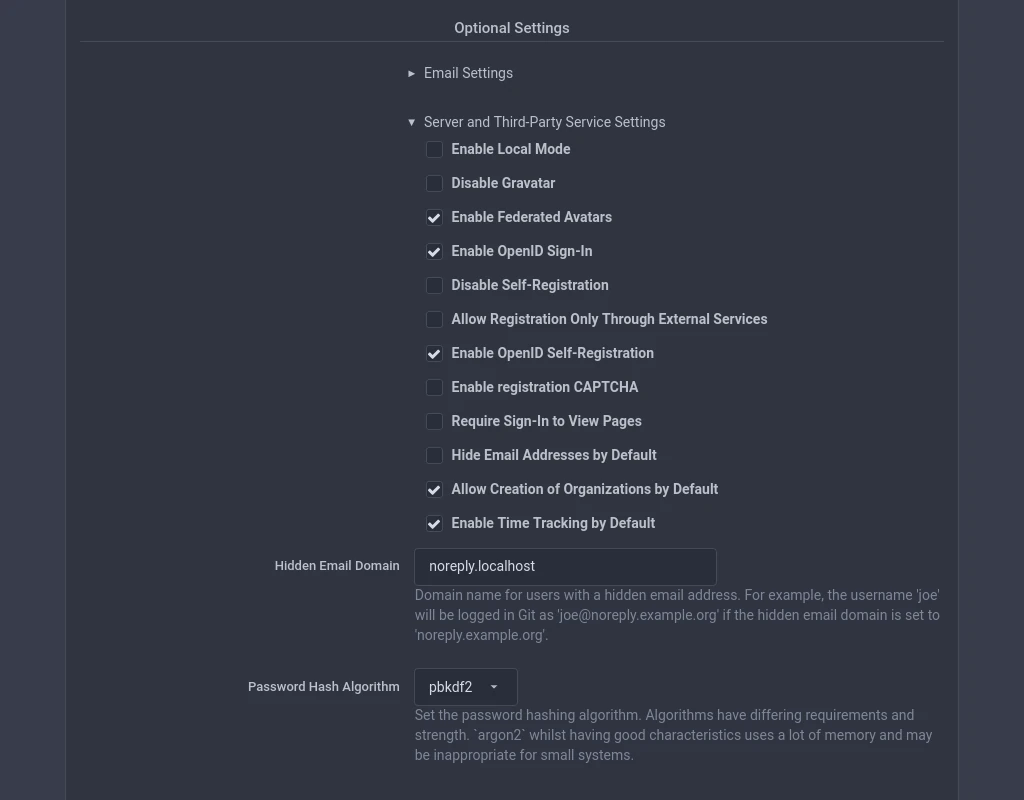
The next part of the optional settings pertain to server and third party services. These options are completely up to you to decide. I will draw particular attention to one: DISABLE SELF-REGISTRATION. If you don’t want other people creating accounts on your server you’ll want to be certain to select this option.
Last up is creating an administrator account. To me, this part should not be labeled as optional. Be sure to create yourself an administrator account here.
Once you’ve compeleted all of the steps in the wizard, click the green INSTALL GITEA button.
Possible Error After Initial Configuration
After you’ve completed the initial configuration, the page will attempt to reload and you might experience an error when it does. If this happens, DON’T PANIC. Try loading the root URL itself without any directories and it should load fine.
Adding SSH Keys To Gitea
Once you’ve logged into the system, you can add your own SSH certificate to your account to allow for this method of accessing your repositories. If you need help with how to accomplish this, I have created a brief tutorial that shows you how this is done.
Upgrading Your Containers
Eventually you’ll want to update your containers as new versions of the software are released. To do this, again navigate to your gitea folder:
cd ~/docker/giteaTo update your containers, run the same command before to create the containers in the first place:
docker-compose up -dThis will automatically remove your old containers and replace them with new ones using the latest versions – since we’ve specified latest as the version to use on our image settings in the Docker Compose file.
Conclusion
Congrats! You should now have a working Gitea server of your own. If you have questions on any of the material here, please ask in the comment section below. I’m always willing to help explain something better if needed.
If you found this tutorial helpful and would like to support our efforts to create additional resources like this, please consider making a donation. Your support is greatly appreciated. Thanks for reading and I hope you visit again soon!

Thanks for a thorough guide. I have one lingering question…
How does mapping the host `~/docker/gitea/.ssh` folder into the contianer `/data/git/.ssh` enable gitea to accept SSH connections? It feels like there might be a missing step. Is this so the host machine can somehow see the `authorized_keys` file gitea maintains? If so, how does the host machine know to check that particular folder (i.e. `~/docker/gitea/.ssh`)?
Hey Steve – you’re very welcome!
Mapping the host folder into the container is just for persistent storage for the authorized_keys file. The /data/git/.ssh location is simply where the container is designed to store the file. The host system doesn’t care at all about the authorized_keys file because we’re passing the SSH connection off to the container. In my example we’re passing port 2222 on the host to port 22 inside the container and the SSH connection is then established inside the container.
I hope this helps!
You can use the -rootless docker tag now. So gitea is not running as root user anymore within the Docker container..
See the rootless tags on: https://hub.docker.com/r/gitea/gitea/tags
As well as this PR: https://github.com/go-gitea/gitea/pull/10154