Pi-hole’s ability to manage local DNS records is one of its most useful yet least talked about features – especially in a homelab environment – regardless of if you’re running just a few simple services in your lab or something more complicated like a Kubernetes cluster full of containerized services.
This tutorial covers the following topics:
- Why Use Local DNS / CNAME Records
- When To Use A / AAAA vs CNAME Records
- Local Domains vs Internet Domains
- Managing Local DNS Records
- Managing Local CNAME Records
You can use the links above to skip to a particular section of this tutorial, however I recommend reading the entire tutorial in order to not miss any useful information.
This article is part of my Pi-hole series. Be sure to check out the other articles in this series for additional information.
Pi-hole Series Index
- What Is Pi-hole & Why Would You Want To Use It?
- Installing Pi-hole On Debian / Ubuntu Servers
- Installing Pi-hole Using Docker
- Installing Pi-hole On TrueNAS Scale
- Basic Pi-hole Configuration
- Using Gravity Sync To Sync Multiple Pi-hole Instances
- Advanced Pi-hole Config: Recursive DNS With Unbound
- Using Pi-hole Local DNS And Why It’s Important In Your Homelab — You Are Here
Why Use Local DNS / CNAME Records?
DNS stands for DOMAIN NAME SYSTEM – it’s the thing that tells your computers and devices how to connect to websites and servers on the internet. If, like me, you’re old enough to remember phone books … think of DNS like a giant phone book. When you want to connect to a website, DNS looks up the website’s domain name and returns back its IP address. For this example, think of IP addresses like a phone number.
CNAME records are a specific type of DNS record. Your typical DNS records that associate a domain name with an IP address are known as A / AAAA records – depending on whether they’re IPv4 or IPv6 records. A CNAME record doesn’t associate a domain with an IP, but instead associates a domain with another domain.
In addition to typical DNS records that help you find resources on the internet, local DNS records can be created specific to your own LAN to associate domain names with your own internal IP addresses. These local DNS records make it easy to access any of these systems remotely without having to know their IP address – as it’s much easier to remember a system’s name than its IP.
Without running a server like Pi-hole, the most common method of creating and managing local DNS records is via the HOSTS FILE on individual systems. The problem with this approach is having to manage the hosts file on every system can be tedious. Lucky for us, Pi-hole gives us the ability to create and centrally manage our own DNS / CNAME records.
When To Use A / AAAA vs CNAME Records
Understanding when it’s best to use an A / AAAA record or a CNAME record is something I can’t stress enough. If you follow my advice up-front it’ll save you from having to re-do your records later.
A / AAAA Records
The best use for A / AAAA records is when a domain identifies the hostname of a physical or virtual system. Examples would be the hostnames of your workstations and servers. Perhaps you have a virtual machine setup for a specific purpose like a Nginx web server. Additionally, it makes sense to create an A / AAAA record for virtual IP addresses used when load balancing servers.
These records might look something like this:
SERVERS
- server-01.yourdomain.local / 192.168.1.11
- server-02.yourdomain.local / 192.168.1.12
- server-03.yourdomain.local / 192.168.1.13
VIRTUAL MACHINES
- webserver-01.yourdomain.local / 192.168.1.101
- webserver-02.yourdomain.local / 192.168.1.102
- webserver-03.yourdomain.local / 192.168.1.103
LOAD BALANCERS
- server-loadbal.yourdomain.local / 192.168.1.10
- webserver-loadbal.yourdomain.local / 192.168.1.100
WORKSTATIONS
- workstation-01.yourdomain.local / 192.168.1.201
- workstation-02.yourdomain.local / 192.168.1.202
- workstation-03.yourdomain.local / 192.168.1.203
CNAME Records
The best use for CNAME records is when a domain identifies a specific site or service hosted on your network. These sites and services exist within the physical and/or virtual servers on your network. By using a CNAME record to associate the domain of a site / service with the server that it runs on, you only have to update the IP address of the server’s A / AAAA record if you happen to change it instead of also having to update the records for all of your service domains as well.
Examples of possible CNAME records (CNAME / Associated Domain):
- intranet-site.yourdomain.local / webserver-loadbal.yourdomain.local
- nextcloud.yourdomain.local / server-01.yourdomain.local
- plex.yourdomain.local / server-02.yourdomain.local
- gitea.yourdomain.local / server-03.yourdomain.local
Local Domains vs Internet Domains
I thought it would be a good idea to take a few paragraphs to go over the difference between local domains on your network as opposed to internet domains like you’re more typically used to using.
When we talk about your normal internet domains – such as techaddressed.com for example – we’re talking about domains that you pay a registration fee to a licensed domain registrar – such as Namecheap (affiliate) – and anyone on the public internet can access that domain.
In your own personal network, though, there are no domain registrars, zero fees to pay, and nobody outside of your network can access these domains. What’s more, unlike being limited to your normal top level domains – such as .com, .net, .org – you can make your domains whatever you’d like.
In the examples I gave above I used yourdomain.local as secondary and top level domains. As you’ll see in the examples I use in screenshots below, on my own network I use techaddressed.lan as my domain.
You have the freedom to be as creative as you want with your local domains. You don’t even have to use anything more than one or two words if you don’t want. Your domains could be as simple as nextcloud.home or just simply gitea, for example.
However you choose to setup your local domains, it’s best to choose domains you’ll easily remember.
MANAGING Local DNS Records
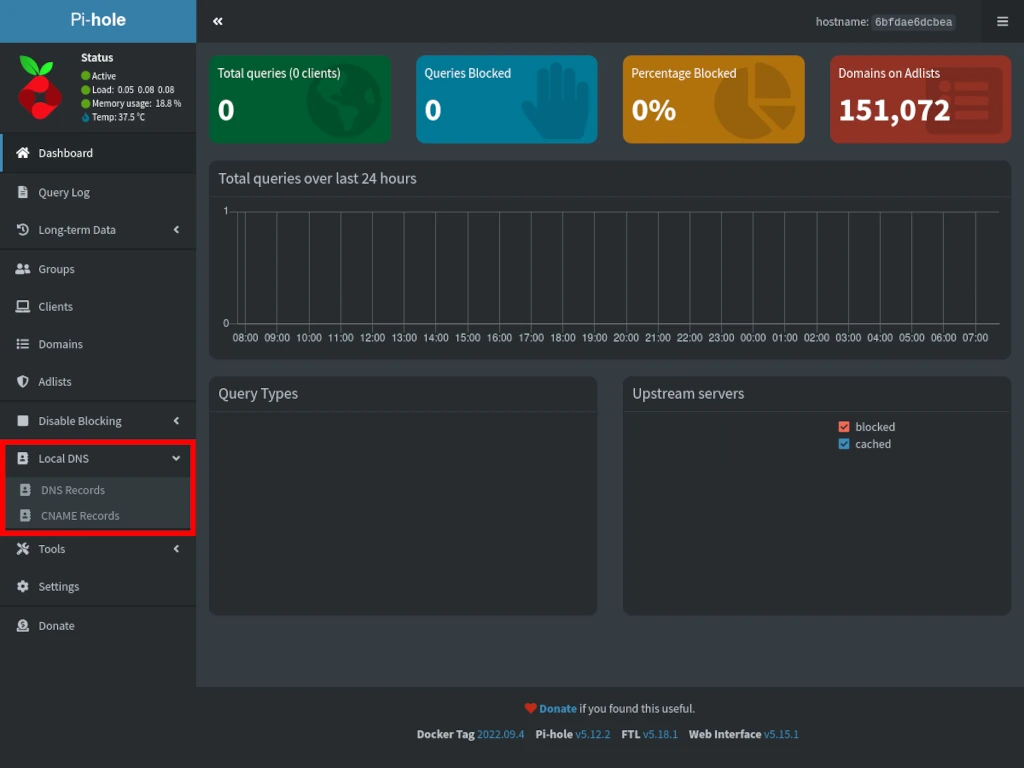
To create a local DNS record, first find LOCAL DNS in the left side navigation menu and expand it to reveal DNS RECORDS and CNAME RECORDS. Select DNS RECORDS.
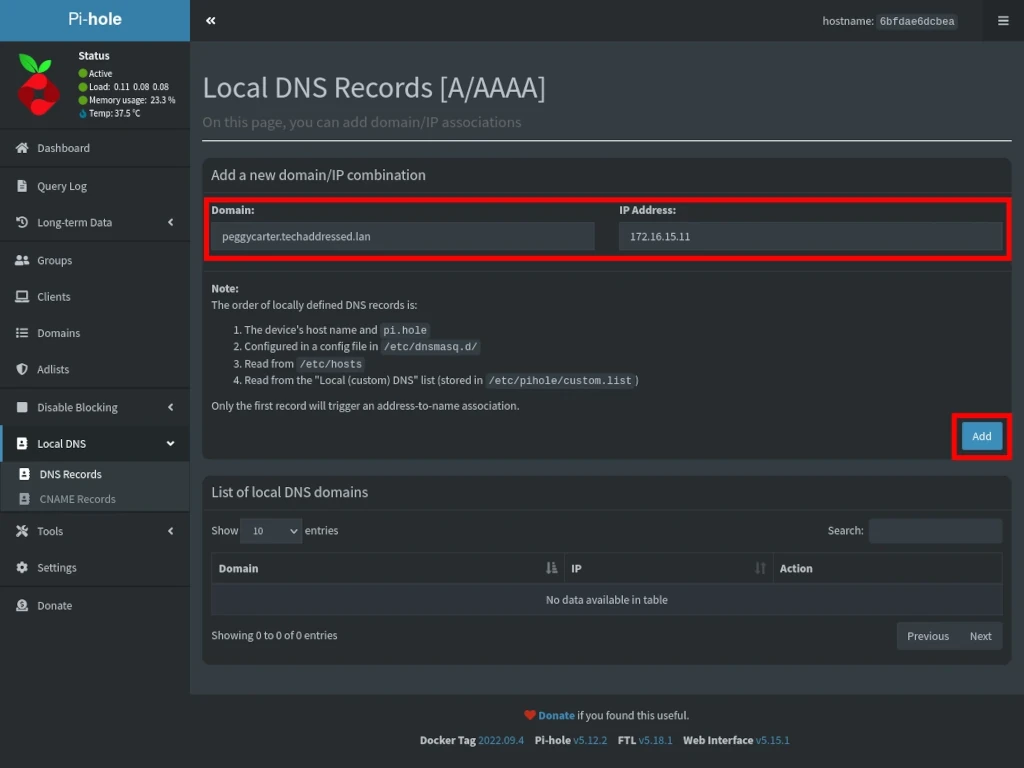
The interface for adding DNS records is straightforward. Enter the local domain you wish to create a record for where it says DOMAIN and the IP address associated with the domain where it says IP ADDRESS then click ADD. Addresses can be either IPv4 (A records) or IPv6 (AAAA records) depending on your needs.
Your local DNS records will appear under the list of local DNS domains – as shown below. You can remove a record at any time by clicking the small TRASH ICON to the right under the ACTION heading. You cannot edit an entry. If you’ve made a mistake, delete the bad entry and create a corrected one.
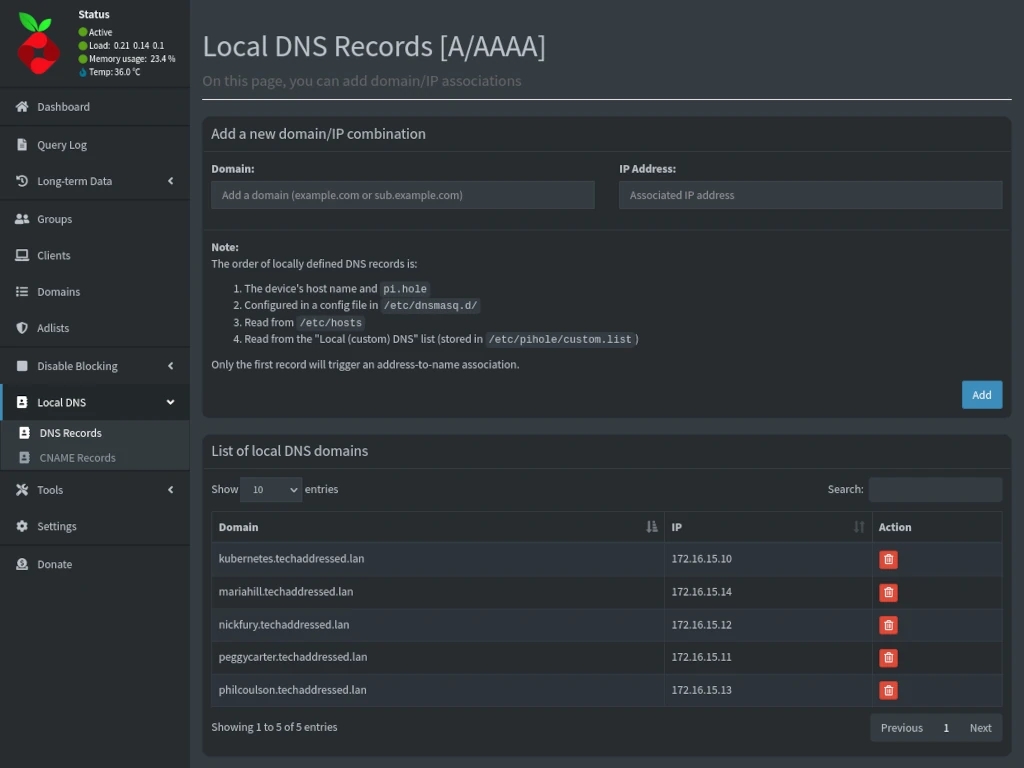
In the example screenshot, above, I’ve entered in some additional example records from my own homelab. Four of these records represent physical computers – peggycarter, nickfury, philcoulson, and mariahill (yes my network is named after Marvel characters). The kubernetes record points to a virtual IP that is shared and load balanced between the three physical computers that comprise my kubernetes cluster.
MANAGING Local CNAME Records
Just as with DNS records, expand the LOCAL DNS navigation menu and select CNAME RECORDS.

The interface for CNAME records is similar to the DNS records interface, though instead of associating an IP address with a local domain we’re going to associate it with another domain. Under DOMAIN enter your local domain and under TARGET DOMAIN enter domain this CNAME record is associated with.
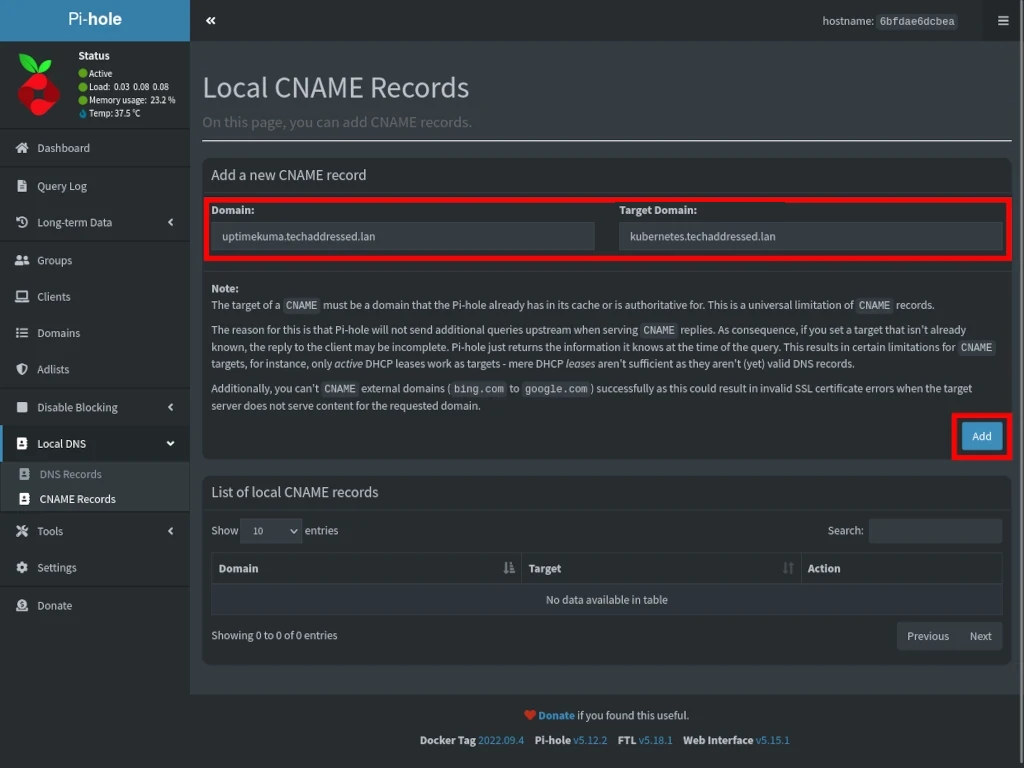
Like your local DNS records, your CNAME records will be displayed at the bottom of the interface as shown below.
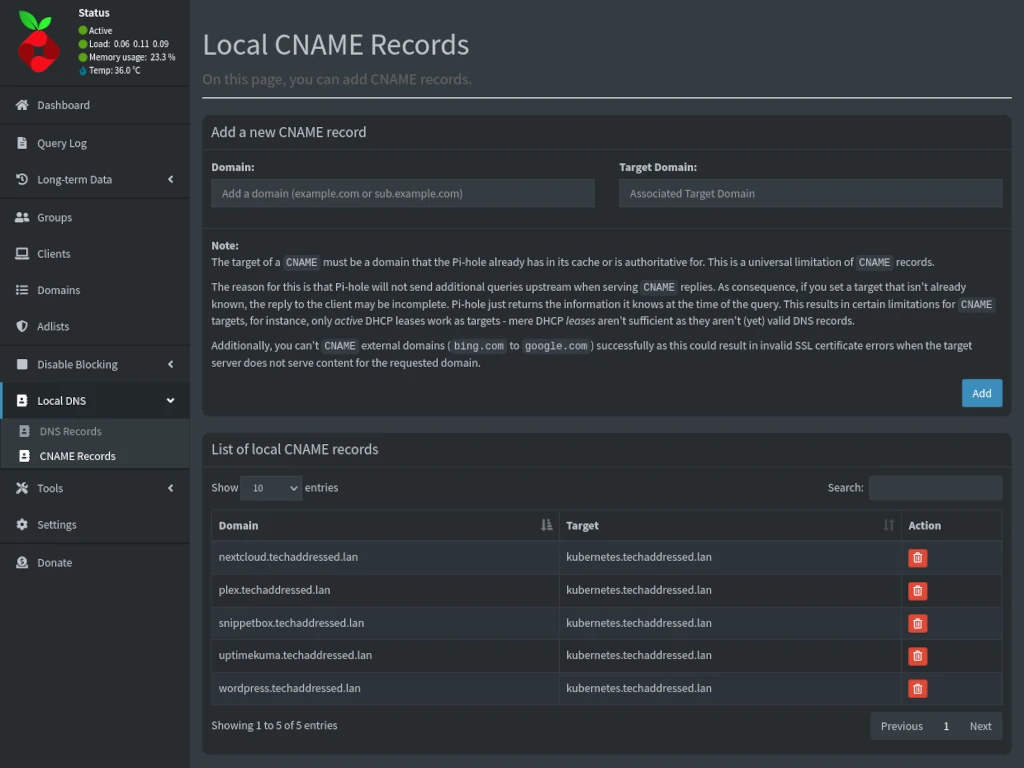
In the example screenshot, above, I’ve entered in some additional example CNAME records from my own homelab. These records are for specific services on my network, such as nextcloud, plex, snippetbox, uptimekuma, and wordpress.
As I mentioned earlier – and can’t stress enough – adding these domains as CNAME records instead of DNS records makes it easier to update your records. For example, if I were to change the shared virtual IP of my kubernetes cluster, I only have to update the local DNS record for kubernetes in order to update every CNAME record that points to it. Otherwise, if each of these local CNAME records were a local DNS record, I’d have to update the record for each to reflect the new IP address.
Conclusion
Ultimately, how you choose to implement local DNS is up to you. I’ve given you the information you need to setup these records in Pi-hole as well as my advice on how to best use these tools. In the end, though, it’s your network. Configure it as you see fit.
If you have any suggestions on better methodologies for setting up local DNS records, please sound off in the comments below.
If you found this tutorial helpful and would like to support our efforts to create additional resources like this, please consider making a donation. Your support is greatly appreciated!
If you can’t make a donation, please consider sharing this tutorial with others who may be interested. If you have questions about anything regarding this tutorial, please be sure to leave them in the comments below. Thanks for reading, and I hope you visit again soon!

I currently have use two BIND9 (master and slave) with local zones. If I switch to use Pi-hole, will the block list and local DNS need to be added separately to two Pi-hole instances or any replication available below two Pi-hole instances?
I can’t say with any certainty as I’ve never tried this myself. I’m not aware of any way to replicate the block list or local DNS from your existing BIND setups to the Pi-holes directly. You’ll need to setup your block list and local DNS in at least one of the Pi-holes which can then be replicated with Gravity Sync to the other.
https://www.techaddressed.com/tutorials/gravity-sync-pi-hole-instances/