This is an advanced configuration not because it’s particularly difficult to implement, but because it’s not necessary for your Pi-hole system to function properly. For those who would prefer to not rely on third party DNS providers – whether for privacy reasons or just because you can – configuring your Pi-hole system with Unbound for recursive DNS takes only a few minutes to setup and configure.
This article is part of my Pi-hole series. Be sure to check out the other articles in this series for additional information.
Pi-hole Series Index
- What Is Pi-hole & Why Would You Want To Use It?
- Installing Pi-hole On Debian / Ubuntu Servers
- Installing Pi-hole Using Docker
- Installing Pi-hole On TrueNAS Scale
- Basic Pi-hole Configuration
- Using Gravity Sync To Sync Multiple Pi-hole Instances
- Advanced Pi-hole Config: Recursive DNS With Unbound — You Are Here
- Using Pi-hole Local DNS And Why It’s Important In Your Homelab
Before We Begin
A few things we need to address before we begin.
Assumptions
This tutorial assumes that you’ve already got a working Pi-hole installation on either a Debian or Ubuntu based server and that you know how to access the terminal on that server. If you need instructions on installing Pi-hole, please refer to the series index at the top of the page.
Installing Packages
Let’s begin with ensuring our server’s packages are up to date.
sudo apt update && sudo apt upgrade -yNext, let’s install our recursive DNS resolver, Unbound.
sudo apt install unbound -yOnce the software has completed installing, next up is configuring Unbound.
Configure Unbound
To configure Unbound, we need to create it’s config file. Start by copying the contents we need to put into the file into your clipboard. I’ve provided the config file contents below – I obtained it from the Pi-hole website.
server:
    # If no logfile is specified, syslog is used
    # logfile: "/var/log/unbound/unbound.log"
    verbosity: 0

    interface: 127.0.0.1
    port: 5335
    do-ip4: yes
    do-udp: yes
    do-tcp: yes

    # May be set to yes if you have IPv6 connectivity
    do-ip6: no

    # You want to leave this to no unless you have *native* IPv6. With 6to4 and
    # Terredo tunnels your web browser should favor IPv4 for the same reasons
    prefer-ip6: no

    # Use this only when you downloaded the list of primary root servers!
    # If you use the default dns-root-data package, unbound will find it automatically
    #root-hints: "/var/lib/unbound/root.hints"

    # Trust glue only if it is within the server's authority
    harden-glue: yes

    # Require DNSSEC data for trust-anchored zones, if such data is absent, the zone becomes BOGUS
    harden-dnssec-stripped: yes

    # Don't use Capitalization randomization as it known to cause DNSSEC issues sometimes
    # see https://discourse.pi-hole.net/t/unbound-stubby-or-dnscrypt-proxy/9378 for further details
    use-caps-for-id: no

    # Reduce EDNS reassembly buffer size.
    # IP fragmentation is unreliable on the Internet today, and can cause
    # transmission failures when large DNS messages are sent via UDP. Even
    # when fragmentation does work, it may not be secure; it is theoretically
    # possible to spoof parts of a fragmented DNS message, without easy
    # detection at the receiving end. Recently, there was an excellent study
    # >>> Defragmenting DNS - Determining the optimal maximum UDP response size for DNS <<<
    # by Axel Koolhaas, and Tjeerd Slokker (https://indico.dns-oarc.net/event/36/contributions/776/)
    # in collaboration with NLnet Labs explored DNS using real world data from the
    # the RIPE Atlas probes and the researchers suggested different values for
    # IPv4 and IPv6 and in different scenarios. They advise that servers should
    # be configured to limit DNS messages sent over UDP to a size that will not
    # trigger fragmentation on typical network links. DNS servers can switch
    # from UDP to TCP when a DNS response is too big to fit in this limited
    # buffer size. This value has also been suggested in DNS Flag Day 2020.
    edns-buffer-size: 1232

    # Perform prefetching of close to expired message cache entries
    # This only applies to domains that have been frequently queried
    prefetch: yes

    # One thread should be sufficient, can be increased on beefy machines. In reality for most users running on small networks or on a single machine, it should be unnecessary to seek performance enhancement by increasing num-threads above 1.
    num-threads: 1

    # Ensure kernel buffer is large enough to not lose messages in traffic spikes
    so-rcvbuf: 1m

    # Ensure privacy of local IP ranges
    private-address: 192.168.0.0/16
    private-address: 169.254.0.0/16
    private-address: 172.16.0.0/12
    private-address: 10.0.0.0/8
    private-address: fd00::/8
    private-address: fe80::/10
This config has Unbound operating using port 5335. We’ll need this information later.
Next up, let’s create the config file using the nano editor.
sudo nano /etc/unbound/unbound.conf.d/pi-hole.confWith nano open, paste the config file contents then press CTRL + X and then enter when prompted to save the file and exit nano.
Now we need to restart unbound for the new configuration to take effect.
sudo systemctl restart unboundYou can check the status of Unbound to ensure it’s working properly with this command.
sudo systemctl status unboundWe have one step left now – updating our Pi-hole upstream DNS settings.
Update Pi-hole DNS Settings
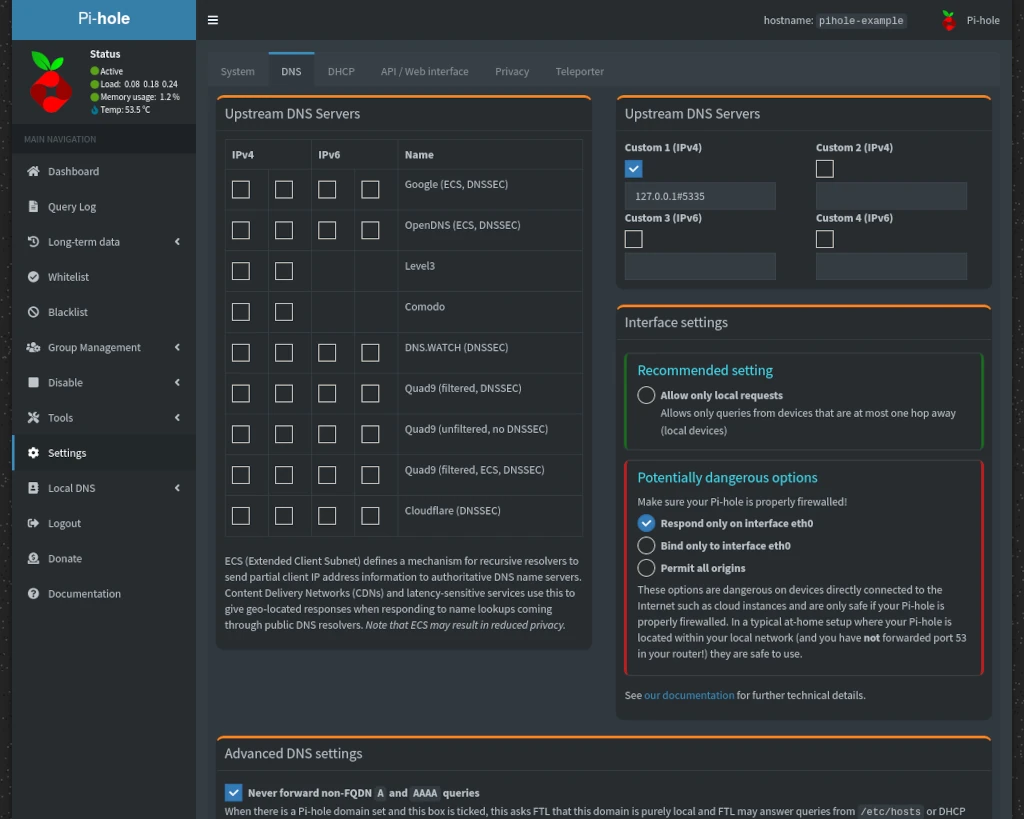
Log into your Pi-hole and go to the DNS tab on the Settings page. Uncheck all Upstream DNS Servers in the left column and enter 127.0.0.1#5335 under Custom 1 in the right column. Remember earlier I mentioned we’d need to know that Unbound was using port 5335?
Once you’ve made the changes, scroll down and click Save.
Conclusion
And that’s all there is to it! Your Pi-hole setup will now make it’s own recursive DNS queries instead of relying upon a 3rd party DNS provider. If you found this tutorial helpful or have any questions, I encourage you to please share it with others and/or leave a comment below. If you would like to support our efforts to create additional resources like this, please consider making a donation. Your support is greatly appreciated! Thanks for reading and I hope you visit again soon!


Hello Robert,
hope you’re doing well.
Can you teach completly newbie how to add unbound to docker pihole docker-compose.yml file and all the steps following?
I’ve added this to my to-do list. I can’t promise how quickly I’ll be able to get to this, however, I will endeavor to get a tutorial out.
Just a heads up that I have the process for setting up Pi-hole + Unbound via Docker worked out (as well as syncing). There will be some additional tutorials coming (hopefully) soon.
In recent years I have taken internet privacy more and more seriously.
When I found PiHole, it was the most exciting thing I heard of. I finally got around to setting it up with unbound.
But I have a concern/question.
The idea behind unbound is to TLS/HTTPS encapsulate DNS requests,
yet it appears that it is still sending out DNS Requests via UDP 53
I have not yet done a TcpDump, but intend to at some point. Was just wondering if anyone could shed some light on why requests are still going out to the internet Via UDP 53. Are these packets encrypted? I wouldn’t imagine they are since TLS and HTTPS are TCP protocols.
My goal is to close UDP 53 completely on my firewall so no rogue DNS Servers, or software starts trying to bypass my PiHole/Unbound server. I dont mind UDP 53 packets flying around my LAN, I just dont want them going out to the internet without being Encapsulated first.
Any insight would be helpful.
Thanks! <3
I’m actually working (unfortunately slowly – life’s been busy) on content for exactly this. The solution to this problem is something called “Stubby” to handle the TLS component.