Keeping the settings of multiple Pi-hole instances synced with each other is easy to setup with Gravity Sync. In this tutorial, I show you how to get it installed and configured as well as discuss a few strategies how to best configure syncing between instances.
This article is part of my Pi-hole series. Be sure to check out the other articles in this series for additional information.
Pi-hole Series Index
- What Is Pi-hole & Why Would You Want To Use It?
- Installing Pi-hole On Debian / Ubuntu Servers
- Installing Pi-hole Using Docker
- Installing Pi-hole On TrueNAS Scale
- Installing Pi-hole On TrueNAS Scale
- Basic Pi-hole Configuration
- Using Gravity Sync To Sync Multiple Pi-hole Instances — You Are Here
- Advanced Pi-hole Config: Recursive DNS With Unbound
- Using Pi-hole Local DNS And Why It’s Important In Your Homelab
Before You Begin
There are a few things that are important to note before you start installing Gravity Sync.
Pi-hole Environment
This tutorial should work for any Pi-hole instance installed on a physical device or in a virtualized environment using Debian / Ubuntu or derivatives. It is not guaranteed to work with containerized deployments using Docker or similar technologies. There are, however, containers available pre-configured for this use.
What Gravity Sync Does Not Change
It’s important to know Gravity Sync’s limitations. There are certain things that it does not modify or sync between Pi-hole instances:
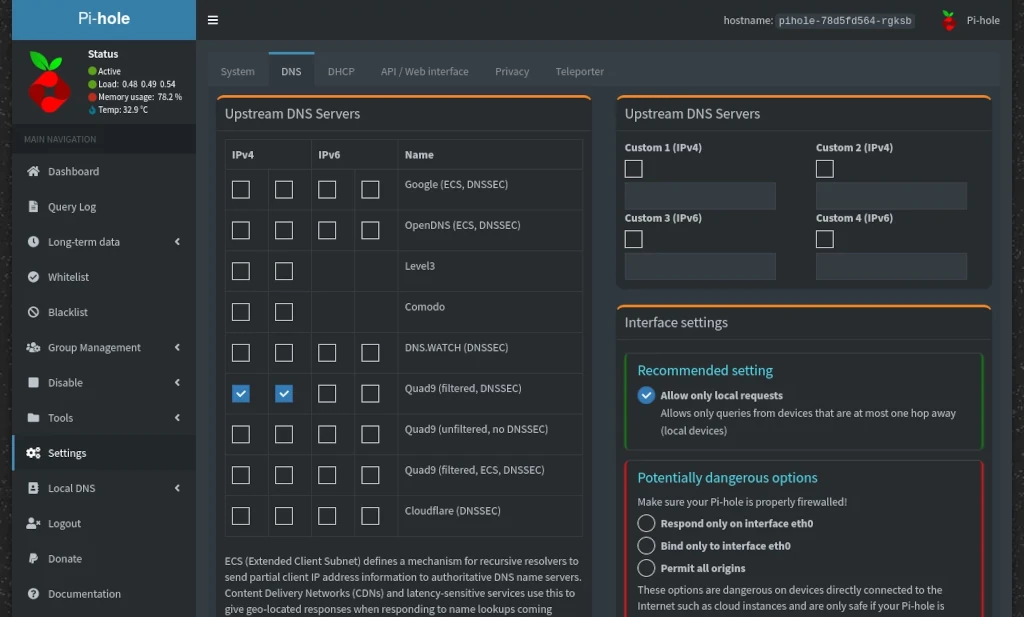
- Upstream DNS Settings
- Statistics / Long Term Data
- DNS Caches
- DHCP information / leases
Other settings such as white/black lists, local DNS settings, groups, etc … will all replicate between systems.
If you care about monitoring your Pi-hole statistics you will need to retrieve them from each Pi-hole instance. There is – at least as of the time of writing – no way to get combined statistical info.
Syncing Strategies
One last thing to think about before I go over how to install Gravity Sync is exactly how you want your Pi-hole instances to sync with each other. There are two strategies I cover in this tutorial for how you could do this:
- Two-Way Sync
- Sync To Primary Instance
A two-way sync is exactly what it sounds like – you have two Pi-hole instances and you want them to sync both ways so that any changes made to one Pi-hole will get replicated to the other.

The other strategy you might consider – and this is my personal preference – is to sync to designate one Pi-hole as the primary instance that all other instances sync with. This strategy works well with any number of instances – not just two.
For example, say you have three instances of Pi-hole setup across three different devices – we’ll call them pihole0, pihole1, and pihole2. If we consider pihole0 to be the primary instance where any and all changes are made, we would configure pihole1 and pihole2 to sync the changes from pihole0.
Initial SSH Configuration
The first thing you need to do before installing or configuring Gravity Sync is to install and configure SSH on all of your Pi-hole systems.
If it’s not already installed, install SSH with this command:
sudo apt install ssh -yOnce SSH is installed, you need to next change a few of the default configuration settings. From the terminal:
sudo nano /etc/ssh/sshd_configOnce inside the editor, you’ll want to uncomment the following lines by deleting the # at the beginning of the line.
PubkeyAuthentication yes
PasswordAuthentication yes
If you intend on configuring Gravity Sync to connect via SSH using the root user, you’ll also need to configure SSH for this.
PermitRootLogin yesOnce you’ve made the necessary changes, press CTRL + X to exit and Y to save.
It’s important to have password authentication enabled before setting up Gravity Sync – otherwise you’ll have to manually install the SSH key that it generates onto the remote system.
Install & Configure Gravity Sync
I’ve broken this into two separate sections based on which sync strategy you’ll be implementing. Only follow the directions of the one appropriate for your setup.
Two-Way Sync
If you’re going to do a simple two-way sync between Pi-hole instances, you’ll run this command on each system:
curl -sSL https://raw.githubusercontent.com/vmstan/gs-install/main/gs-install.sh | bashThe Gravity Sync installer will automatically run the config command when the software install is complete. If you’re using a non-standard SSH port, you’ll need to stop the config utility by pressing CTRL + C on the keyboard and then re-launch the config utility with this command where #### is the necessary port:
gravity-sync config ####It will ask you for the IP address of the Pi-hole instance it should sync with as well as the user account to use for sync purposes. It’s possible to use a dedicated account for this purpose, however, you can also simply use the account you’re currently logged into.
If this is the first time a SSH connection is being made from the current system to the remote system you may get asked this question. Be sure to answer Y or yes.
Are you sure you want to continue connecting (yes/no/[fingerprint])?Once you’ve done this on both Pi-hole systems, you’re ready to move to the next section on re-configuring SSH.
Sync To Primary Pi-hole Instance
If you’re going to use one Pi-hole instance as the primary instance and have one or more additional instances sync the configuration changes from it, start on your primary instance and run this command:
curl -sSL https://raw.githubusercontent.com/vmstan/gs-install/main/gs-install.sh | bashThe Gravity Sync installer will automatically run the config command when the software install is complete. At this point it will ask you for an IP address. Because we don’t want our primary instance to create its own remote connection to another instance, instead of entering an IP press CTRL + C on the keyboard to stop running the configuration.
Move on to your secondary instances and run the same command as above. If you’re using a non-standard SSH port, you’ll need to stop the config utility by pressing CTRL + C on the keyboard and then re-launch the config utility with this command where #### is the necessary port:
gravity-sync config ####This time, when you’re prompted for an IP address, enter the IP of your primary Pi-hole instance. You’ll next be asked for the user account to use for sync purposes. It’s possible to use a dedicated account for this purpose, however, you can also simply use the account you’re currently logged into.
If this is the first time a SSH connection is being made from the current system to the remote system you may get asked this question. Be sure to answer Y or yes.
Are you sure you want to continue connecting (yes/no/[fingerprint])?Once you’ve completed this on all secondary Pi-hole systems, you’re ready to move to the next section on re-configuring SSH.
Re-configure SSH
With Gravity Sync installed and configured – unless you’re using password based authentication to connect to your system – you’ll need to disable password authentication in SSH. If you’re using passwords, you should seriously consider changing to using key based authentication.
To disable passwords, go back into the SSH config file like you did previously and modify this setting then save and exit.
PasswordAuthentication noIf your Pi-hole system is using the root user, you’ll also need to modify the root login setting as well.
PermitRootLogin prohibit-passwordWith all of the initial setup complete, let’s move on to talking about how to actually sync your Pi-hole instances.
Manual Sync
There may be times you need a change to be synced immediately without waiting for the next automated one to run. With that in mind, before we get into auto syncing between instances, it’s useful to know how perform a manual sync.
I’ll start with demonstrating how to compare two Pi-hole instances to tell you if there is any data out of sync between the two instances. If you’re using a two-way sync you can run this command from either instance. If you’re using a primary instance to control settings, you’d run this command from a secondary instance.
gravity-sync compareIf you’re using a two-way sync and want to update the opposite instance of the one you’re actively logged into, you would sync using a push:
gravity-sync pushWith either sync of the strategies, if you need update the instance you’re actively logged into, you would sync using a pull:
gravity-sync pullYou might want to try a manual sync on your systems before moving onto enabling the automated sync to ensure that everything up to this point is working correctly.
Automated Sync
Automating Gravity Sync is easy:
gravity-sync autoBy default, this will enable syncing on a semi-random schedule that, according to the developers, should average out to be roughly every 5 minutes.
If you’d prefer to adjust the sync frequency, you could use one of these options instead:
gravity-sync auto hour
gravity-sync auto half
gravity-sync auto quad
These still use a semi-random sync schedule, but should sync roughly every hour, 30 minutes, or 15 minutes respectively.
Once you’ve enabled automatic syncing, you can check that Gravity Sync is running properly with this command:
sudo systemctl status gravity-syncThe results should come back as either active or inactive if everything is working properly and show failed in red text if there’s a problem.
Updating Gravity Sync
Like any software, you should occasionally check for updates to Gravity Sync. Start with running this command to see if there are updates available:
gravity-sync versionIt will tell you both the current running version and the latest version. If there’s a newer version available, run this command to perform the update:
gravity-sync updateConclusion
You now should have everything you need to keep your Pi-hole instances in sync with each other. If you haven’t already, consider checking out my tutorial on your configuring Pi-hole instances as recursive DNS resolvers using Unbound.
If you found this tutorial helpful, I encourage you to please share it with others. If you would like to support our efforts to create additional resources like this, please consider making a donation. Your support is greatly appreciated! Thanks for reading and I hope you visit again soon!


Sorry I’m bothering with this question, I landed here after searching for an answer for a while, and well, yours seems to be the best explained site I’ve found about gravity-sync, so here is my question!
You (brilliantly may I add) explained the importance of key based authentication on SSH, and (my preferred way) ‘sync to primary’ way of using it (either with push or pull depending on which side you are) but I couldn’t find here, in the documentation or anywhere else for what matters, what happens EXACTLY once you enable automated sync, does it sync both ways? Does it push? Does it pull? I don’t think I’ve seen this mentioned anywhere! Everywhere look it just say “enable automated sync”, some places say in every pi-hole instance, some others say only on the one you want to replicate (master), but it doesn’t strike me as a minor detail to know what exactly I’m automating, especially considering that one of the options is to wipe all my most recent changes, maybe I missed something, but I believe there’s no mention to pass setting to the automated sync about push, pull, or sync both ways…
Thank you in advance.
Hey thanks for the question! If you’re syncing from a primary pi-hole instance as I detail, you’ve only installed gravity-sync on your primary instance and not configured it to sync at all on its own so it won’t ever initialize its own sync and the secondary instances should handle all of their own syncing.
Now – here’s the thing. If you made a change to something on one of the secondary instances, the auto sync will push that change up to your primary instance. If all of your changes are being made on the primary instance, however, your secondary instances won’t ever have anything to sync back to the primary. Ever since they updated gravity-sync to use systemd, I haven’t found anyway yet to specify to only pull -vs- push and pull.
If I can find some time later today, I’ll go back and make some edits to hopefully make this more clear.
I’m getting this error while trying push or pull:
sudo: a terminal is required to read the password
I can’t find any solution with google, any ideas?
It sounds like you don’t have a SSH key setup on your system. Are you just syncing two systems? If it’s just two Pi-hole instances, start by checking that each has a public key in .ssh/authorized_keys. There should be an entry that ends with the username@hostname of the other system. If there’s no key present, the sync would require a password to create the connection.
Something else to check – are you syncing using root or a user account? If you’re using a user specific for the purpose, is it configured with a shell?
Works great but you may want to update the guide as the curl URL in the article no longer works. Thanks.